11th Battalion (Australia)
In March 1916, the battalion was deployed to the Western Front in France and Belgium where it took part in trench warfare until the end of the war in November 1918.
Seventy-three percent of original enlistments were Australian-born, with the remaining recruits being mainly English-born with smaller numbers coming from other parts of the British Isles.
Originally bound for the United Kingdom, where they were to complete training, after stopovers in the Cocos Islands and Colombo, their orders were changed due to concerns about overcrowding in training camps in the United Kingdom and at the start of December, the battalion arrived at Mena Camp in Cairo, Egypt.
Under heavy machine gun and rifle fire, the battalion stormed the cliffs, driving the Turks back.
[20] On 4 May 1915, a party of 100 men from the battalion, led by Captain Raymond Leane and a detail of engineers, launched an unsuccessful attack on a Turkish fort at Gaba Tepe,[19] which was being used to observe artillery fire onto Australian positions around Anzac Cove.
On 31 July, a party of around 200 men led by Leane were ordered to capture a section of Turkish trenches in front of the battalion's position.
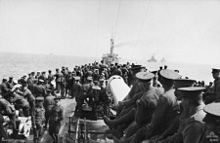
The battalion's war diary records particularly bad weather on Lemnos during this period, noting "Mudros seems a most unsuitable place to send troops for a rest".
[26] On 17 December, the battalion's last casualty of the campaign, a soldier named Private Hayes, died from meningitis.
[29] At this time, the battalion received 367 reinforcements from Australia before undertaking defensive duties around Gebel Habieta, guarding the Suez Canal.
[33] On 30 March 1916, as the AIF's infantry divisions were transferred to Europe, the battalion sailed from Alexandria aboard the HMT Corsican.
[35] In mid-May, after a period of acclimatisation and training to prepare them for the European battlefield, the 11th Battalion moved up to the front line around Petillon in the Fleurbaix sector, with a strength of 27 officers and 929 other ranks.
A further draft of reinforcements, totalling 69 men all ranks, arrived on 25 May,[36] and on 30 May the battalion had its first experience of combat on the Western Front.
[37] Late that evening, German artillery bombarded the Allied line around the Cordonnerie salient, before infantry launched a raid on the 11th Battalion's trenches.
[38] During the night of 24/25 July, the Australians attacked again, but after establishing a new defensive line, the 11th was forced to withdraw after suffering heavily from both friendly and enemy shelling.
Just before dawn on 21 August, about 200 men from the 11th took part in an attack around Mouquet Farm; casualties amounted to 20 killed and 40 wounded and afterwards the battalion was moved to Belgium.
[42] As the Allies pursued the withdrawing Germans, in late February the 11th Battalion captured Le Barque, conducting mopping-up operations before advancing to Thilloy where they fought a minor engagement before being relieved by the 3rd Battalion, having lost 12 killed and 30 wounded during the fighting and a further 10 men killed and 13 wounded by artillery.
[43] In March, Lieutenant Colonel Rupert Rafferty took over as commanding officer and the following month, as the Allied line was pushed further forward towards the Hindenburg Line, the 11th Battalion played a supporting role during the 3rd Brigade's attack around Boursies, before occupying the front around the village of Louverval.
The Germans then put in another attack, which was once again turned back, before the 11th launched a limited counterattack and regained the ground that had been lost.
Their first attack came around Glencorse Wood on 20 September, during which the 11th Battalion lost 46 killed and 100 wounded, before moving to Westhoek Ridge in early October.
Another move saw them transferred to Broodeseinde Ridge, where they conducted a raid on German positions around Celtic Wood on 6/7 October in concert with the 12th Battalion.
[51] In early March, the 11th Battalion moved to the Hollebeke sector, where they were subjected to gas attacks before being sent south to Amiens at the start of April, joining the rest of the 1st Division in defence of Hazebrouck in the middle of the month.
[53] On 2 June, the 11th Battalion attacked Mont de Merris, which resulted in the capture of a large amount of German equipment and over 200 prisoners for the loss of 16 men killed and 74 wounded.
[56] The 11th Battalion did not take part in the opening phase of the offensive, moving to Hamel and establishing themselves in a defensive position around Harbonnieres.
Later, they were moved to Vaire and then Cerisy, before supporting the 9th and 12th Battalions around Chuignolles and Proyart on 23 August and then around Chuignes and Cappy two days later, where further losses were experienced.
[58] The heavy casualties that the Australians had suffered during the final year of the war, and the decrease in volunteers arriving from Australia, meant that the battalion was desperately understrength.
In October, they were withdrawn from the line for rest and reorganisation, at the insistence of the Australian prime minister, Billy Hughes.
The battalion's personnel were slowly repatriated to Australia, while those that waited undertook training to prepare them for civilian life.
In 1927, territorial designations were introduced and the battalion adopted the title of the "Perth Regiment"; it was also awarded battle honours for World War I, receiving a total of 23.
The two units remained linked until 1 October 1936, when the 11th Battalion (City of Perth Regiment) was re-formed in its own right,[64] as part of an expansion of the Militia due to concerns about war in Europe.
[72] After landing at Jacquinot Bay the battalion was based around the Tol Plantation and conducted patrolling operations to restrict the Japanese to the Gazelle Peninsula.