135th Siege Battery, Royal Garrison Artillery
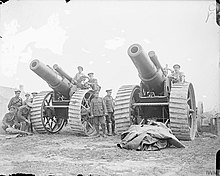
[5][6] At this stage of the war the 8-inch howitzers in use (Marks I–V) were improvised from cut-down and bored-out barrels of 6-inch coast defence guns, with the recoil checked by enormous wooden wedges.
The shelling of the German positions continued, with 135th Siege Bty putting down a particularly heavy bombardment on 13 November to support Fifth Army's attack further north (the Battle of the Ancre).
The BEF was taking over part of the line from the French, so 135th Siege Bty moved south to rejoin XV Corps in this new sector, transferring to 6th HAG on 11 December.
The battery's bombardments continued daily until 4 March, when 8th Division of XV Corps carried out a surprise local attack on Bouchavesnes.
On Z day 135th Siege Bty was manning the brigade OP, with the FOOs and signallers tasked with following the attacking infantry as closely as possible, jumping off from the same tunnels under Arras and laying out a telephone line as they advanced.
[22][23][24][25][26][27] Although VI Corps' attack on 9 April had been successful, the follow-up over succeeding days was less so, the guns having to be pushed forward through mud and destruction to bring the enemy into effective range.
Next day 135th Siege Bty began moving forward to Feuchy Chapel, but the traffic congestion was so bad that the leading section could not pull its guns into position until after daybreak on 13 April, when it came under considerable enemy shelling.
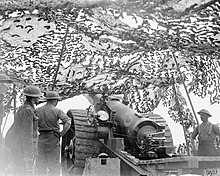
A particularly destructive CB shoot ranged by aircraft hit the battery on 21 April, when ammunition dumps, camouflage and nearby supply tanks were destroyed.
[27][28][29] After a period of rest the gunners returned to their guns at Feuchy Chapel on 15 May, but pulled them out next day when 135th Siege Bty was transferred to 48th HAG with VII Corps for the final attacks on the Hindenburg Line.
It then carried out CB shoots nearly every day with air observation while improving its positions, the miners digging new dugouts including an underground battery command post and telephone exchange.
This was the preparation for a spoiling attack by the Germans that captured the British front line trenches and pushed the infantry back over the canal.
[10][43] 83rd Brigade's role was CB work on XIII Corps' front, and with its excellent observation from Vimy Ridge 'S' and 'X2' positions (the latter shared with the 9.2-inch howitzers of 69th Siege Bty) were able to carry out some effective shoots against hostile batteries around Crest Wood.
[39][44] The Germans were expected soon to launch a Spring Offensive, so all gun positions were well stocked with ammunition and equipped with gas-proof dugouts and buried telephone cables.
83rd Brigade was withdrawn into GHQ Reserve on 19 July, and 135th and 69th Siege Btys temporarily joined 67th Bde, moving to new positions at Souchez.
The heavy batteries remained hidden and silent until Zero hour, so no registration could be carried out, relying instead on the Field Survey Section to lay the guns accurately on their targets.
[39][53][54][55][56][57] During the Battle of Albert (23 August) 83rd Bde's batteries fired in support of the French XXXI Corps, which had relieved the Canadians but made little progress.
An advance party of 135th joined the rest of the brigade near Nesle on 30 August, ready to begin preparing new positions and the guns were ordered up that evening; they were in action at Herly by 12.00 next day.
Although the OP came under some fire and the gun lines were bombed by aircraft nightly, 83rd Bde noted that hostile shelling was well below normal levels, and as the enemy pulled back out of range its batteries were placed in GHQ Reserve at Renancourt near Amiens on 5 September to undergo training.
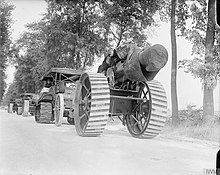
[39][54][58] 83rd Brigade rejoined Fourth Army on 14 September and that night the caterpillar tractors began dragging the heavy guns up via Villers-Brettoneux to Attilly to support the next phase of the Hundred Days Offensive.
By 18 September the guns were in position, ammunition had been brought up to forward dumps and the battery fired in support of the surprise attack of the Battle of Épehy that morning.
On 20 September the Germans began a destructive CB shoot against the battery, ranged by an aircraft, but caused no casualties or damage to guns, although some ammunition was destroyed.
[14][39][54][59][60][61] Before 135th Siege Bty left the dangerous positions at Attilly, its five remaining guns supported a limited attack on the Quadrilateral on 24 September, a preliminary operation allowing Fourth Army to close up to the Hindenburg Line.
[14][39][54][62][63][64][65][66] 83rd Brigade now began moving its lighter guns forward across the canal to support 46th (NM) Division in the pursuit, leaving behind the 8- and 9.2-inch howitzers of 135th and 69th Siege Btys under the temporary command of 14th Bde.
On the night of 3/4 October three caterpillar tractors were made available to move half of the battery 10 miles (16 km) to Magny-la-Fosse, where it was ready for action by 08.00.
On 8 October IX Corps attacked Mericourt as part of the Second Battle of Cambrai, and 135th Siege Bty supported this with CB fire from four howitzers, one being unserviceable.
Launched at 05.20 on 17 October the attack quickly achieved an advance of 4,000 yards (3,700 m) and after firing on enemy batteries 135th Siege Bty found itself out of range soon after 11.20.
After preparing fresh positions at Écaillon, the battery moved its platforms up on 31 October, despite problems on the crowded and slippery roads, and the first four guns arrived in the evening.
[14][39][54][71][72][73][74] After the Armistice 83rd Bde was selected to form part of the British Army of Occupation in Germany, but 8-inch howitzers were not to be taken, so 135th Siege Bty was left behind once more.
By 26 June a cadre of about 30 men left for England leaving the officer commanding and an equipment guard to entrain the guns and then embark them from Dunkirk on 6 August.
One of the battery's 8-inch Mk VII howitzers was put on display at The Crystal Palace in an exhibition that formed the basis of the Imperial War Museum.


