1st Armoured Division (United Kingdom)
During the interwar period, the British Army examined the lessons it learnt during the First World War and determined there was a need to experiment with and develop theories of manoeuvre and armoured warfare.
[3] In early 1937, British planners assumed a European war would be fought against Germany, and a BEF would be dispatched to Europe to supplement Franco-Belgian forces.
[7][8][9] David French, a historian who wrote about the development of the British Army during this period, commented that cavalry officers largely supported mechanisation, but resisted turning their regiments into motorised infantry.
In a compromise, Major-General Alan Brooke, who had served in the artillery but had no prior experience in mobile forces or their training, was appointed to command on 24 November 1937.
[16][b] Shortly after, the French government was informed of a preliminary timetable for the arrival of the BEF in the event of war; "One Regular Armoured Division will become available about the middle of 1940".
[26] During the same period, the Commander-in-Chief, Home Forces, General Sir Walter Kirke developed Julius Caesar, a plan to defend the UK from a potential German invasion.
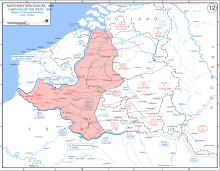
Approaching German forces, coupled with aerial attacks on Le Havre and the mining of the port resulted in the decision to unload the rest of the division at Cherbourg.
In actuality, ten German divisions were operating in this area, were not as weakened as British command believed, had already seized and reinforced bridgeheads across the Somme, and had completed the encirclement of the BEF.
Evans held the opinion that his force was unable to achieve any of these missions due to the lack of infantry and supporting arms and that his division had still not assembled.
[46] It then came under the command of the French Tenth Army and the remnants of the division started to concentrate, with the instruction to launch a counterattack into the southern flank of the renewed German advance.
[47][48] In the final stages of the campaign, Britain attempted to reinforce France with a second BEF while the French considered a national redoubt in Brittany that would include the division.
Between 16 and 18 June, now under the command of Lieutenant-General James Marshall-Cornwall's Norman Force, the division was withdrawn from Brest, Cherbourg, and Saint-Nazaire in Operation Aerial, and returned to the UK with just 13 tanks.
In June, with a stalemate in the Western Desert campaign that was being fought in Egypt and Italian Libya, General Sir Claude Auchinleck—commanding British and Commonwealth forces in North Africa and the Middle East—informed the War Office that he needed at least two and ideally three armoured divisions to undertake offensive action to lift the Siege of Tobruk.
According to Carver, there was an "acrimonious exchange" between Lumsden and XIII Corps headquarters, the parent formation of the 1st Armoured Division, and no order was issued for two hours.
The armoured brigades fought additional actions in support of the infantry but during the hours of darkness it was decided to abandon the position, marking a turning point in the battle and the start of the Eighth Army's retreat from Gazala.
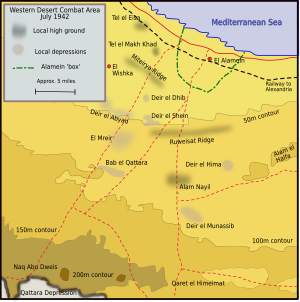
[74][75] As the Eighth Army retreated into Egypt, it formed up at Mersa Matruh, which had originally been considered the location in which British forces would conduct "a last-ditch stand" because its loss would bring the Mediterranean Fleet based at Alexandria and the city of Cairo within range of Axis aerial attacks.
On 13 July, a conference was held by XIII Corps, during which the two divisional commanders grudgingly reconciled and decided how the 1st Armoured Division would be used, although both left with different impressions of the subject.
[83][84][85] Two days later, the New Zealand infantry assaulted the ridge, but communication breakdowns meant they were unable to inform the 1st Armoured Division of their success and the tanks did not move.
Lumsden had, by that point, become notorious for providing verbal instructions to his subordinates, denying them if a positive outcome was not achieved, and taking praise if successful.
Minor efforts to advance were thwarted by Axis anti-tank gunfire from positions believed to have been bypassed during the night assault and the tanks withdrew.
Reports, however, indicated minefields had not been cleared so at dawn on 27 July, the tanks were again not in a position to support the exposed infantry, and one Australian battalion and one British brigade suffered heavy losses.
[96] With the fighting over, the division moved into reserve for rest, leave, integrating reinforcements, and to conduct training that was to last until October and would include night marches.
[100][101] Three days after the start of the battle, the division's infantry launched a night assault to capture two Axis strongholds, although map-reading errors delayed progress.
The subsequent defence of Outpost Snipe inflicted heavy losses on Axis forces that conducted a counterattack and resulted in Lieutenant-Colonel Victor Buller Turner being awarded the Victoria Cross.
[106] In the final stages of the battle, the 90th Light Division was repeatedly engaged as they conducted a rearguard action to protect the Axis forces that had started their general retreat from El Alamein.
[116] At the end of August 1944, it moved forward to join the fighting, advancing behind the assaulting infantry, and lost 22 tanks due to mechanical breakdowns by the time it reached the Foglia river on 3 September.
A more successful attack was made the following day when a village was captured and 60 prisoners were taken, but this advantage was unable to be exploited due to insufficient supporting infantry.
In conjunction with other formations, the division then cleared Coriano but immediate exploitation was made difficult due to German opposition and defences, and too few infantry were able to support the attack.
[122] Oliver Leese, the commanding officer of the Eighth Army, criticised the division's performance during the fighting, saying; "it is extraordinary how difficult it is to make new troops realise the inter-dependence of tanks and infantry until they have gained the knowledge by bitter experience in battle".
During October 1944, it commanded three small, ad hoc groups that had been created and was used to screen assembling Allied forces during further fighting on the Gothic Line.