2nd Armoured Division (United Kingdom)
After the Battle of France, with the threat of a German invasion of the United Kingdom, priority for equipment shifted to the 2nd Armoured Division, which was brought up to strength.
Upon arriving in Egypt in December 1940, the division was further reduced in order to provide support for Operation Lustre, an expeditionary force to Greece.
The consensus of historians is that there was little the division could have done to prevent this, given the circumstances of its being under equipped, poorly supplied, lacking proper training, and having inadequate communications and an unclear chain of command.
In January 1939, the Secretary of State for War Leslie Hore-Belisha proposed splitting the Mobile Division into two smaller formations but found no support for this move.
[11] Shortly after, the French were informed of a preliminary timetable for the arrival of the British Expeditionary Force (BEF) in the event of war: "One Regular Armoured Division will become available about the middle of 1940, the second would not be available 'till a later date'".
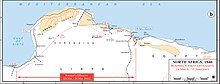
The initial objective was limited: to destroy forward Italian forces and advance as far as Sollum, near the Libyan border, if the situation allowed.
[51] Further prosecution of the offensive was discussed, but it was believed that the province of Tripolitania would be too hard to defend or supply if captured and that the occupation of Cyrenaica would provide sufficient security for Egypt.
British strategy shifted to supporting Greece, and to maintaining the status-quo in the Balkans, to prevent additional countries from being occupied by Germany or Italy.
[64][65] The terrain between El Agheila and Benghazi was optimal for armoured warfare, and no easily defensible infantry position existed.
Neame also predicted that once operations got underway, the 2nd Armoured Division's tank numbers would rapidly dwindle due to breakdowns.
[70][71][e] The British underestimated the size of the Axis effort, believing that only four divisions would be available to them until the end of May, of which only two could be used in offensive operations due to supply constraints.
[72] The British forward area was patrolled by one platoon from the 1st Tower Hamlets Rifles, supported by an anti-tank gun from the 9th Australian Division, and elements of the KDG.
Axis forces took up position in an abandoned colonial fort near El Agheila and ambushed a patrol from the 1st Tower Hamlets Rifles the following day.
Fighting lasted through the day, with the British fending off several assaults, including attacks by German Junkers Ju 87 Stuka dive bombers.
[81] On the desert flank, the 3rd Armoured Brigade continued to withdraw, although only at 7 mph (11 km/h) in order to match the slowest vehicles, which were towing artillery.
The discussions were hampered by ignorance of events, and notably included Neame informing Gambier-Parry that the 3rd Armoured Brigade was not to be committed en masse without his permission.
[86][87] Early on 3 April, the 3rd Armoured Brigade reached Antelat (~31 miles (50 km) northeast of Agedabia, and halfway to Msus), and had been located by German aerial reconnaissance.
[93] At midday, Lieutenant-General Richard O'Connor (GOC British Troops in Egypt) arrived at the front and held a meeting with the senior commanders in Cyrenaica, including Gambier-Parry, who opined that the Axis forces would not attempt a further advance now that Benghazi had been taken.
[96] The following day, alarmist reports suggested Axis armoured forces had passed Msus; but the KDG, and other Allied units, verified that this was not the case.
At the same time, the attack on the fort prompted O'Connor to order a general withdrawal of all Allied forces towards Gazala, via Derna.
[102][105] In the afternoon, a patrol of the 3rd Indian Motor Brigade, based at El Adem, intercepted advanced Italian troops at Acroma, near Tobruk, and took 18 prisoners.
[107] Near Derna, German troops briefly managed to block some desert tracks, before moving to a position near the coastal road east of the town.
German patrols intercepted and disrupted some Allied convoys, and captured Neame and O'Connor, but the route east remained open until the following day.
[108] Early on 7 April, Brigadier Reginald Rimington, GOC 3rd Armoured Brigade, was mortally wounded and captured after an ambush on a desert track en route to Derna.
[109][110] Barton Maughan, author of the Australian official history for this period of the fighting, wrote "by coincidence ... the 5th Royal Tanks ... [were] where they were most needed and could be most effectively employed that day".
They continued east, before meeting British reconnaissance forces near El Adem on 10 April, and reached Tobruk just prior to midnight.
French wrote "such strictures are exaggerated", highlighted that Gambier-Parry started his career in the infantry before he transferred to the Royal Tank Corps, and stated that singling him out for blame is harsh.
[84] At the squadron and regimental level, the chain of command impeded mobility, as permission was needed to move a single tank from an assigned position.
This overlapping chain of command resulted in delayed, misunderstood, mixed, and changed orders that severely impeded the division's capability.
[86][126] Due to these factors, the general and historian David Fraser wrote, once "the Germans chose to drive across the chord of the Cyrenaican arc there was little to stop them".