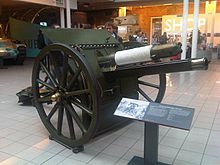
3rd West Lancashire Artillery
[3][4][5] As the unit expanded, Mewburn was superseded in command by the local linen merchant Robert Trimble, who joined from the Liverpool Irish and had financed the raising of the third battery.
[28][30] During the winter of 1914–15 the infantry of the West Lancashire Division were sent to reinforce the British Expeditionary Force (BEF) fighting on the Western Front.
For the whole of the previous day and up to Zero hour (04.20) on 8 August, the divisional artillery and heavy guns kept up a continuous bombardment (described as 'awe-inspiring') of the enemy positions, particularly Guillemont village, which was known to be strongly fortified.
When the infantry advanced they were preceded by a creeping barrage (a new technique at the time) fired by the divisional artillery supported by other batteries.
The attack on the right was successful, and at 05.20 the infantry on the left were reported to be in Guillemont Station, but the centre was held up by a belt of barbed wire and the barrage had to be brought back to support them.
However, the leading battalion was unable to get into position until 05.00, and then made a gallant attack without the benefit of the barrage, suffering heavy casualties.
The guns and all this ammunition were assembled in secrecy, the AFAs moving into the area a battery at a time over a long period, though some were subjected to German counter-battery (CB) fire.
Later in the day the field batteries began to move forward across the shattered No man's land to bring the further objectives into range.
The artillery duel went on for several weeks before the attack, with British batteries taking heavy casualties from German CB fire and gas shelling.
The offensive opened on 31 July with the Battle of Pilckem Ridge, the infantry advancing behind the biggest barrage programme yet devised.
Despite setbacks – II Corps suffering the worst hold-up in front of Westhoek on the Gheluveldt Plateau and losing the barrage – a general advance of 3,000 yards (2,700 m) was achieved, but by evening rain was falling heavily and it proved almost impossible to move the guns and ammunition up through the mud.
As with Messines, the first phase of this battle was an artillery victory thanks to massive and well-planned preparation and tactics, though in this case the element of surprise was provided by the first mass use of tanks and the guns were silent until Zero hour on 20 November.
[43][62][63][64] After its initial success, the battle bogged down into bitter fighting round Bourlon Wood, during which 12th Division was largely inactive.
The Germans were preparing a major counter-offensive, and on 29 November III Corps assigned HQ, A and D (H) Btys of CCLXXVII Bde to support 6th Division.
[43][65][66] On 8 December the brigade was reunited and transferred to 16th (Irish) Division in VII Corps, with which it stayed during the winter, apart from a period of rest for most of January 1918.
[43] When the German spring offensive opened on 21 March 1918, the salient held by 16th Division was quickly overrun and the survivors tried to make a stand round Ronssoy.
Although their observation posts (OPs) were virtually blinded by the mist and their communication links cut by shellfire, many batteries continued firing until overrun.
[43][71][72][73][74] 14th Division came under heavy attack on 4 April (the Battle of the Avre) and fell back about 2 miles (3.2 km), but then the enemy were stopped dead by the artillery.
When the German bombardment shifted to the infantry's front line trenches at 06.20, the field batteries responded by firing their pre-planned 'SOS' tasks blindly into the mist.
About 11.00 the mist began to clear and the OPs brought down shrapnel fire on the massed German infantry with devastating effects.
As the RA historian comments, the order was obeyed: one gun of C/CCXXLVII AFA Bde 'stood in the open for two hours with no pause in its firing, and lived to tell the tale.
[43][77] On 31 July the brigade joined 52nd (Lowland) Division, newly arrived from the Palestine, which went into the line north-east of Arras.
It moved from Weeton Camp in Lancashire to join 57th (2nd WL) Division at Canterbury where it took over BLC 15-pounders and BL 5-inch howitzers from the 1st Line.
[94] During the period of the Phoney War, the AA defences of NW England were not tested in action, and the time was spent in equipping and training the TA units.
[87][106][107][108] Calcutta was raided regularly during the winter of 1942–43, as was the supply base at Chittagong when British forces advanced int the Arakan in December 1942.
On 5 June 1943, 211 HAA Bty was sent up from Bombay to Chittagong, where it was joined by the rest of the regiment on 10 November, coming under the command of 13 AA Bde in time for Fourteenth Army's renewed offensive.
On 14 May 1944 the regiment moved back to India, coming under 101 Lines of Communication (LoC) area at Piska in Ranchi district, and then via Ratu and Jubbulpore to Poona by 20 July.
A manpower crisis in South East Asia Command was leading to a reduction in AA units, with many of the gunners being sent for infantry training.
[122][123] with the following organisation:[4][23][116][117] In 1961 the regiment absorbed the technically trained personnel of 855 (Essex Fortress) AA Control and Reporting Bty, and in 1964 the designation was changed from 'Light Anti-Aircraft' to 'Light Air Defence'.
[124] The following served as Honorary Colonel of the unit:[11] In the entrance hall of the Garston Branch of the Royal British Legion there is a brass memorial plaque to 38 men of 13th Lancashire and B/277 Btys who died in WWI.