6th Infantry Brigade (New Zealand)
There were fears that the Japanese Empire had hostile intentions towards British Commonwealth possessions in the Pacific and the brigade represented trained and equipped manpower that could be used in home defence.
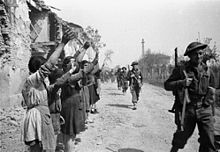
[9] The Germans began their invasion of Greece on 6 April and within a few days, the Aliakmon Line was abandoned with the brigade being withdrawn to Olympus Pass and into a series of rearguard actions.
The brigade duly embarked from Monemvasia on 29 April on the Royal Navy cruiser HMS Ajax and four destroyers, with the 24th Battalion acting as the rearguard for the evacuation.
"[12] While the New Zealanders were fighting in the Greece and Crete campaigns, the situation in North Africa had significantly changed with the entry of the Afrika Korps into the theatre of operations in order to aid the Italians there.
[13] The 2nd New Zealand Division was attached to XIII Corps, part of the British Eighth Army,[14] and designated to participate in Operation Crusader.
[21] Arriving a few hours after their initial contact with the enemy earlier in the morning, the 25th Battalion made its first attempt to capture the feature, having received orders to do so from Barrowclough.
On 27 November, the 6th Brigade fought a fierce battle with a battalion of the 9th Bersaglieri Regiment and by the end of the day all of Sidi Rezegh was under the control of the New Zealanders.
The 6th Brigade was strung out along Sidi Rezegh in pockets, vulnerable to a counter-attack, and elements of the 15th Panzer Division made contact on 28 November.
The Allied high command was concerned that the Middle East was at risk from an invasion by the Germans and the New Zealanders were tasked with blocking their likely route from the Caucasus.
[36] The brigade, with the 25th Battalion as its reserve,[37] successfully achieved its objective, although with some losses to 24th Battation, and was consolidating its positions when the 21st Panzer Division attacked on 22 July.
[35] At daylight, the tanks of the 21st Panzer Division caught the headquarters of 6th Brigade, which along with 24th and 25th Battalions (the latter having moved up during the night), was positioned in the relatively shallow El Mrier Depression.
Firing from the edge of a low cliff overlooking the depression, the Germans caused heavy losses amongst the infantry battalions before passing through their positions in pursuit of the British armour.
[38] What remained of 6th Brigade moved to the southern section of the Alamein line where it manned defensive positions during the Battle of Alam Halfa, Rommel's failed attempt to cut off the Eighth Army.
A reinforced 2nd New Zealand Division,[39] with Brigadier William Gentry in command of 6th Brigade,[43] was to play a major role in the forthcoming attack.
The New Zealanders, along with two British infantry brigades, resumed the fight on 2 November in Operation Supercharge, which was intended to break the frontlines in the south.
[39] The 2nd New Zealand Division, after a month of reorganisation and training at Sidi Azeiz,[46] re-entered the campaign in mid-December at El Agheila in an attempt to trap the Afrika Korps.
[61] Having been based in Maadi Camp since early June,[62] the brigade left Egypt on 5 October to begin the division's shift to Italy.
[63] The brigade, along with the rest of the 2nd New Zealand Division, moved to the banks of the Sangro River early the following month and was scheduled to mount a night crossing on 21 November.
[65] Although briefly disturbed during the crossing by a German machinegun, there were no casualties, and the battalions of the brigade pushed forward and seized their objectives, a range of hills over 1,000 yards (910 m) beyond the river.
The initial attack was launched by 25th Battalion on the evening of 2 December but without the use of supporting armour or artillery as the brigade's commander, Brigadier Graham Parkinson, did not anticipate any difficulty in taking the town.
[67] The leading platoons of the battalion penetrated into the town square but soon robust defence, supported by German tanks of the 26th Panzer Division, forced them back.
Two tank troops from the 18th Armoured Regiment were ordered forward but by the time they had reached the outskirts of Orsogna, the infantry were withdrawing from the town.
[76] An initial attack on Cassino, which involved the 4th Indian Division, the 28th Maori Battalion and New Zealand engineers, was mounted on 15 February but failed due to a lack of air and armoured support.
[82] However, it was unable to achieve its objectives;[83] the Germans defended strongly, assisted by the rubble that hampered the easy movement of the supporting armour.
A squadron of the 20th Armoured Regiment was in support, and the crossing itself was covered by artillery, fighter bombers, and flamethrowers and was achieved with minimal opposition.
[97] Despite suffering casualties due to being accidentally bombed by Allied bombers, 25th Battalion continued to lead the advance of the 6th Brigade to the Santerno, which it crossed on 11 April.
[102] Although the war was nearly over, care was still required as the brigade moved forward through the towns of Padua and Gorizia,[103] before the surrender of all German forces in Italy on 2 May.
[102] Along with other elements of the 2nd New Zealand Division, 6th Brigade remained in and around Trieste for several weeks to counter the presence of the partisans, who had laid claim to the city.
In mid-June the partisans withdrew from the city and several weeks later the New Zealand government decided that the division would not be required for service in the Pacific Theater of Operations.
In early August, the division began demobilisation with long serving men leaving for New Zealand via Bari while the remaining personnel withdrew to wintering positions near Florence.