Battle of Arnhem
Market Garden was proposed by Field Marshal Sir Bernard Montgomery, who favoured a single push northwards over the branches of the Lower Rhine River, allowing the British Second Army to bypass the Siegfried Line and attack the important Ruhr industrial area.
Farthest north, the British 1st Airborne Division landed at Arnhem to capture bridges across the Nederrijn (Lower Rhine), with the 1st Polish Parachute Brigade following on.
The 3rd Battalion (Lieutenant Colonel Fitch) would head through Oosterbeek to Arnhem (Tiger route), assist in the capture of the road bridge and take up positions in the east of the town.
[13] The advance into Arnhem would be led by a troop of jeeps from the 1st Airborne Reconnaissance Squadron (Major Frederick Gough) on Leopard route, who would attempt a coup de main on the road bridge.
[19] Browning's intelligence officer – Major Brian Urquhart – obtained information from the 21st Army Group in Belgium and Dutch resistance that German armour was present around Arnhem.
[41] Units of the Airlanding Artillery and Divisional HQ headed into Wolfheze and Oosterbeek where medical officers set up a Regimental Aid Post at the home of Kate ter Horst.
At the time of the landings, only one organised unit was in place to oppose the Allied advance toward the bridges (the 16th SS Training Battalion camped in Wolfheze) and their commander – Sepp Krafft – acted quickly to establish a blocking screen west of Oosterbeek.
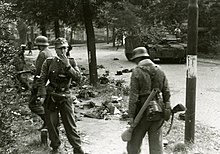
Most of the battalion and various other supporting units – including two jeeps of Gough's squadron, four 6-pounder anti-tank guns, Brigade HQ (without Lathbury), and Royal Engineers (in total numbering about 740 men) moved into Arnhem centre as night fell.
Mackenzie also advised him to send one of his units – the South Staffords (which was not complete and was awaiting its full complement of men in the second lift) – to Arnhem to help with the advance to the bridge.
Units of Kampfgruppe von Tettau attacked the Border's positions; men of the SS NCO school overran Renkum and Kriegsmarine troops engaged the British all day as they withdrew.
[90] The battle gave Urquhart the opportunity to escape from his hiding place, and he was able to return to the Divisional HQ at the Hotel Hartenstein in Oosterbeek, where for the first time he was able to learn the extent of the German forces facing them.
[94] Making a fighting withdrawal with the Germans of Kampfgruppe Krafft closely pursuing them, the units fell back across LZ 'L', defended by the King's Own Scottish Borderers, who were awaiting the arrival of the glider-borne elements of the Polish Parachute Brigade.
Despite the bravery of the pilots (Flight Lieutenant David Lord received the Victoria Cross posthumously), the Airborne forces only recovered 31 short tons (28 t) of supplies.
[104] By forming a defensive perimeter around Oosterbeek and securing the Driel ferry crossing, Urquhart hoped to hold out until XXX Corps could reach them and establish a new bridgehead over the Rhine.
[104] The eastern side of this new perimeter was fairly stable after the previous day's retreat from Arnhem, with numerous ad hoc units under company commanders defending the approaches to Oosterbeek.
[119] In later years, Walter Harzer claimed that, during the final hours of fighting, his men intercepted a radio message sent from the bridge that ended with the sentences: "Out of ammunition.
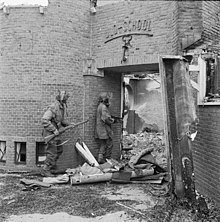
[107][128] The Hermann Göring NCO School attacked the Border positions on the west side near the Rhine, forcing them to abandon tactically important high ground overlooking Oosterbeek.
Hopes were raised when three armoured cars of XXX Corps' Household Cavalry managed to skirt the German defences on the island and link up with Sosabowski's force.
[143][145] When the Germans cut the narrow supply road near Nijmegen later that day, it seems that Horrocks realised the futility of the situation and plans were drawn up to withdraw the 1st Airborne Division.
[152] The small boats, without skilled crews, the strong current and poor choice of landing site on the north bank meant that of the 315 men who embarked, only a handful reached the British lines on the other side.
Half of the engineers' boats were too far west to be used (the 43rd (Wessex) Division mistakenly believing the crossing points used by the Dorsets the previous night were in British hands), slowing the evacuation.
[169] Later in the day, they rounded up about 600 men, mostly wounded in aid stations and those left behind on the north bank, as well as some pockets of resistance that had been out of radio contact with division headquarters and did not know about the withdrawal.
[176][177] On 17 October, Montgomery informed Alan Brooke – Chief of the Imperial General Staff – that he felt the Polish forces had "fought very badly" at Arnhem and that he did not want them under his command.
[181] Browning recommended that Sosabowski be replaced – suggesting Lieutenant Colonel Jachnik or Major Tonn – and in December the Polish government in exile duly dismissed him, in a move almost certainly made under British pressure.
[190][191] In his analysis of the battle, Martin Middlebrook believed the "failure of Browning to give the 82nd US Airborne Division a greater priority in capturing the bridge at Nijmegen" was only just behind the weakness of the air plan in importance.
[195] Frost believed that the distance from the drop zones to the bridge and the long approach on foot was a "glaring snag" and was highly critical of the "unwillingness of the air forces to fly more than one sortie in the day [which] was one of the chief factors that mitigated against success".
[174] Chester Wilmot agreed with this, claiming that the salient was of immense tactical value for the purpose of driving the Germans from the area south of the Maas and removing the threat of an immediate counterattack against Antwerp.
[208] After the battle, the residents of Arnhem and its surrounding towns and villages were evicted from their homes, allowing the Germans to turn the north bank of the Rhine into an elaborate defensive position.
[212] Although the battle was a disaster for the British 1st Airborne Division, their fight north of the Rhine is considered an example of courage and endurance and one of the greatest feats of arms in the Second World War.
A memorial near the museum reads: To the People of Gelderland; 50 years ago British and Polish Airborne soldiers fought here against overwhelming odds to open the way into Germany and bring the war to an early end.