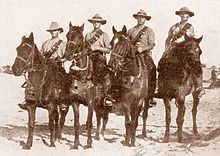
Auckland Mounted Rifles Regiment
[11] Stopping at Hobart, the New Zealand convoy waited until 1 November to be joined by an Australian contingent, then thirty-eight ships set sail, heading north.
[14] In May 1915, the regiment, with the rest of the brigade, was warned to prepare to embark for the Gallipoli Campaign, serving in a dismounted role as part of the Australian and New Zealand Army Corps (ANZAC).
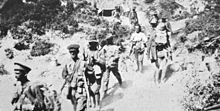
[16] The regiment was responsible for the section of the front known as "Walker's Top" and "The Nek", opposite what was possibly the strongest Turkish position, only fifty yards (46 m) away.
They were relieved on 12 September and left Gallipoli the next day for the rest camp on the island of Lemnos, where they were joined by three officers and 216 other ranks as reinforcements on 5 October.
[37] At the end of July, the 3rd Squadron was sent to patrol twenty miles (32 km) to the south near the Nagid well, observing the left flank of a Turkish force crossing the Sinai.
The 3rd Squadron, supported by Lewis guns from the machine-gun sections, was positioned in the centre of the line between the Canterbury Mounted Rifles and a British yeomanry regiment.
Taking the lead, the regiment advanced close enough by 14:30 to charge the position on horseback, then dismounted and continued the attack on foot, all in the face of heavy rifle and machine-gun fire.
[43] That night the regiment bivouacked at Katib Gannit and returned to the site of the battle the next day, 6 August, but the Turkish army had withdrawn eastwards.
They also located a telephone wire that the withdrawing Turks had failed to disconnect, enabling them to monitor the German and Turkish command issuing orders.
[29][46] The next three months were spent on reconnaissance patrols and manning observation posts until 20 December, when the advance east recommenced, with the regiment forming the vanguard for the ANZAC Mounted Division.
[29][49][50] On 8 January 1917, the ANZAC Mounted Division headed out for their next objective, the police post at Rafa, thirty miles (48 km) to the east on the Egyptian-Palestinian border.
Forty-five minutes later, the regiment was located behind a ridge line observing the Turkish defences, which consisted of trenches and redoubts, with a good field of fire to their front.
[36][55][59] The second British attempt to take Gaza would be on 17 April, but the day before the brigade moved to Hareira, providing flank protection and preventing Turkish reinforcement from that direction.
While the rest of the brigade retired to the west, the regiment remained at the front manning observation posts until 11 November, when they were relieved by the British Westminster Dragoons.
These killed or wounded all those defending a small hill, which was then occupied by the Turkish troops, bringing indirect fire onto the rest of the regiment's positions, which by now were becoming untenable.
The next day the regiment moved forward alone and established a line of observation posts between Beit Dejan and Safiriyeh, just under four miles (6.4 km) from Jaffa.
[80] In the last month the regiment had lost twenty-seven dead and eighty-eight wounded, sixty-one had to be evacuated to the rear as they were ill and two men were missing.
[82] In February the ANZAC Mounted Division was ordered to cross over to the British right flank, to conduct operations in the Jordan Valley by first capturing Jericho.
Eventually the British secured a position that allowed then to bring fire onto the Turkish defences in front of the regiment, forcing them to retire further up the Kalimun hill.
[88][89] However, on 22 February the rest of the NZMRB returned to Ayun Kara, leaving the regiment in the valley under command of the 60th (London) Division, tasked to carry out mounted patrols of the river.
Engineers had finished the pontoon bridge by 08:10 and more troops were crossing, but their exploitation was restricted to around five hundred yards (460 m) from the river line as they were confronted by strong Turkish defences.
[96][97] The next morning, when the NZMRB had crossed the river, McCarroll was given command of the vanguard, comprising the regiment, a squadron from the Canterbury Mounted Rifles and the Hong Kong and Singapore Mountain Artillery Battery.
At 01:45 the regiment moved forward, dismounted and managed to get close enough to the first objective to charge home without being seen, capturing the first trench, five machine-guns and twenty-three prisoners.
The regiment's exact casualties are not documented, but the NZMRB lost thirty-eight dead, 122 wounded and had thirteen men reported missing during the raid.
Eventually the regiment was ordered to gallop forward to the front line, deploying to cover two miles (3.2 km) along the track from Es Salt.
[82][115][116] The regiment remained in the western foothills of the Jordan Valley, based at Talat Ed Dumm, until the end of May, then moved to El Khudr, beside Bethlehem, where some men were granted leave in Port Said, and Jerusalem.
The 4th Squadron, leading, covered the first ten miles (16 km), reaching Kh Fusail and then Tel Es Ed Dhiab, with no opposition.
Passing abandoned wagons, dead men and animals, they had caught up with the Turkish rearguard by 12:00, but had to stop at the village of Suweileh to water their horses and wait for the rest of the brigade to catch up with them.
That night a selected group of 100 men, commanded by Major John Herrold, were sent out twelve miles (19 km) across country to damage the Hedjaz rail line south of Amman.
[133] While waiting for repatriation to New Zealand the regiment played a minor role in the 1919 Egyptian Revolution, which was a Nationalist uprising in the Nile Delta region.