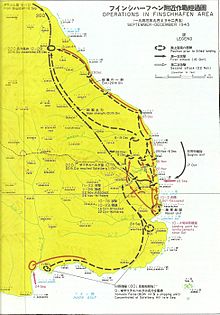
Battle of Sattelberg
Involving forces from Australia, the United States and Japan, the fighting centred on the Sattelberg mission station which was situated atop a hill about 900 metres (3,000 ft) above sea level, approximately 8 kilometres (5.0 mi) inland from Finschhafen, New Guinea.
Over the course of 10 days they advanced west from Jivevaneng up the southern approaches to the mission, reducing the Japanese position with armour, artillery, and air support.
Following the fall of Lae in September 1943,[2] the Australians continued their advance north along the New Guinea coast towards the Huon Peninsula, with the aim of securing Finschhafen, where large scale air and naval facilities could be constructed for operations that were planned against New Britain.
As the 20th Brigade advanced south towards their objective at Finschhafen, intelligence indicated that the Japanese were moving to the high ground to the west at Sattelberg, which was situated about 900 metres (3,000 ft) above sea level.
[5][6] Captured documents showed that three infantry battalions were being concentrated at an old Lutheran mission station that had been established at Sattelberg in the 19th century during the German colonial administration of the area.
[7][8] Concerned for the security of his lines of communication due to the presence of Japanese on his flank, the Australian brigade commander adopted more cautious tactics, while reinforcements were called for.
[10] During the advance on Finschhafen, a company from the 2/17th Battalion, which had been tasked with securing the beachhead and the flank, had been sent to Sattelberg but had been unable to occupy it due to the strength of the Japanese force already there.
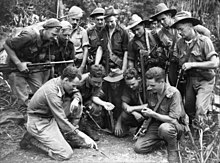
[18] It was during the early stages of this fighting that an American soldier, Private Nathan Van Noy, from the 532nd Engineer Boat and Shore Regiment, performed the deeds that resulted in him being posthumously awarded the Medal of Honor.
[19] With the 79th Infantry Regiment having lost around 50% of its strength and with ammunition and food running low (by the end of the month, they had been reduced to quarter rations), the Japanese divisional commander, Katagiri, made the decision to call off the attack in order to pull back from Jivevaneng and Katika and regroup on the higher ground further west around the mission.
[20] Following this, Katagiri received orders from the 18th Army commander, General Hatazō Adachi, who delivered them personally at Sattelberg, for the 20th Division to prepare to hold the mission and to engage in offensive operations in the immediate vicinity.
[20] As a part of this plan, Katagiri decided that he would use the 80th Infantry Regiment to defend Sattelberg, while the 79th would concentrate in the Nongora area with the intention of launching a counter-attack upon the Australian forces advancing from Katika, near the Song River on 25 November.
[4] The 2/23rd Battalion, which would hand over its defensive duties to the 2/4th Commando Squadron,[38] would start further south from Kumawa, protecting the left flank, and after paralleling the Sattelberg road, they would marry up with the 2/48th at a position called "Steeple Tree Hill", or the "2,600 feature", by the Australians ("Miyake-dai" to the Japanese), where it was planned to halt for resupply and re-appreciation before undertaking the final attack.
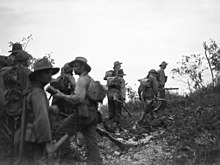
In the early afternoon, the advance was resumed, however the Australians only managed to progress a further 250 yards (230 m) before they were halted by stiff opposition from Japanese armed with 37 mm anti-tank guns.
[48] Elsewhere, in front of the 2,200 feature and on the southern flank, only limited progress was made by the Australians,[44] who suffered a number of casualties from Japanese 75 mm mountain guns before these were silenced by a bombardment by the 2/12th Field Regiment.
[33][51] Progress was made, however, and amidst hand-to-hand fighting troops from the 2/48th managed to seize part of the 2,600 feature (Steeple Tree Hill), after engineers under the command of Lieutenant (later Captain) Augustus Spry, helped clear the way through the use of two fougasses that were fashioned out of 4-gallon drums filled with petrol, which were exploded in order to stun the Japanese and provide a smoke screen while the infantry attacked.
[52] The 2/23rd Battalion to the south, up against the same defensive system that was delaying the 2/48th, was also held up further, while on the northern route, the 2/24th found the 2,200 feature unoccupied, but was unable to proceed further after they came under heavy machine-gun and artillery fire.
[24] Given the desperate supply situation, which was made all the worse when the 24th Brigade cut the track between Gusika and Wareo,[59] the Japanese 18th Army commander, Adachi, gave Katagiri approval to withdraw from Sattelberg after 20 November.
[55] Katagiri subsequently ordered Colonel Sadahiko Miyake, the commander of the 80th Infantry Regiment, to inflict as many casualties upon the Australians as possible and then begin a progressive withdrawal to Wareo.
When formulating his defence plans in October, he had originally intended to launch an attack from Nongora with the 79th Infantry Regiment on 25 November, however, with the Australians advancing steadily towards the main position at Sattelberg, Katagiri decided to bring this forward in order to take some of the pressure off the troops defending the mission.
[55] An intense five-day Allied aerial bombardment, which had begun on 19 November, had destroyed the majority of the Japanese guns around Sattelberg, and the ammunition and food situation had become critical, despite the arrival of several tonnes of rice at Wareo the day before.
[62] In an effort to find the best possible route, the Australians sent out small reconnaissance patrols and based on the intelligence they gained Whitehead produced a new set of orders prior to stepping off on 22 November.
Indeed, Whitehead went as far to express this to the 2/23rd's commanding officer, Lieutenant Colonel Frederick Tucker, who pointed out that his lack of progress had been caused by the large number of tasks that the battalion had been assigned, namely the competing demands to secure the flank while attempting to move quickly through broken country in order to make its scheduled rendezvous with the 2/48th.
The 2/48th, nearing their objective, cautiously began to probe the outer positions, while to the north, three companies from the 2/24th managed to reach the saddle that lay below the north-eastern approach to the mission, although there was still uncertainty as to whether or not the Japanese had withdrawn from the 2,200 feature.
After they had struck Turn-Off Corner, the infantry from the 2/23rd were accompanied by engineers from the 2/13th Field Company, who were tasked with laying down a makeshift road, over which the tanks that had been re-allocated to the 2/23rd would traverse.
Around the hut, the Japanese had constructed a number of reinforced defensive positions and although they had not been damaged by the numerous aerial attacks that had been launched by the Allies during the previous week, it was believed that because the approach was so difficult, it might be lightly defended.
[75] Derrick's response to this order was to obfuscate, however, and instead of withdrawing, he subsequently led his platoon forward, attacking 10 Japanese positions with grenades as his men supported him with Bren and Owen submachine-gun fire.
[68] Indeed, it was later established that Miyake, who had been in command of the troops gathered around the mission and had been given permission to abandon Sattelberg if the situation became untenable, had decided to withdraw from the position soon after Derrick's attack.
[31] Finally, at 10:00 am, upon the insistence of the 2/48th Battalion's commanding officer, Lieutenant Colonel Robert Ainslie, Derrick was given the honour of raising the Australian flag over the mission, signifying that the battle had come to an end.
Upon completion of the flag-raising ceremony, a company from the 2/48th moved on to the 3,200 feature, which had also been abandoned, while further to the west, the 2/23rd, along with the 2/4th Commando Squadron cleared Mararuo and in the process found evidence that the Japanese had withdrawn towards Wareo.
Derrick was the fourth soldier from the 2/48th Battalion to receive the award; by the end of the hostilities the 2/48th had the distinction of being the most highly decorated Australian Army unit of the Second World War.