Battle of St Quentin Canal
[9] The objective was to break through one of the most heavily defended stretches of the German Siegfriedstellung (Hindenburg Line), which in this sector used the St Quentin Canal as part of its defences.
The assault achieved its objectives (though not according to the planned timetable), resulting in the first full breach of the Hindenburg Line, in the face of heavy German resistance.
[10] Rawlinson wanted the Australian Corps, under the command of Lieutenant General Sir John Monash, with its well-earned reputation, to spearhead the attack.
Monash was unhappy, because his Australian force was by now short of manpower and many soldiers were showing signs of strain, having been heavily engaged in fighting for several months.
To Monash's plan Rawlinson made a very significant change: IX Corps would launch an assault directly across the deep canal cutting south of the Bellicourt Tunnel.
[17] Monash's plan assumed that the Hindenburg outpost line would be in Allied hands by the date set for the start of the battle.
Whilst the Australians had already captured it in the southern part of the front (from where the American 30th Division would launch its attack), the northern section of the line was still in German hands.
[26] Commander in Chief Field Marshal Sir Douglas Haig initially opposed using the Americans to take the outpost line, wanting to preserve them for the main attack.
The British III Corps had previously failed to capture the outposts, but that failure had been attributed by Rawlinson to the tiredness of the troops.
Monash asked Rawlinson for permission to delay the main attack due on 29 September, but this was refused because of the priority given to Marshal Ferdinand Foch's strategy of keeping the Germans under the relentless pressure of coordinated assaults along the front.
[33] However, the absence of a creeping barrage in the 27th Division sector was to have a very detrimental effect on the initial operations of the battle on the front opposite the tunnel.
[35] Many of the high explosive shells fired had special fuses which made them very effective in destroying the German barbed wire.
[37] The British were greatly helped by the fact that they were in possession of highly detailed captured plans of the enemy defences (especially useful for the IX Corps sector).
[24] Monash had originally intended to capture the Beaurevoir Line on 29 September, but Rawlinson removed this as a first day objective, considering it overly ambitious.
[37] On the left of the front, where the U.S. 27th Division began at a disadvantage, none of the objectives were met on the first day and the Americans suffered severe losses.
[40] Rather than leapfrogging through the Americans, the Australian 3rd Division became involved in a desperate fight for positions that should already have been captured had Monash's plan run to timetable.
[49] Monash wrote: "...in this battle they demonstrated their inexperience in war, and their ignorance of some of the elementary methods of fighting employed on the French front.
Their sacrifices, nevertheless, contributed quite definitely to the partial success of the day's operations..."[50] The objective of U.S. II Corps, the Catelet–Nauroy Line, was not captured by the Americans.
[51] Late on 29 September Rawlinson wrote: "The Americans appear to be in a state of hopeless confusion and will not, I fear, be able to function as a corps, so I am contemplating replacing them ...
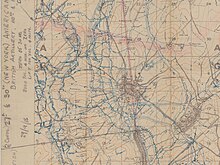
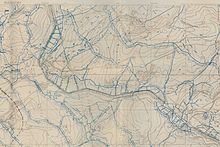
[59] IX Corps had to cross the formidable canal cutting (which increased in depth as it approached Riqueval until its very steep banks, strongly defended by fortified machine gun positions, were over 15 m (50 ft) deep in places),[60] and then fight its way through the Hindenburg Line trenches.
[62] Following a devastating artillery bombardment (which was heaviest in this sector),[37] and in thick fog and smoke, the 46th Division fought its way through the German trenches west of the canal and then across the waterway.
[63] The ferocity of the creeping artillery barrage contributed greatly to the success of the assault, keeping the Germans pinned in their dugouts.
[64] The soldiers used a variety of flotation aids devised by the Royal Engineers (including improvised floating piers and 3,000 lifebelts from cross-Channel steamers) to cross the water.
[65] Some men of the 1/6th Battalion, the North Staffordshire Regiment, led by Captain A. H. Charlton, managed to seize the still-intact Riqueval Bridge over the canal before the Germans had a chance to fire their explosive charges.