Battle of Wagram
After the battle, Emperor Napoleon bestowed on Louis-Alexandre Berthier, who was his Marshal, Chief of Staff, Minister of War and Vice-Constable of the Empire, the victory title of 1st Prince of Wagram, making him an official member of the French nobility.
Encouraged by Napoleon's peninsular imbroglio, British subsidies and the promise of a military intervention in northern Europe, the Austrians decided that the European political context of 1808 and 1809 offered their best chance to retake lost provinces.
Austrian military preparations were accelerated in 1808 and early 1809, with operations set to occur in several war theatres, including the main one in Bavaria and sideshows in Italy, Dalmatia, Westphalia, Tyrol and Poland.
[16] By March 1809, war between Austria and France was imminent and the Habsburg army, 200,000 men strong, massed in the northwestern province of Bohemia, near the frontier with the Confederation of the Rhine, the French-dominated confederacy of German states.
The French crossing resulted in the Battle of Aspern-Essling, beginning on 21 May; the more numerous Austrian army faced only a fraction of the Grande Armée, as Napoleon was unable to bring through the bulk of his forces in time.
Still, Charles's attempt to drive the outnumbered enemy back resulted in total failure, as the French led a skillful combined-arms defense, with their cavalry playing a vital role in keeping the Austrians at bay.
The French offensive was quite successful but Napoleon soon received alarming news that the main bridge had broken and consequently, no further reinforcements and ammunition could be brought from the southern bank, making a protracted battle impossible.
[27] Although a generalissimus, with supreme authority over the entire Austrian army, Charles's position was constantly undermined by his imperial brother and the war party at the court, who were corresponding directly on military matters with his chief of staff, General Major Wimpffen and some of the corps commanders.
The constant flow of information from the front maintained a bellicose atmosphere in the high political circles and an erroneously optimistic opinion about Austria's military situation, which hindered Charles's best attempts to get his brother to sue for peace.
One of the senior generals, Johann von Hiller, commander of VI Korps was overtly critical of Charles's strategy and resigned on 4 July, on the eve of the battle of Wagram, giving health reasons as a pretext.
[25][Note 3] Another irreplaceable loss was Louis-Vincent-Joseph Le Blond de Saint-Hilaire, who had been created a Marshal of the Empire just a month before, in recognition of his brilliant conduct during the earlier campaign, but received a mortal wound during the battle and died before the coveted baton could arrive from Paris.
Evidence of this came a couple of days before the newly planned crossing of the Danube, when Napoleon's most senior Corps commander, Maréchal André Masséna fell from his horse and badly injured his foot, rendering him unable to ride for some time.
They also carefully scouted the shores and small islands of the Danube and installed batteries in strategic positions, in a bid to cover Vienna, but above all with the aim of keeping the enemy guessing about the exact location of the upcoming crossing.
[34] There was perhaps further justification for this choice on a tactical level: the broken and wooded terrain in the immediate proximity of the Danube was adapted to fighting in open order formations, which were insufficiently mastered by his men, and at which the French were adept.
Bernadotte sent forward the two battalions of the 5th Light regiment, which successfully pushed back the opposition, allowing the rest of his Corps to continue its advance towards the village of Aderklaa, near which they had to stop, towards 15:30, as they met enemy cavalry.
[48] Never a man to lose time, Napoleon probably noted that the sun was still high on the sky, that the Austrian right wing was placed noticeably far away from the main body, and that there was still no sign of the arrival of Archduke John's army from the east.
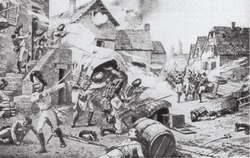
This village, consisting of no more than 30 wooden houses and a bridge, soon caught fire from the French artillery bombardment, but the Austrian defenders from Hardegg's brigade[48] (8th Jäger regiment and a battalion of Volunteers from the Erzherzog Karl Legion) stood their ground, despite the flames.
Moments later, Zeschau's Saxon brigade, with Prince Maximilian's regiment attached to it, came in support, but these troops had been much disordered when crossing the Russbach, and upon entering the smoke filled streets of the village, they too lost impetus.
On the Austrian left, IV Korps, with the Advance Guard now attached to it, was to move against the French III Corps, and it was expected that Archduke John's "Army of Inner Austria" would arrive from Pressburg in time to support this attack.
Davout immediately ordered a counterattack on Grosshofen, with Puthod attacking frontally and Gudin from the flank, and made sure that the defenders of Glinzendorf steadfastly hold their ground, while releasing heavy musketry upon the slowly advancing enemy columns.
[74] Napoleon, who was by now present alongside Davout, reconnoitered the situation and, seeing that Archduke John's army was nowhere near the battlefield, ordered the reserves back to Raasdorf, leaving only Arrighi's cuirassiers and a battery of 12-pounders with III Corps.
This was thus the right time for a general attack, but the Austrian military doctrine discouraged commanders from taking too much initiative, and Bellegarde chose to stick to his orders and wait for III Korps, whose leading elements were only just coming up, in line with the Grenadiers.
The Emperor did not want to commit his valuable, fresh infantry reserves just yet, so he ordered Masséna to break contact with the enemy and take his IV Corps southwards and attack the Austrian VI Korps.
Executing such a manoeuvre required great skill and incurred high risks, as it meant that Masséna's men would have to move in vulnerable march column formations, through a sector with numerous enemy infantry, cavalry and artillery.
Due in part to the fact that Austrian Corps on other sectors of the battlefield failed to attack at the same time, Rosenberg was forced to draw his troops back to their initial positions, occupying the plateau and the strategic village of Markgrafneusiedl, situated just below the escarpment.
During this manoeuvre, Nostitz's cavalry, placed initially on the plain below the escarpment, were pushed back and forced up the slope of the plateau by Grouchy's and Pully's dragoons; the Austrian horse subsequently redeployed to protect Nordmann's flank.
At this crucial juncture, Friant committed his entire division and, despite the failure of a first attack, soon managed to gain a firm foothold on the escarpment, pushing towards the tower at Markgrafneusiedl, a sign that the battle in this sector was turning in favour of the French.
French pressure and the fast-spreading fire forced Hessen-Homburg's brigade, which had been drawn up in support of Rohan's division, to evacuate the position and reform on the escarpment behind the village, closely followed by Gudin's skirmishers.
A massive, albeit brief, cavalry clash occurred and in the melee, both Nostitz and Rothkirch were wounded and the Austrians were driven back, leaving behind the cannon they had captured moments earlier and taking refuge behind the infantry.
Between 9 and 12 July, the French from Eugène's "Army of Italy" clashed with Archduke John's forces in a series of skirmishes and pushed them back into Hungary, while Masséna caught up with and fought the Austrian rearguard in several actions, most notable of which was the one at Hollabrunn.