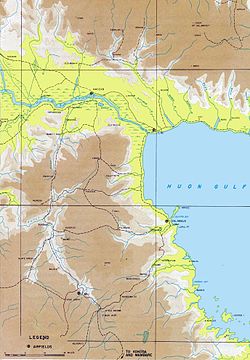
Battle of Wau
Forces of the Empire of Japan sailed from Rabaul and crossed the Solomon Sea and, despite Allied air attacks, successfully reached Lae, where they disembarked.
By the time the Japanese reached the Wau area after a trek over the mountains, the Australian defenders had been greatly reinforced by air.
In the battle that followed, despite achieving tactical surprise by approaching from an unexpected direction, the Japanese attackers were unable to capture Wau.
The miners partially cleared the area and built houses and workshops, and established a water supply and an electricity grid.
[1] Wau aerodrome was a rough Kunai grass airstrip 3,100 ft (940 m) in length with a 10 per cent slope heading directly for Mount Kaindi.
[4] This required good visibility, but the weather over Owen Stanley Range was characterised by frequent storms, vertical drafts, and mists which rose from the jungle floor.
Easy chairs, refrigerators, bathtubs, stoves, dynamos, linoleum, carpets, garden statuary, even great mining dredges, bulldozers and power shovels—all were brought in by air, and this in a decade when most people in Australia were still thinking it adventurous to take a five-minute joy ride over an airfield.
Non-native women and children were evacuated while men of military age were called up for service in the New Guinea Volunteer Rifles, the local militia unit.
These refugees made a hazardous journey over the Owen Stanley Range on foot by way of Kudjeru and Tekadu to Bulldog, a disused mining settlement where there was an aerodrome, and thence down the Lakekamu River to the sea.
[7][8] With the feasibility of the route thus demonstrated, New Guinea Force decided to establish a line of communications to Wau via the Bulldog Track.
A platoon of the 1st Independent Company left Port Moresby in the schooner Royal Endeavour and traversed the route, joining the men of the New Guinea Volunteer Rifles holding the Wau area.
[10] On 22 May, the 21st Troop Carrier Squadron USAAF flew in commandos of the 2/5th Independent Company to join Kanga Force.
"[15] They had however managed to threaten the Japanese without provoking them into an offensive against Wau at a time when the Allies did not have the resources to reinforce Kanga Force, and they had provided valuable information.
The Bulldog Track would be upgraded to a highway capable of carrying trucks and tanks that could support a division that would advance overland on Lae.
[16] Lieutenant General Hitoshi Imamura, the commander of the Japanese Eighth Area Army at Rabaul, correctly deduced his opponent's intentions and the strength of Kanga Force and resolved to head off the danger to Lae.
He ordered Lieutenant General Hatazō Adachi's Eighteenth Army to secure "important areas to the west of Lae and Salamaua".
[19] Blamey chose not to wait for this to become clear, but immediately ordered the 17th Infantry Brigade to move from Milne Bay to Wau on 4 January 1943.
[21] The Commander, Allied Air Forces, South West Pacific Area, Lieutenant General George Kenney, ordered his bomber commander, Brigadier General Kenneth Walker, to carry out a full-scale dawn bombing attack on the shipping in Rabaul Harbour before it could depart.
Forewarned by Ultra, USAAF and RAAF aircraft spotted, shadowed and attacked the convoy, which was shielded by low clouds and Japanese fighters.
11 Squadron RAAF under the command of Flight Lieutenant David Vernon made a night bombing attack on the convoy which sank the transport Nichiryu Maru.
Between 10 and 16 January, the Okabe Detachment moved down the coast in barges to Salamaua,[30] where it assembled and completed its preparations for the attack on Wau.
[39] The fighting at Buna ended on 23 January, freeing up aircraft to support Wau, and 52 brand-new Dakotas of the US 317th Troop Carrier Group had arrived in Australia, their movement from the United States having been expedited in response to urgent requests from General Douglas MacArthur arising from the Buna fighting.
After a quick maintenance check, they were flown up to Port Moresby to help the 374th Troop Carrier Group fly the 17th Infantry Brigade into Wau.
Their cargo included two dismantled 25 pounder guns of the 2/1st Field Regiment with 688 rounds of ammunition, under the command of Captain R. J.
These were landed in the morning and in action before noon, shelling a concentration of 300 enemy troops between the villages of Wandumi and Kaisenik.
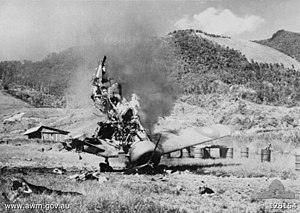
[41] Japanese attacks that day succeeded in reaching the corner of the airstrip but were forced to fall back under enormous pressure.
Eight P-39s of the 40th Fighter Squadron were patrolling at 12,000 feet (3,700 m) over Wau, having provided escort for a flight of five Dakotas, when they sighted 24 Japanese planes.
[45][46] Major General Ennis Whitehead's Advanced Echelon (ADVON) headquarters in Port Moresby ordered three squadrons based there to join the battle.
This time, the plan was to approach from the north, building a road from Markham Point to the Snake River Valley.
The 51st Division was earmarked for the mission, but it suffered heavy losses en route to New Guinea in the Battle of the Bismarck Sea.