Battle off Samar
Seventh Fleet Support Force, they were devastated, running a gauntlet of torpedoes from 39 PT boats and 22 destroyers before coming under accurate radar-directed gunfire from six battleships (five of them survivors of the Pearl Harbor attack) and seven cruisers.
In addition, none of his ships had a gun larger than 5 inches (130 mm), firing 54-pound (24 kg) shells, but unable to penetrate the Japanese cruiser or battleship armor, and had a limited range of 7 miles (11 km).
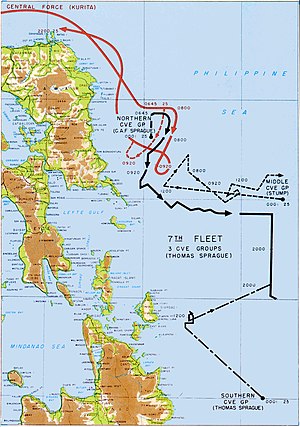
At 06:50 Admiral Sprague ordered a formation course change to 090, directed his carriers to turn to launch their aircraft and then withdraw towards a squall to the east, hoping that bad visibility would reduce the accuracy of Japanese gunfire.
The Japanese reliance on optical range finders aided by color-coded dye loads in each shell and mechanical calculators made it difficult for them to identify their targets through the rain and smoke and limited their ability to maneuver while firing.
Effective damage control and redundancy in propulsion and power systems kept them running and fighting even after they had absorbed dozens of hits before they sank, although the decks would be littered with the dead and the seriously wounded.
[22] At 07:00, Commander Ernest E. Evans of the destroyer Johnston, responded to incoming shell fire bracketing carriers of the group he was escorting by laying down a protective smokescreen and zigzagging.
[24] Firing the destroyer's 5-inch (127 mm) guns at their maximum range of 10 nmi (12 mi; 19 km), Johnston scored several hits on Kumano's superstructure, which erupted into flame and smoke.
At 07:30, three battleship main battery shells passed through the deck of Johnston and into her portside engine room, which cut the destroyer's speed in half to 17 kn (20 mph; 31 km/h) and disrupted electric power to her aft gun mounts.
Attacking Tone, the leading heavy cruiser to the east of the formation, Johnston closed to 3.0 nmi (3.4 mi; 5.5 km), now firing with reduced efficiency due to her lost SC radar, yet still registering many hits.
Yamato's 6.1-inch (155 mm) guns scored a hit on Hoel's bridge at 6.9 nmi (8.0 mi; 13 km), knocking out all voice radio communication, killing four men and wounding Kintberger and Screen Flag Officer Commander William Dow Thomas.
In the Combat Information Center, Executive Officer Fred Green quickly suggested a course that would put Hoel in a position to attack the leading "battleship", either Kongō or possibly the heavy cruiser Haguro.
[48] Gunnery Officer Lt. Bill Sanders directed Hoel's main battery of five 5-inch (127 mm) guns in a rapid-fire barrage, drawing the attention of a substantial portion of the Japanese fleet.
Heermann—captained by Commander Amos T. Hathaway was on the disengaged side of the carriers at the start of the fight when at 07:37 he received an order from Commodore Thomas to take the lead position in a column of "small boys" to attack the approaching enemy fleet.
Heermann steamed into the action at flank speed through the formation of "baby flattops" through smoke and intermittent rain squalls that had reduced visibility at times to less than 100 yd (90 m), twice having to back emergency full to avoid collisions with friendly ships, first with Samuel B. Roberts and then at 07:49 with Hoel, as she tried to take her assigned position at the head of the column in preparation for a torpedo attack.
The easterly course was drawing the enemy too close to San Bernardino Strait and away from any help that might come from Admiral Oldendorf's forces to the south, and Kurita was about to gain the windward side of his formation, which would render his smoke less effective.
However, Kurita missed the chance and his forces followed Taffy 3 around the circle, his earlier decision to send his destroyers to the rear having removed them from a position that they could have intercepted or prevented the American formation's turn.
The stern chase was also advantageous for the sole anti-ship armament of small carriers was a single manually controlled stern-mounted 5 in (127 mm) gun as a stinger, though they were loaded with anti-aircraft shells.
While the ship was not struck directly, the mining effect of the under-keel explosion severely damaged her hull, deranged her starboard machinery, and tripped all of the circuit breakers in her electrical network.
Haguro's detailed action report states that Chōkai's immobilizing damage resulted from a bomb hit at 08:51, she was later scuttled by torpedoes from Japanese destroyers as she could not join the retreat, confirmed by other officers of Center Force.
The determined, concentrated sea and air attack from Taffy 3 had already sunk or crippled the heavy cruisers Chōkai, Kumano, and Chikuma, which seemed to confirm to the Japanese that they were engaging major fleet units rather than escort carriers and destroyers.
Signals from Ozawa eventually convinced Kurita that he was not currently engaged with the entirety of Third Fleet, and that the remaining elements of Halsey's forces might close in and destroy him if he lingered too long in the area.
Calculating that the fight was not worth further losses and believing he had already sunk or damaged several American carriers, Kurita broke off the engagement at 09:20 with the order: "all ships, my course north, speed 20."
A relieved Halsey sent the following message to Nimitz, Kinkaid and General Douglas MacArthur at 12:26: "It can be announced with assurance that the Japanese Navy has been beaten, routed and broken by the Third and Seventh Fleets."
Partly as a result of disastrous communication errors within Seventh Fleet and a reluctance to expose search ships to submarine attack,[82] a very large number of survivors from Taffy 3, including those from Gambier Bay, Hoel, Johnston, and Roberts, were not rescued until October 27, after two days adrift.
Finally, when a Landing Craft Infantry of Task Group 78.12 arrived, its captain used what is almost a standard method of distinguishing friend from foe, asking a topical question about a national sport,[84][85] as one survivor, Jack Yusen, relates: We saw this ship come up, it was circling around us, and a guy was standing up on the bridge with a megaphone.
Domination of the skies, prudent and timely maneuvers by the U.S. ships, tactical errors by the Japanese admiral, and superior American radar technology, gunnery and seamanship all contributed to this outcome.
[citation needed] Clifton Sprague, the commander of Task Unit 77.4.3 in the battle off Samar, was later bitterly critical of Halsey's decision and of his failure to inform Kinkaid and the Seventh Fleet clearly that their northern flank was no longer protected: In the absence of any information that this exit [of the San Bernardino Strait] was no longer blocked, it was logical to assume that our northern flank could not be exposed without ample warning.Regarding Halsey's failure to turn TF 34 southwards when Seventh Fleet's first calls for assistance off Samar were received, Morison writes: If TF 34 had been detached a few hours earlier, after Kinkaid's first urgent request for help, and had left the destroyers behind, since their fueling caused a delay of over two hours and a half, a powerful battle line of six modern battleships under the command of Admiral Lee, the most experienced battle squadron commander in the Navy, would have arrived off San Bernardino Strait in time to have clashed with Kurita's Center Force. ...
"[c][97] Perhaps the most telling comment was made laconically by Vice Admiral Willis Augustus Lee in his action report as the Commander of TF 34: "No battle damage was incurred, nor inflicted on the enemy by vessels while operating as Task Force Thirty-Four.
This divided command was more important in determining the course of the battle than the tactical decision made by Halsey and led to an American disunity of effort that nearly allowed Kurita's mission to succeed.
The survivors formed associations which still meet annually, and raised funds to build memorials in San Diego near the current location of the USS Midway (CV-41) Museum, which contains a model of Gambier Bay.