Checkmate
[1][2] If a player is not in check but has no legal moves, then it is stalemate, and the game immediately ends in a draw.
A checkmating move is recorded in algebraic notation using the hash symbol "#", for example: 34.Qg3#.
The term checkmate is, according to the Barnhart Etymological Dictionary, an alteration of the Persian phrase "shāh māt" (شاه مات) which means "the King is helpless".
[7] Persian "māt" applies to the king but in Sanskrit "māta", also pronounced "māt", applied to his kingdom "traversed, measured across, and meted out" thoroughly by his opponent; "māta" is the past participle of "mā" verbal root.
So the king is in mate when he is ambushed, at a loss, helpless, defeated, or abandoned to his fate.
[12] In modern Persian, the word mate depicts a person who is frozen, open-mouthed, staring, confused and unresponsive.
In modern parlance, the term checkmate is a metaphor for an irrefutable and strategic victory.
The Persians (c. 700–800) introduced the idea of warning that the king was under attack (announcing check in modern terminology).
As a result, the king could not be captured,[14] and checkmate was the only decisive way of ending a game.
[15] Before about 1600, the game could also be won by capturing all of the opponent's pieces, leaving just a bare king.
[16] In Medieval times, players began to consider it nobler to win by checkmate, so annihilation became a half-win for a while, until it was abandoned.
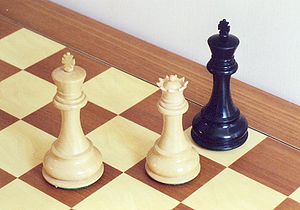
[18] In the illustration, White checkmates by forcing the Black king to the edge, one row at a time.
The first two diagrams show representatives of the basic checkmate positions with a queen, which can occur on any edge of the board.
There are five general types of stalemate positions that can occur, which the stronger side must avoid.
The first diagram shows the basic checkmate position with a rook, which can occur on any edge of the board.
In the third diagram position, White checkmates by confining the black king to a rectangle and shrinking the rectangle to force the king to the edge of the board: Avoid stalemate There are two stalemate patterns:[30]
[31] "The process, though a bit lengthy, is fascinating because it gives us a glimpse of the power of the two bishops on the open board.
Two principles apply: In the position from Seirawan, White wins by first forcing the black king to the side of the board, then to a corner, and then checkmates.
Müller and Lamprecht give a fifteen-move solution; however, it contains an inaccurate move by Black (according to endgame tablebases).
[38] Of the basic checkmates, this is the most difficult one to force, because these two pieces cannot form a linear barrier to the enemy king from a distance.
The second position is a checkmate by the knight, with the black king on a side square next to the corner.
However, the mating process requires accurate play, since a few errors could result in a draw either by the fifty-move rule or stalemate.
A back-rank checkmate is a checkmate delivered by a rook or queen along a back rank (that is, the row on which the pieces [not pawns] stand at the start of the game) in which the mated king is unable to move up the board because the king is blocked by friendly pieces (usually pawns) on the second rank.
[49] The mate is usually seen in a corner of the board, since fewer pieces are needed to surround the king there.
The knight on f7 delivers mate to the king on h8 which is prevented from escaping the check by the rook on g8 and the pawns on g7 and h7.
In the diagram showing Stamma's mate (named for Philipp Stamma), White to move wins:[50] White also wins if Black is to move first: This checkmate occurred in Jesús Nogueiras–Maikel Gongora, 2001 Cuban Championship[51] (see diagram), which proceeded: If 82...a2 then 83.Nb3#.
[52] A similar position with the knight on d2 is more than 500 years old, identified as "Partito n. 23" by Luca Pacioli, in his MS De ludo scachorum (Latin for "The game of chess"), dated 1498 and recently reprinted (Gli scacchi) by Aboca Museum Edizioni.