HMAS Sydney (D48)
During the early part of her operational history, Sydney helped enforce sanctions during the Abyssinian Crisis, and at the start of World War II was assigned to convoy escort and patrol duties in Australian waters.
In May 1940, Sydney joined the British Mediterranean Fleet for an eight-month deployment, during which she sank two Italian warships, participated in multiple shore bombardments, and provided support to the Malta Convoys, while receiving minimal damage and no casualties.
The ship was laid down by Swan Hunter & Wigham Richardson at Wallsend-on-Tyne, England, on 8 July 1933 for the Royal Navy as HMS Phaeton, named after the Greek mythological figure.
[22] Although Waller suggested that a second tower be installed aft to provide redundancy, it was deferred indefinitely as subsequent commanding officers did not share his concerns, and combat experiences of other Leander-class cruisers showed that the system was more robust than expected.
[5][30] A mixture of 0.303-inch (7.7 mm) machine guns were used for close defence work, and could be fitted to pedestals at various points on the ship, primarily around the bridge and on the three searchlight platforms (one either side of the forward funnel, the third raised above the aft superstructure).
[37] Almost immediately after departing, Sydney was instructed to join the Royal Navy's Mediterranean Fleet at Gibraltar and assist the 2nd Cruiser Squadron in enforcing economic sanctions against Italy in response to the Abyssinian crisis.
[40] On 28 November, Sydney joined the Australian heavy cruisers Australia and Canberra in an unsuccessful four-day search for the German pocket battleship Admiral Graf Spee, which was known to be operating in the Indian Ocean.
[51] By 01:00 on 11 June, all ships in harbour had departed to search for Italian warships in position to attack Alexandria, and secure the sea lines of communication in the eastern Mediterranean and Aegean.
[53] On 21 June, Sydney fired in anger for the first time, joining the British cruisers Orion and Neptune, the French battleship Lorraine, and a force of destroyers in shelling the Italian-controlled Libyan port of Bardia.
[55] During this operation, the Australian ship's Walrus amphibian performed bombardment spotting for the squadron, but was fired on by three biplanes: although reported at the time as Italian Fiat CR.42 Falcos, the attackers were later determined to be British Gloster Gladiators.
[54][59] On the evening of 7 July, Sydney departed from Alexandria as part of a fleet including four other light cruisers, three battleships, an aircraft carrier, and sixteen destroyers, divided into three groups.
[61] Throughout the day, the fleet had to defend itself from multiple Italian air raids: at one point Sydney and the other cruisers of the 7th Squadron attacked what they thought was a high-flying bomber, but was later determined to be the planet Venus.
[68] Believing that these two tasks were incompatible, and that protecting the destroyers was the more important, Sydney's commander, Captain John Collins, ordered the two ships to move 100 nautical miles (190 km; 120 mi) south of their patrol area while maintaining radio silence.
[74] Collins ordered the destroyers to torpedo the ship and rescue survivors: Hyperion, Ilex, and Havock did so, while Hero and Hasty supported Sydney in continuing pursuit of Bande Nere.
[75] At 10:37, the chase ended, as the faster Italian cruiser had outrun the Allies, visibility was reduced by smoke and haze, and ammunition aboard the pursuing ships was low: Sydney had ten shells left for her forward turrets.
[95] Sydney started December in the Aegean, where she escorted convoys and shelled the port of Valona, then proceeded to Malta for a refit and repairs to her rudder, which lasted until the end of the year.
[90] The recall was attributed to the need to bring Sydney in for a major refit and give her personnel leave, a plan to spread combat experience throughout the RAN by trading the cruiser with her sister ship, Perth, and a need to protect Australia against the German merchant raiders operating in the area, particularly following the attacks on Nauru.
[32][106] The cruiser then escorted the four-ship Anzac convoy US 12B to Fremantle: heavy seas while crossing the Great Australian Bight caused "A" turret to become jammed on a port facing.
[107][108] On the night of 5–6 October, a mysterious ship that responded to challenge signals near Rottnest Island then disappeared led the Naval Officer in Charge Fremantle to believe that the approaches to the harbour had been mined.
[121][124] During this, Kormoran maintained heavy fire, and around the time of the eighth or ninth German salvo, a torpedo launched at the start of the engagement hit Sydney just forward of "A" turret and near the ASDIC compartment (the weakest point on the ship's hull), ripping a hole in the side and causing the bow of the cruiser to angle down.
[135][136] Sydney's shells had crippled Kormoran; the German sailors abandoned ship after it was determined that below-deck fires could not be controlled before they reached the gun magazines or the mines in the cargo hold.
[129] Sydney's failure to reach Fremantle on 20 November was not initially cause for concern, as several factors might have delayed the cruiser, none of which were sufficient reason to break the order to maintain wireless silence.
[144] Attempts to learn what had happened were hampered by the German officers instructing their sailors to obfuscate the enemy with false answers, people describing events they did not witness but heard of later, and difficulty in keeping groups separated in order to check their stories against each other.
[145] Despite this, Australian authorities were able to piece together the broad details of the battle, which was verified by a group of German sailors who had been taken to Sydney instead: their interviews showed the same commonalities and inconsistencies as those from Fremantle, and the interrogators concluded that the true story was being recounted.
[155][156] The battle between Sydney and Kormoran is seen as controversial: the disbelief that a modified merchant ship could so successfully defeat a cruiser combined with the lack of Australian survivors led some to believe that the German account was false.
[158][159] The main claims made by supporters of an alternative view of the engagement include: that the Germans fired on Sydney before raising their battle ensign, or after using a flag of surrender or signals of distress to lure the cruiser in, that a Japanese submarine was partially or completely responsible for sinking Sydney, that the involvement of the Japanese was covered up to lure the United States into the war, and that Australian survivors were killed in the water to eliminate witnesses.
[168] Theories to explain Burnett's actions include that he was inexperienced or incompetent, deceived by Kormoran's disguise, the idea that he was under conflicting orders instructing that raiders be attacked at range but enemy supply ships be captured, or that he was trying to clearly identify the merchantman.
[180] Mearns, with the aid of other researchers, focused on primary sources (rediscovering several archive files and diaries in the process), and came to the conclusion that the German accounts were true, and that the ship would be found at the northern position.
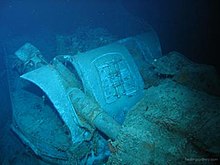
[191] The bow of the cruiser had broken off as the ship sank, and was located at the opposite end of a debris field stretching less than 500 metres (1,600 ft) north-west from the hull, which was sitting upright on the ocean floor.
[197] In April 2015, an expedition to the wrecks by Curtin University and the Western Australian Museum commenced, with the objective of using 3D imaging to map the wrecksites for further study, and to determine if any deterioration since the 2008 discovery requires the development of a conservation management plan.