Huon Peninsula campaign
The campaign formed the initial part of an offensive that the Allies launched in the Pacific in late 1943 and resulted in the Japanese being pushed north from Lae to Sio on the northern coast of New Guinea over the course of a four-month period.
[5] Allied planners began formulating their plans for the future direction of the fighting in the wider Pacific with a focus upon retaking the Philippines and the eventual capture of the Japanese Home Islands.
A veteran formation of the all-volunteer Second Australian Imperial Force (2nd AIF), the 9th Division was vastly experienced, having fought in the North African campaign, where it had held Tobruk against a German onslaught earlier in the war and had been heavily engaged at the First and Second Battle of El Alamein.
24 Squadron RAAF equipped with Vultee Vengeance dive bombers; these units undertook numerous close air support and resupply missions throughout the campaign.
[16] Due to the impracticalities of using wheeled transport in the jungle, Allied logistics was undertaken primarily by means of water transport such as landing craft and barges which moved supplies along the coast, with overland supply to combat units being completed by New Guinean labourers and,[17] at times, by Australian combat troops themselves, which were re-roled temporarily to undertake portage tasks as required,[18] and augmented where possible with jeeps.
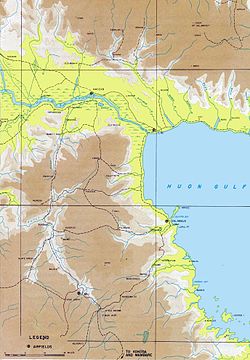
These units were situated across a broad area between the Mongi River, east of Lae to Arndt Point, Sattelberg, Joangeng, Logaweng, Finschhafen, Sisi and on Tami Island.
[27] Once the supplies had been landed, resupply parties were used to carry the stores overland on foot along a number of key tracks to their main troop concentrations around Sattelberg and Finschhafen.
[19] In contrast, the Australian force had fought together in previous campaigns and was backed up by a formidable logistical support base that could deliver them a technological and industrial superiority that the Japanese were unable to match.
[32] Following MacArthur's directive to secure the airfields at Lae and Finschhafen, the Commander-in-Chief Allied Forces, South West Pacific Area, General Thomas Blamey, an Australian, ordered the capture of the Huon Peninsula.
[41] The Australians then began the arduous advance west towards Lae, passing through "thick jungle, swamps, kunai grass and numerous rain-swollen rivers and streams" which, along with heavy rain, slowed their progress.
[49] Navigational errors resulted in the troops being landed on the wrong beaches, with some of them coming ashore at Siki Cove and taking heavy fire from the strong Japanese defences in pillboxes and behind obstacles.
The Japanese had established strong defences along the river's southern bank, which the Australians attempted to outflank by sending a force to the west, climbing through steep terrain.
[54] After an attack across the Ilebbe Creek by the 2/13th Infantry Battalion, which cost the Australians 80 casualties on 1 October,[47] the Japanese naval troops which were holding Finschhafen began to withdraw.
[55] When the Japanese counterattack came, signalled by a bonfire on Sattelberg,[58] the first wave fell upon the 24th Brigade around Jivevaneng on 16 October but the attack, having been put in a piecemeal fashion,[59] was pushed back.
[12] The next day Japanese aircraft attacked Allied forces around Scarlet Beach and this was followed shortly an amphibious landing which was all but destroyed at sea by fire from American and Australian anti-aircraft and machine-guns.
[12] It was during this assault that an American soldier, Private Nathan Van Noy, from the 532nd Engineer Boat and Shore Regiment, performed the actions for which he was later posthumously awarded the Medal of Honor.
[60] Only a small number of Japanese managed to make it ashore amidst the devastating fire and, by the following day, these all had been killed or wounded by Australian infantry conducting mopping up operations.
The Japanese exploited the gaps in the line between the 2/28th Infantry and the 2/3rd Pioneer Battalions,[61] and launched an attack towards the coast with the objective of capturing the high ground 1.7 miles (2.7 km) west of Scarlet Beach,[12] and splitting the Australian forces at Katika.
[61] Australian resistance was strong despite giving up the advantage of the high ground, with field and anti-aircraft artillery engaging at ranges as short as 220 yards (200 m) "over open sights".
[67] An old German mission, Sattelberg lay roughly 5 miles (8.0 km) inland and due to its size and height – 3,150 feet (960 m) – its possession by a large force of Japanese posed a significant threat in the minds of the Australian commanders.
[69] The advance got off to a bad start initially as it was hampered in the inland area by the prevalent rugged terrain which consisted largely of thick jungle and steep "razor-back" ridges.
He sent columns of infantry, no more than company-size, to advance along "narrow fronts" ahead of one or two tanks, with engineers in support to improve the track or deal with "booby traps" or mines as they were found.
[73] Initially, this had just been conceived as a holding action to protect the 2/48th's flank, but due to the slow progress on the main track, at this point, the Whitehead decided to change his strategy, determining to use a "double-pronged" attack, with the 2/24th also attempting to break through to Sattelberg from the north.
[83] On 19/20 November, three companies from the 2/32nd Infantry Battalion, under the command of Major Bill Mollard, occupied the position, and began to attack the Japanese resupply parties that were moving through the area, inflicting heavy casualties.
[86] In an effort to retake Pabu and the ground north of the Song River, a force consisting of two Japanese battalions, from the 79th and 238th Infantry Regiments, advanced south along the coastal track from Bonga.
[95] The first stage of Wootten's plan involved advancing north and securing a line along a ridge that ran between Gusika, on the coast, and Wareo, which was 4.35 miles (7.0 km) inland.
The following morning, the Australians launched a costly and unsuccessful company-level attack against the ridge, but after darkness the Japanese abandoned the position, allowing the 2/15th to occupy it and then clear Nongora on 2 December.
To the north of the abandoned village, the Japanese were positioned in strength and they launched a strong counterattack, which retook the vital high ground for them but was checked from progressing further by a heavy Australian artillery bombardment.
The most significant action during this time took place on 11 December when the 2/24th Infantry Battalion attacked the 2200 feature north-east of Wareo, near the Christmas Hills, which resulted in 27 Japanese killed.
One Australian veteran, Sergeant Charles Lemaire, who had previously fought against the Germans at El Alamein with the 2/17th Infantry Battalion, described the Japanese as "tenacious, brave, self-sacrificing".