John Balmer
John Raeburn Balmer, OBE, DFC (3 July 1910 – 11 May 1944) was a senior officer and bomber pilot in the Royal Australian Air Force (RAAF).
An instructor at Point Cook from 1935 to 1937, he achieved renown in Air Force circles when he reportedly parachuted from a training aircraft to motivate his pupil to land single-handedly.
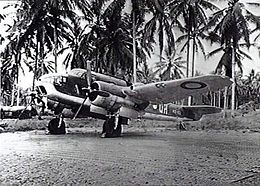
Appointed an Officer of the Order of the British Empire in June 1942, he led the Beauforts on bombing and torpedo missions against Japanese targets in the New Guinea campaign.
[1][5] Nicknamed "Sam", Balmer undertook flying instruction on the 1933 "B" (reservists) course conducted at RAAF Station Point Cook, Victoria, where his classmates included future group captain John Lerew.
He gained a reputation as a hard taskmaster, and on one occasion—according to RAAF folklore—parachuted from a training aircraft to give his student the proper motivation to make a solo landing, though at least one newspaper at the time reported that he had in fact fallen out.
[1][8] On 15 August 1938, Balmer was forced to crash land an Avro Anson near Whitfield, Victoria, after its wings iced up—one of a series of accidents that befell the type following its introduction to Australian service.
[10] Parallel to his Air Force career, in the years leading up to the outbreak of World War II Balmer gained national attention as a long-distance motorist.
Partnered by a fellow officer, he set a cross-country record of 65 hours and 10 minutes travelling from Perth, Western Australia, to Melbourne in December 1936.
[14] On occasion, Balmer detected Japanese luggers that were illegally fishing in Australian waters and, according to Mark Johnston, overflew them at such a low altitude that "his Hudson's slipstream rocked the boats violently" and the crew "shook their fists" at him.
[19][20] In tribute to its original incarnation, Balmer adopted the RAF unit's crest, which featured a skull-and-crossbones emblem and the motto Sarang Tebuan Jangan Dijolok (Malay for "Do not stir up a hornet's nest").
100 Squadron transferred to Mareeba in Far North Queensland on 22 May, after Balmer decided that a proposed base at Cairns was unsuitable owing to periodic flooding.
[22] While his crews at Mareeba gained experience on maritime patrols, he travelled to Port Moresby, New Guinea, on 26 May to test the Beaufort in operational conditions; as he came in to land he was fired upon by US anti-aircraft batteries, whose gunners had "never seen a Goddamn aircraft like that before", but escaped damage.
[19] The unit withdrew to Laverton for training and patrol work during July and August, before moving to Milne Bay to again take part in the New Guinea campaign.
6 and 100 Squadrons were given what the official history of the RAAF in World War II called the "huge task" of keeping open the sea lanes between Australia and New Guinea, while disrupting as best they could Japanese lines of communication and supply.
The units kept up a punishing schedule of daily long-range reconnaissance and anti-submarine patrols, according to the official history, "practically without navigation aids, frequently through rain storms and heavy cloud" but, "supported by ground staffs as enduring as themselves, the crews maintained an almost inflexibly high standard and achieved considerable success".
[28] On the night of 4/5 October, Balmer took ten of his Beauforts from Milne Bay on a far-ranging assault against Japanese ships in the vicinity of the Shortland Islands, near Bougainville.
The squadron had been raised under Article XV of the Empire Air Training Scheme, and operated Avro Lancaster heavy bombers.
[33] The statistical likelihood of surviving an operational tour of 30 missions in Bomber Command was never more than 50 per cent, and during the Battle of Berlin, loss rates were far higher.
467 Squadron began to concentrate on targets in France and Belgium as the Allied air campaign shifted focus from strategic bombing to destroying airfields and disrupting lines of communication prior to the invasion of the continent.
[1][37] Considered a "dynamic" leader and a "brilliant" pilot,[1][10] Balmer was decorated with the Distinguished Flying Cross (DFC) for "great skill and devotion to duty" during "a varied tour of operations"; promulgated in the London Gazette on 18 April, the award citation further described him as "a most efficient squadron commander, whose keenness and zeal have set a fine example".
Rather than take disciplinary action, Balmer allowed the man medical leave and sought out respite for him in the country, after which the pilot returned to active duty and completed his tour of operations.
In an effort to shore up the morale of his younger crews, Balmer decided to personally lead their next mission the following night, against a military camp at Bourg-Léopold (Leopoldsburg), Belgium.
[40] Initially posted as missing, Balmer and his crew were later confirmed to have died when their Lancaster crashed near Herenthout in provincial Antwerp after being attacked by a night fighter.