Naval Battle of Guadalcanal
[4] By nightfall on 8 August, the 11,000 Allied troops secured Tulagi, the nearby small islands, and a Japanese airfield under construction at Lunga Point on Guadalcanal (later renamed Henderson Field).
[6] Because of the threat posed by CAF aircraft based at Henderson Field, the Japanese were unable to use large, slow transport ships to deliver troops and supplies to the island.
The Japanese warships—mainly light cruisers or destroyers from the Eighth Fleet under the command of Vice Admiral Gunichi Mikawa—were usually able to make the round trip down "The Slot" to Guadalcanal and back in a single night, thereby minimizing their exposure to air attack.
Enabling the approach of the transport convoy was a nighttime bombardment of Henderson Field by two battleships on 14 October that heavily damaged the airfield's runways, destroyed half of the CAF's aircraft, and burned most of the available aviation fuel.
The Army requested assistance from Yamamoto to deliver the needed reinforcements to the island and to support their planned offensive on the Allied forces guarding Henderson Field.
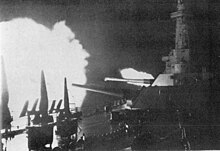
Equipped with special fragmentation shells, they were to bombard Henderson Field on the night of 12–13 November and destroy it and the aircraft stationed there in order to allow the slow, heavy transports to reach Guadalcanal and unload safely the next day.
This hurt Callaghan's forces because Buchanan was the destroyer that was able to successfully fire torpedoes that permanently disabled and sank the heavy cruiser Furutaka at the Battle of Cape Esperance, the first American sinking of a large Japanese warship due to surface ships.
The convoy of slower transport ships and 12 escorting destroyers, under the command of Raizō Tanaka, began its run down The Slot from the Shortlands with an estimated arrival time at Guadalcanal during the night of 13 November.
Abe was apparently surprised by the proximity of the U.S. ships, and with decks stacked with San Shiki special bombardment (rather than armor penetrating) munitions, he was momentarily uncertain if he should withdraw to give his battleships time to rearm, or continue onward.
[50][51] Blasted into a floating wreck by over 20 shell hits and lit up by a massive fire in just one minute, Cushing could only respond with machine gunfire, which managed to kill a sailor on Yukikaze's deck but otherwise caused only cosmetic damage.
Portland fired on her and scored several hits with her main guns, while the back flotilla of US destroyers, Aaron Ward, Barton, Monssen, and Fletcher quickly closed the range to attack Hiei.
[56][57][58] The destroyer Laffey evaded the burning Cushing and ran into a rain squall, and several minutes later discovered Hiei so close that they missed colliding by 20 ft (6 m), only avoiding the collision by accelerating.
[61] Along with Kirishima, Inazuma, and Ikazuchi, the four ships made repeated hits on San Francisco, disabling her steering control and killing Callaghan, Captain Cassin Young, and most of the bridge staff.
Not expecting a ship-to-ship confrontation, it took the crews of the two Japanese battleships several minutes to switch to armor-piercing ammunition, and San Francisco, almost helpless to defend herself, managed to momentarily sail clear of the melee.
[54][71] Portland was still firing on Hiei when she was hit by a torpedo from Inazuma or Ikazuchi which blew a 60 foot hole in the stern, jamming her rudder in a 5 degree turn to port and disabling her aft 8-inch (203 mm) gun turret.
[69][74] Immediately afterwards, Amatsukaze nearly collided with the retreating San Francisco, and initially Commander Hara didn't recognize the cruiser as an enemy warship due to the sheer number of deformities inflicted on her by Hiei and Kirishima's gunfire.
[94] During the morning and early afternoon, IJN carrier Jun'yō under the command of Vice Admiral Kakuji Kakuta, which was located about 200 miles north of the Solomons, dispatched several combat air patrols, consisting of Mitsubishi A6M Zero fighters and Nakajima B5N and Aichi D3A bombers (for navigational aid), to cover the crippled Hiei.
[98] Departing from the Solomon Islands area with San Francisco, Helena, Sterett, and O'Bannon later that day, Juneau and the other warships were detected by the Japanese submarine I-26, which fired three torpedoes.
[103] Shortly before noon, Yamamoto ordered Vice Admiral Nobutake Kondō, commanding the Second Fleet at Truk, to form a new bombardment unit around Kirishima and attack Henderson Field on the night of 14–15 November.
The battleship Kirishima, after abandoning her rescue effort of Hiei on the morning of 13 November, steamed north between Santa Isabel and Malaita Islands with her accompanying warships to rendezvous with Kondo's Second Fleet, inbound from Truk, to form the new bombardment unit.
Suzuya and Maya, under the command of Shōji Nishimura, bombarded Henderson Field while the rest of Mikawa's force cruised around Savo Island, guarding against any U.S. surface attack (which in the event did not occur).
[b] 2 fast battleships 4 destroyers At 22:55 on 14 November, radar on South Dakota and Washington began picking up Kondo's approaching ships near Savo Island, at a distance of around 18,000 m (20,000 yd).
South Dakota tried to follow but had to turn to starboard to avoid Benham which resulted in the ship being silhouetted by the fires of the burning destroyers and made her a closer and easier target for the Japanese.
[132] Almost blind and unable to effectively fire her main and secondary armament, South Dakota was illuminated by searchlights and targeted by gunfire and torpedoes by most of the ships of the Japanese force including Kirishima, beginning around midnight on 15 November.
Although able to score a few hits on Kirishima, South Dakota took 26 hits—some of which did not explode—that completely knocked out her communications and remaining gunfire control operations, set portions of her upper decks on fire, and forced her to try to steer away from the engagement.
At length, believing that the way was clear for the transport convoy to proceed to Guadalcanal (but apparently disregarding the threat of air attack in the morning), Kondo ordered his remaining ships to break contact and retire from the area about 01:04, which most of the Japanese warships complied with by 01:30.
[145] Kondo, who also held the position of second in command of the Combined Fleet, was a member of the upper staff and battleship "clique" of the Imperial Navy, while Abe was a career destroyer specialist.
These supplies and replacements were not enough to sustain Japanese troops on the island, who – by 7 December 1942 – were losing about 50 men each day from malnutrition, disease, and Allied ground and air attacks.
[149]General Alexander Vandegrift, the commander of the troops on Guadalcanal, paid tribute to the sailors who fought the battle: We believe the enemy has undoubtedly suffered a crushing defeat.
All those efforts are appreciated but our greatest homage goes to Callaghan, Scott and their men who with magnificent courage against seemingly hopeless odds drove back the first hostile attack and paved the way for the success to follow.