Thomas Blamey
During the First World War, he participated in the landing at Anzac Cove on 25 April 1915, and served as a staff officer in the Gallipoli campaign, where he was mentioned in despatches for a daring raid behind enemy lines.
On the orders of MacArthur and Prime Minister John Curtin, he assumed personal command of New Guinea Force during the Kokoda Track campaign, and relieved Lieutenant General Sydney Rowell under controversial circumstances.
After correspondence with the military authorities he persuaded the Deputy Assistant Adjutant General, Major Julius Bruche, that he should be given the option of taking up an appointment for one of the vacancies in another state.
His first child was born on 29 June 1910, and named Charles Middleton after a friend of Blamey's who had died in a shooting accident; but the boy was always called Dolf by his family.
[11] Along with Bridges, White, and other members of 1st Division headquarters, Blamey left the battleship HMS Prince of Wales in a trawler and landed on the beach at Anzac Cove at 07:20 on 25 April 1915.
[20] Its commander, Major General James Gordon Legge, preferred to have an Australian colonel in this post as he felt that a British officer might not take such good care of the troops.
[22] At the Battle of Pozières, he developed the plan of attack which captured the town,[23] for which he received another mention in despatches,[24] and was awarded the Distinguished Service Order in the 1917 New Year Honours.
[36] For his services as Corps Chief of Staff, Blamey was appointed Companion of the Order of the Bath in 1919,[37] mentioned in despatches twice more,[38][39] and was awarded the French Croix de guerre.
In order to cover up the identities of the two women involved, Blamey initially issued a press release to the effect that Brophy had accidentally shot himself (three times).
Like the station's general manager, Alfred Kemsley, Blamey felt that Australians were poorly informed about international affairs, and set about raising awareness of matters that he believed would soon impact them greatly.
[70] Two other officers, Major Generals Gordon Bennett and John Lavarack, were considered, and also had strong and well-connected supporters, but unlike Blamey they were public critics of the government's defence policies.
Menzies limited his choice of commanders by insisting that they be selected from the Militia rather than the Permanent Military Forces (PMF), the Army's full-time, regular component.
[77] He refused to allow his troops to perform police duties in Palestine, and established warm relations with the Jewish community there, becoming a frequent guest in their homes.
[85][86][87] His foresight and determination saved many of his men, but he lost credibility when he chose his son Tom to fill the one remaining seat on the aircraft carrying him out of Greece.
[91][92] However, to ensure that command would not pass to Blamey in the event of something happening to Wavell, the British government promoted Sir Henry Maitland Wilson to general in June.
[94] During the Syrian campaign against the Vichy French, Blamey took decisive action to resolve the command difficulties caused by Wilson's attempt to direct the fighting from the King David Hotel in Jerusalem by interposing Lavarack's I Corps headquarters.
[95] During Blamey's absence in Greece, AIF units had become widely scattered, with forces being deployed to Cyprus, and the 9th Division and the 18th Infantry Brigade coming under siege in Tobruk.
Menzies, and later his successors, Arthur Fadden and John Curtin, backed Blamey, and Auchinleck and Churchill were forced to give way resulting in the relief of most of the Australian troops by the British 70th Division.
In March 1942, Vasey, Herring and Steele approached the Minister for the Army, Frank Forde, with a proposal that all officers over the age of 50 be immediately retired and Major General Horace Robertson be appointed commander-in-chief.
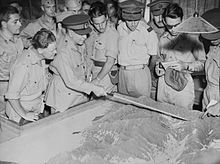
According to Lieutenant General George Kenney, the commander of Allied Air Forces, Blamey "frankly said he would rather send in more Australians, as he knew they would fight ... a bitter pill for MacArthur to swallow".
His greatness was demonstrated almost daily by a knowledge unparalleled in Australia of how an army should be formed and put to work; by his exercise of the vital field command at the same time as he kept within his grasp a vastly detailed control of the Australian Army as a whole; by his sagacity and strength in meeting the rapidly changing demands of a difficult political situation; by his ability speedily to encompass the requirements of the new war and plan far ahead of the events of the day as he controlled them; by his generally unappreciated humanity.
[132] In February 1944 there was criticism in Parliament of the way that Blamey had "side tracked" various generals; the names of Bennett, Rowell, Mackay, Wynter, Herring, Lavarack, Robertson, Morshead and Clowes were mentioned.
He urged that the Empire Air Training Scheme be curtailed, and opposed MacArthur's proposal to use the Australian Army primarily for logistic support and leave combat roles principally to American troops.
[139] On 5 April 1944, Blamey departed for San Francisco on board SS Lurline for the first leg of a voyage to attend the 1944 Commonwealth Prime Ministers' Conference in London as part of Curtin's party.
Blamey vigorously defended his aggressive policy to reduce the bypassed Japanese garrisons and free the civilian population, but some felt that he went too far in putting his case publicly in a national radio broadcast.
In some places this created tensions and rivalry which adversely affected Blamey's reputation, through no fault of his own; also the ambiguous relationship between his headquarters and MacArthur's led to disagreements of which at least the Ministers were aware.
In the end, Forde decided to give Blamey the Buick staff car he had used during the war, which had clocked up 50,000 miles (80,000 km) in the Middle East and the South West Pacific.
[152] In September 1948, Blamey paid a visit to Japan, where he was warmly greeted on arrival at Iwakuni by Horace Robertson, the commander of the British Commonwealth Occupation Force, who also provided an RAAF honour guard.
Ten of his lieutenant generals served as pallbearers: Frank Berryman, William Bridgeford, Edmund Herring, Iven Mackay, Leslie Morshead, John Northcott, Sydney Rowell, Stanley Savige, Vernon Sturdee and Henry Wells.
[164] A statue of Blamey stands in Kings Domain, Melbourne, on the corner of Government House Drive and Birdwood Avenue, opposite that of John Monash.