6th Battalion, Royal Warwickshire Regiment
Converted to an Anti-Aircraft (AA) role, it defended the West Midlands during The Blitz in the early part of World War II, and then joined Eighth Army in North Africa, including service in the famous Siege of Tobruk and in the Italian Campaign.
[5][6][12] The 5th and 6th Battalions continued to share a drill hall at Thorp Street, Birmingham, and both were in the Warwickshire Brigade of the TF's South Midland Division.
[12][13] On the outbreak of war in August 1914 the units of the South Midland Division had just set out for annual training when orders recalled them to their home depots for mobilisation.
[13][14][16][15][17] The South Midland Division was selected to proceed to France to join the British Expeditionary Force (BEF) early in 1915, and the 1/6th Royal Warwicks disembarked at Le Havre at the beginning of April.
Even before Zero hour the 'jumping-off' trenches came under fire from 'crumps' of enemy artillery, and machine guns began playing over No man's land from both flanks.
Running short of hand grenades and ammunition, and attacked by German troops moving down from Serre, the survivors were forced back from Munich Trench to the Quadrilateral.
[20][21][22][23][24] The 1/6th Bn was involved in the following further operations while serving on the Western Front:[13][16] On 10 November 1917 the 48th Division received orders to move to Italy.
It was not until the 2nd South Midland Division concentrated at Northampton in January 1915 that the men were issued with .256-in Japanese Ariska rifles with which to train.
[5][14][15][26][27] In February and March 1916 the units of 61st Division moved to Salisbury Plain to begin final training for overseas service.
[27] Thereafter, the battalion was involved in the following operations:[26][27] Due to the manpower shortage being suffered by the BEF, 2/5th Royal Warwicks was disbanded on 20 February 1918, some of the men being drafted into the 2/6th Bn.
A and C Companies made the raid on Cepy Farm at 22.00 and obtained prisoners from three regiments and two separate divisions, indicating that the German lines were packed ready for an attack.
On 1 October, 182nd and 184th Bdes attacked behind a deep barrage at 05.40 against little resistance and then followed German rearguards over broken ground well beyond the original objectives.
But at 09.30 a strong German counter-attack was made, supported by captured British tanks, which pushed the brigade's flank back to the Rhonelle.
A group of officers from the regiment volunteered to join the Regular 4th AA Rgt for service with the British Expeditionary Force (BEF) in France.
[53][54]) While at Southend, one Troop of 484 (Carmarthenshire) Searchlight (S/L) Bty (also awaiting embarkation) was attached to it, and Lt-Col Mortimer Ruffer took over as CO on 18 November.
[40][55][56][57] However, the move overseas was cancelled for the rest of the regiment (RHQ, 192 and 199 Btys), which waited at Southend until 25 February 1941 when the order to mobilise was repeated.
[59][60] On 17 August 1941, RHQ embarked at Alexandria aboard HMAS Nizam of the 'Tobruk Ferry Service', which sailed during the night to the besieged port of Tobruk.
[69][62][70] The Royal Artillery historian notes that the Stuka attacks concentrated on gun positions, which was a serious threat to HAA sites, whose instruments could not cope with the rapid height changes.
The gunners devised a tactic of opening fire with short fuzes just before the dive started, to force the pilots to fly through a ring of bursts.
[62][70][71] There was an alert for possible paratroop attack on 19 November when four Junkers Ju 52 transport aircraft flew low along the coast: one was shot down by fire from RHQ's LMGs and Shrapnel shells from 153 HAA Bty.
[59] In the last two months of the siege, troops of HAA guns took it in turn to move out to the perimeter and take on ground targets under the control of 9th Australian Division.
By then the harbour defences under 69th HAA Rgt were:[59] Lieutenant-Colonel Ruffer, who had acted a brigade commander on occasions, was awarded the Distinguished Service Order (DSO) after the siege.
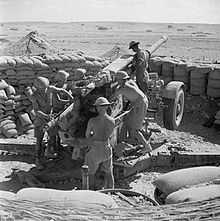
[59][73][74] At Sollum, Lt-Col Ruffer was appointed AADC, and had four batteries of 61st LAA Rgt under his command, positioned to cover gaps in the barbed wire defences, later withdrawn to provide close AA protection for the field gun and HAA sites.
Enemy air activity preceding the Second Battle of El Alamein was sporadic, but during one attack on the railway 192 HAA Bty shot down three Messerschmitt Bf 109s.
In April the regiment was 'diluted' (as the process was officially described) by 250 Bechuana troops of 1975 AA Company, African Pioneer Corps (APC), to be trained as gunners.
It deployed to defend a group of USAAF landing grounds around Marble Arch, with Lt-Col Ruffer as AADC and 122/13 LAA Bty under command.
On 10 August the regiment set out on the coast road once more, this time back to the Nile Delta, arriving at the end of the month, when the troops were given leave and training.
RHQ shared a building with 41 AAOR (later replaced by a Gun Operations Room (GOR) manned by 69th Rgt) and established cooperation with RAF and Italian Co-belligerent Navy and AA HQs, though the small signal detachment struggled to set up and maintain all the necessary communications.
323 (Surrey) S/L Bty of 30th S/L Rgt ringed the harbour with 21 lights equipped with searchlight control radar (SLC or 'ELSIE') and 112 Company, Pioneer Corps, manned smoke dischargers.
After the disastrous Air raid on Bari in December, Lt-Col Burns laid great stress on training, blackout precautions, and improving communications and liaison, including using Italian Co-belligerent Army AA units.