Battle of Balikpapan (1945)
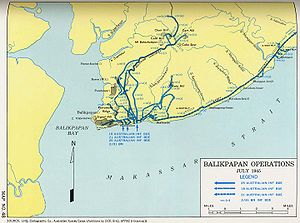
The Australian 7th Division, composed of the 18th, 21st and 25th Infantry Brigades, with a small number of Netherlands East Indies KNIL troops, made an amphibious landing, codenamed Operation Oboe Two, a few miles north of Balikpapan.
[7] British and Dutch forces attempted to resist, but were quickly overwhelmed, but not before destroying or damaging the oil facilities and other important infrastructure.
The destruction of these facilities led to harsh reprisals against civilians, particularly at Balikpapan, which was occupied in late January 1942, after which the entire European population – around 80 to 100 people – was executed.
[11] In the early months of 1944, Royal Australian Air Force Catalina flying boats carried out a series of highly successful mining operations,[12] which reduced the output of Balikpapan's facilities by an estimated 40 percent.
[11] In late September and early October 1944, the US Thirteenth and Fifth Air Forces began long range bombing raids from Noemfoor.
[13][14] This, coupled with Allied operations along Japanese sea lanes of communication, effectively cut off Japan from Balikpapan's oil supply line.
[21] In the planning phase the commander of the Australian Military Forces, General Thomas Blamey recommended against the landing at Balikpapan, believing that it would serve no strategic purpose.
[24] Japanese preparations to defend against Allied landings in Borneo commenced in 1944, with the garrison forces being reorganised and an operational command being set up under the Thirty-Seventh Army.
[29] The main Japanese units were Rear Admiral Michiaki Kamada's 22nd Naval Base Force and elements of the 71st Independent Mixed Brigade.
[30][31] The Japanese holding Balikpapan town consisted of the 2nd Garrison Force – armed labourers, base troops, artillerymen along with a small number of marines – and elements of the 454th Independent Infantry Battalion.
Food and supplies dwindled and units were forced to commence subsistence operations as the majority of troops began to suffer from malnutrition.
The beaches were dotted with Dutch-built concrete pillboxes while the Japanese had dug a complex trench system on the ridges overlooking the town.
The 7th Division had seen action earlier in the war in the Middle East and in New Guinea, but had been resting on the Atherton Tablelands in Queensland when they were assigned to the operation.
[1][24] A shortage of shipping hampered the preliminary movement of troops and a lack of co-ordination and scheduling meant that tactical level planning and battle preparation was carried out in a hasty fashion.
Further west, around Stalkoedo and Klandasan, the beach was more suitable to a large-scale landing operation, but this area was where the majority of the Japanese defences were located.
Additionally, the water in this area was not as deep, and as a result the supporting cruisers would have to stand further out to sea, which would reduce the accuracy of their guns when firing on shore targets.
Ultimately, the Australian commander, Milford, chose to land at three beaches across a 2,000-yard (1,800 m) front in the area occupied by the main Japanese forces, reasoning that the shorter approach march outweighed the risks, which would be reduced by a comprehensive pre-landing aerial and naval bombardment.
[27] While the assigned troops were moving from Queensland to the mounting base at Morotai, the Allies began enacting a deception plan to draw Japanese attention away from the intended landing area.
[53][54] The assaulting troops were landed at the wrong place due to obscuration of key features ashore as a result of the pre-landing bombardment, and a failure to clear all of the beach obstacles.
During the fighting around Klandasan, the 2/10th Battalion attacked a feature dubbed Parramatta Ridge, which was strongly fortified with pillboxes, tunnels, land mines and booby traps.
[54] The fighting for the high ground around Klandasan continued throughout 2 July where the Japanese – largely from the 2nd Garrison Force and elements of the 454th Independent Infantry Battalion[32] – resisted strongly,[60] during which Australian engineers worked to destroy large numbers of Japanese tunnels, as well as neutralising thousands of land mines and booby traps.
Elements of the Japanese 454th Independent Infantry Battalion occupied strong positions in the high ground overlooking the field, and were able to call down heavy concentrations of mortar and artillery fire.
[51] However, heavy fighting took place along the Milford Highway on 5–6 July as part of a Japanese battalion attempted to block the Australian advance on Batuchampar.
The Australians brought up tanks equipped with flamethrowers, and called in a heavy artillery barrage to clear the firmly entrenched defenders;[27] over 8,000 rounds were expended in this effort.
[50] This withdrawal was conducted in good order, and the Australians noted the skill and determination with which the Japanese sited and held their defensive positions during this time.
[69][70] Major operations had ceased by 21 July, when the Japanese abandoned Batuchampar and Manggar,[50] although small scale clashes continued until the end of the war.
However, troops from the 22nd Special Base Force attempted to break into the port facilities around Balikpapan in August from the western side of the bay, and several minor actions were fought during this time.
Additionally, much of the port area and oil producing facilities were heavily damaged by the pre-invasion bombardment and by Japanese sabotage efforts, rendering them useless to the Allies in the short term.
The 21st Brigade was detached to Makassar in the Celebes Islands to accept surrender of the Japanese forces, release prisoners of war and maintain civil order.
[79] A memorial commemorating the 7th Division landing was built in a roundabout in Balikpapan (currently in East Kalimantan, Indonesia) near Merdeka Square and Pertamina complex.