Battle of Isandlwana
[12] The Zulus were equipped mainly with the traditional assegai iron spears and cow-hide shields,[13] but also had a number of muskets and antiquated rifles.
The Zulus had a vast disadvantage in weapons technology,[19] but they greatly outnumbered the British and ultimately overwhelmed[20] them, killing over 1,300 troops, including all those out on the forward firing line.
[19] Isandlwana resulted in the British taking a much more aggressive approach in the Anglo–Zulu War, leading to a heavily reinforced second invasion,[24] and the destruction of King Cetshwayo's hopes of a negotiated peace.
[26] Some of the obstacles to such a plan were the presence of the independent states of the South African Republic and the Kingdom of Zululand, both of which the British Empire would attempt to overcome by force of arms.
[30] When the ultimatum expired a month later, Bartle Frere ordered Lord Chelmsford to proceed with an invasion of Zululand, for which plans had already been made.
[5] The backbone of the British force under Lord Chelmsford consisted of twelve regular infantry companies: six each of the 1st and 2nd Battalions, the 24th Regiment of Foot (which was subsequently renamed the South Wales Borderers).
[44][45] Cetshwayo sent the 24,000 strong main Zulu impi from near present-day Ulundi, on 17 January, across the White Umfolozi River with the following command to his warriors: "March slowly, attack at dawn and eat up the red soldiers.
"[46] On 18 January, some 4,000 warriors, under the leadership of Mavumengwana kaNdlela Ntuli, were detached from the main body to meet with Dabulamanzi kaMpande and attack Charles Pearson's No.
They were preceded by a screening force of mounted scouts supported by parties of warriors 200–400 strong tasked with preventing the main columns from being sighted.
The experience of numerous colonial wars fought in Africa was that the massed firepower of relatively small bodies of professional European troops, armed with modern firearms and artillery and supplemented by local allies and levies, would march out to meet the natives whose poorly equipped armies would put up a fight but in the end would succumb.
Rather than any fear that the camp might be attacked, his main concern was managing the huge number of wagons and oxen required to support his forward advance.
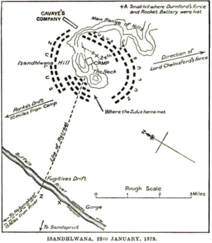
[55] Around 10:30 am, Colonel Anthony Durnford, whose left arm was paralyzed from wounds sustained at Bushman's River Pass during the pursuit of Chief Langalibalele, arrived from Rorke's Drift with 500 men of the Natal Native Contingent and a rocket battery of the No.
The failure to secure an effective defensive position, the poor intelligence on the location of the main Zulu army, Chelmsford's decision to split his force in half, and the Zulus' tactical exploitation of the terrain and the weaknesses in the British formation, all combined to prove catastrophic for the troops at Isandlwana.
Even though the indunas lost control over the advance, the warriors' training allowed the Zulu troops to form their standard attack formation on the run, with their battle line deployed in reverse of its intended order.
Durnford's men, upon meeting elements of the Zulu centre, had retreated to a donga, a dried-out watercourse, on the British right flank where they formed a defensive line.
[68][69] An officer in advance of Chelmsford's force gave this eyewitness account of the final stage of the battle at about 3:00 pm: In a few seconds we distinctly saw the guns fired again, one after the other, sharp.
Evidence shows that many of the bodies, today marked by cairns, were found in several large groups around the camp – including one stand of around 150 men.
[75] A Zulu account relates the single-handed fight by the guard of Chelmsford's tent, a big Irishman of the 24th who kept the Zulus back with his bayonet until he was speared and the general's Union flag captured.
[76] Garnet Wolseley, who replaced Chelmsford, felt otherwise at the time and stated, "I don't like the idea of officers escaping on horseback when their men on foot are being killed.
Although it is impossible to say with certainty, at least 1,000 were killed outright in the assault..."[82] Historian Mike Snook estimated 1,500-2,000 Zulu dead, with a similar number wounded.
When the location of the main Zulu Impi was discovered by British scouts, the Zulus immediately advanced and attacked, achieving tactical surprise.
[99] The official interrogation by Horse Guards under the direction of the Duke of Cambridge, the Field Marshal Commanding in Chief, in August 1879, concluded that the primary cause of the defeat was the "under estimate formed of the offensive fighting power of the Zulu army", additionally the investigation questions Chelmsford as to why the camp was not laagered and why there was a failure to reconnoitre and discover the nearby Zulu army.
[100] Colenso calls Chelmsford's neglecting to follow his own "Regulations for Field Forces in South Africa", which required that a defensible camp be established at every halt, fatal.
The most egregious failure to respond occurred at around 1:30 pm when a message from Hamilton-Browne stating, "For God's sake come back, the camp is surrounded, and things I fear are going badly", was received by Lieutenant-Colonel Harness of the Royal Artillery and Major Black of the 2/24.
They were leading the other four RA guns as well as two companies of the 2/24 and on their own initiative immediately marched back towards Isandlwana and had gone some two miles when they were ordered to return to Mangeni Falls by an aide sent by Chelmsford.
[102] At long last but too late, finally Chelmsford became convinced of the seriousness of the situation on his left flank and rear when at 3:30pm he joined Hamilton-Browne's NNC and realised the camp had been taken.
Meanwhile, an NNC officer, Rupert Lonsdale, who had left Chelmsford's force to get rations for his men, had found the camp in Zulu hands and experienced a narrow escape.
Immediately following the battle, Zulu Prince Ndanbuko urged them to advance and take the war into the colony but they were restrained by a commander, kaNthati, reminding them of Cetshwayo's prohibiting the crossing of the border.
Chelmsford, however, avoided handing over command to Wolseley and managed to defeat the Zulus in a number of engagements, the last of which was the Battle of Ulundi, followed by capture of King Cetshwayo.
[121] Wolseley wrote on 30 September 1879 when, later in the war, the Prince Imperial of France was killed by the Zulu: "I think this is very unfair, and is merely a repetition of what was done regarding the Isandlwana disaster where the blame was thrown upon Durnford, the real object in both instances being apparently to screen Chelmsford.