Battle of Magersfontein
Lord Methuen failed to perform adequate reconnaissance in preparation for the impending battle and was unaware that Boer Vecht-generaal (Combat General) De la Rey had entrenched his forces at the foot of the hills, rather than the forward slopes, as was the accepted practice.
In the early days of the war in the Cape Colony, the Boers surrounded and laid siege to the British garrisons in the towns of Kimberley and Mafeking and destroyed the railway bridge across the Orange River at Hopetown.
[4] Substantial British reinforcements (an army corps under General Redvers Buller) arrived in South Africa and were dispersed to three main fronts.
[7] Nevertheless, his army drove the Boers out of their defensive positions along the railway line at Belmont, Graspan, and the Modder River, at the cost of a thousand casualties.
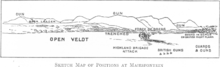
[11] The following day, Cronje moved his forces 10 miles (16 km) north to Scholtz Nek and Spytfontein,[Note 2] where they began to fortify themselves in the hills that made up the last defensible position along the railway line to Kimberley.
Their force now numbered 8,500 fighters,[2] excluding camp followers and the African labourers who performed the actual work of digging the Boer entrenchments.
He found the defences lacking, and realised that Cronje's position at Spytfontein was vulnerable to long range artillery fire from the hills at Magersfontein.
[14] Cronje, who was the more senior officer, disagreed with him, so De la Rey telegraphed his objections to President Martinus Theunis Steyn of the Orange Free State.
The Boers had learnt in earlier battles that the British artillery was superior in numbers to theirs, and could pound any high ground where they placed their guns or rifle pits.
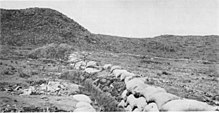
[16] De la Rey recommended, contrary to common practice, that they should entrench themselves forward of the line of kopjes,[Note 3] rather than on the facing slopes.
[17] The trenches overlooking the receding, open ground sloping down towards the British axis of advance afforded the Boers concealment and protection from fire, and permitted them to use the flat trajectory of their Mauser rifles to greater effect.
[18] Since the trenches were concealed, they could thwart the standard British tactic of advancing to within close range under cover of darkness and then storming the Boer position at daybreak.
[19] A final consequence of De la Rey's defensive layout was that the troops would not be able to retreat, as Commandant General Marthinus Prinsloo's forces had done at Modder River.
[19] Before leaving the front, Steyn raised the morale of the Free State burghers[Note 4] by dismissing Prinsloo, who was seen as the chief reason for the defeats in earlier battles.
[25] Methuen's orders show that his intention was to "hold the enemy on the north and to deliver an attack on the southern end of Magersfontein Ridge.
The third column, led by Major-General Sir Henry Edward Colville, was in reserve and was composed of the 12th Lancers, the Guards Brigade, and artillery, engineer, and medical support elements.
[27] As midnight approached, the rain increased to a downpour and the leading elements of the Highland Brigade commenced their advance towards their objective at the southern end of Magersfontein ridge.
[28][30] Wauchope had made a similar night march in his advance on Tel el Kebir in 1882, but this time he was faced not by flat desert terrain and clear skies, but rather by torrential rain, rocky outcrops, and thorn scrub, which caused delays and annoyance.
[35] Wauchope instructed the brigade to extend its order, but in the face of such close-range Boer fire, the changing formation was thrown into disarray and confusion.
The only movement at that time was a team led by Lt. Lindsay, who managed to bring the Seaforth's Maxim forward to provide a degree of fire support.
[37] Methuen ordered all available artillery to provide fire support; the howitzers engaged at 4,000 yards (3,700 m) and the three field batteries at a range of 1 mile (1,600 m).
[37] The remaining Highlanders, now under the command of Lieutenant Colonel James Hughes-Hallet of the Seaforths,[42] had been lying prone under a harsh summer sun for most of the day with the Boers still attempting to encircle them from the south.
[45] Save for seven men, this section was destroyed while valiantly holding back the attack of the Seaforth Highlanders, who were in the process denied access between the hills and prevented from reaching the Boer guns.
[47] In the late afternoon, a Boer messenger bearing a white flag arrived at a Scots Guard outpost to say that the British could send ambulances to collect their wounded lying in front of the trenches at the foot of the hills.
[51] The Boers halted Methuen's advance to relieve the siege of Kimberley, defeated his superior force and inflicted heavy losses, particularly on the Highland Brigade.
[50] Unlike previous occasions, where the Boers withdrew after an engagement, this time Cronje held the Magersfontein defence line,[3][52] knowing that Methuen would again be forced to continue his advance along his logistical railway "lifeline".
[53] On 12 December, when British ambulances again went forward to collect the dead and remaining wounded, they found Wauchope's body within 200 yards (180 m) of Cronjé's trenches.
[55] The animosity that the troops on the ground felt towards their leadership is captured in this contemporary poem by a soldier of the Black Watch: Such was the day for our regiment, Dread the revenge we will take.
Uddgren records 52 men based on identified names, consisting of 26 Swedes, 11 Danes, 7 Finns, 4 Norwegians, and 4 of unknown nationality, of whom all but five were either killed, wounded or captured.
[61] The reverberations of the Black Week defeats led to the hasty approval of large reinforcements being sent to South Africa, from both Britain and the Dominions.