Battle of Ratsua
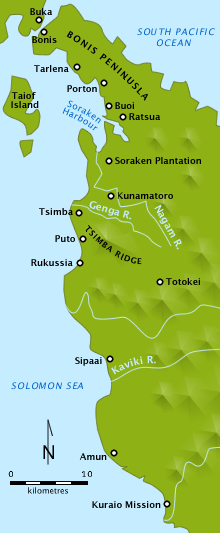
The fighting occurred following a failed landing by Australian forces at Porton Plantation in early June, which was part of an attempt to outflank a series of strong points that the Japanese had built across the base of the Bonis Peninsula.
After this, the fighting in the northern sector around Ratsua essentially became a containment action for the Australians as they concentrated their efforts and resources upon driving south towards Buin, which was the main centre of Japanese resistance on the island at the time.
[2] US Marines conducted an amphibious landing at Cape Torokina, on the western coast of the island, north of Empress Augusta Bay, in November 1943.
[8] The campaign subsequently developed into three separate drives by the Australians, who fanned out from the main Allied base at Torokina: in the north, centre and southern parts of the island.
The first actions were fought around the seizure of Pearl Ridge in late December 1944 to secure control of the east–west avenues of approach across the island, and to prevent any possible Japanese counter-attacks against Torokina.
[12] Meanwhile, Australian troops from the 11th Brigade had continued their advance north from Tsimba Ridge in April–May, clearing up to the Soraken Peninsula,[13] which was captured by the middle of the month by the 26th Infantry Battalion.
[16][17] In an effort to break this resistance and allow the northwards advance to continue, the Australians attempted to outflank the Japanese defensive line by launching an amphibious landing at Porton Plantation on 8 June.
[21][Note 3] In order to concentrate enough forces for the next phase of the operation, Savige decided that the 11th Brigade, which had been carrying the advance north, should be relieved so that it could be transferred to the south following a period of rest and reorganisation.
With each battalion occupying a 4,000-yard (3,700 m) front, which was twice the normal standard, security of their rear areas became difficult as the Japanese took the opportunity to disrupt the Australian logistic efforts, conducting ambushes, cutting communications and planting mines along the tracks.
[25] As the ambushes increased and casualties mounted, forward movement came to a halt, and by 21 July, the 27th Infantry Battalion reported having lost 10 men killed and 36 wounded without having gained any ground.
[24][27] Savige agreed to this on 22 July and the following day the 8th Infantry Battalion launched an attack against a feature known to the Australians as "Como Ridge", which ran roughly northwest to southwest in the centre of the peninsula between Ruri Bay and Buoi Plantation.
As the attack began to falter, one of the wounded, 20-year-old Private Frank Partridge, who had been injured in the arm and thigh,[30] braved the heavy fire that was being put down towards him and gathered the Bren light machine gun from the gunner who had been killed.
Two days later, after the PIB had assumed a flank security role on the eastern side of the peninsula, another patrol clashed with a party of Japanese who had been attempting to set up an ambush near Ruri Bay.
The Australians, under pressure to limit casualties to their largely inexperienced troops, had pursued a cautious campaign and had been slow to regain the initiative in the area following the defeat at Porton Plantation.
[35] On 11 August, in anticipation of the capitulation of Japan following the dropping of two atomic bombs on Japanese cities, the order to cease offensive combat operations on Bougainville was passed to all Australian units by their commanders.
[34] Three days later, on 15 August, the Japanese Emperor Hirohito publicly announced Japan's unconditional surrender,[36] effectively bringing about an end to the war.