Enigma machine
Although Nazi Germany introduced a series of improvements to the Enigma over the years that hampered decryption efforts, they did not prevent Poland from cracking the machine as early as December 1932 and reading messages prior to and into the war.
[2] Many commentators say the flow of Ultra communications intelligence from the decrypting of Enigma, Lorenz, and other ciphers shortened the war substantially and may even have altered its outcome.
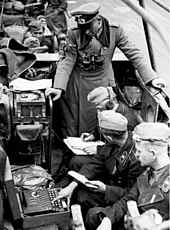
Pre-war German military planning emphasized fast, mobile forces and tactics, later known as blitzkrieg, which depended on radio communication for command and coordination.
[10] Rejewski used the French supplied material and the message traffic that took place in September and October to solve for the unknown rotor wiring.
[11] Over time, the German cryptographic procedures improved, and the Cipher Bureau developed techniques and designed mechanical devices to continue reading Enigma traffic.
[12] On 26 and 27 July 1939,[13] in Pyry, just south of Warsaw, the Poles initiated French and British military intelligence representatives into the Polish Enigma-decryption techniques and equipment, including Zygalski sheets and the cryptologic bomb, and promised each delegation a Polish-reconstructed Enigma (the devices were soon delivered).
[14] In September 1939, British Military Mission 4, which included Colin Gubbins and Vera Atkins, went to Poland, intending to evacuate cipher-breakers Marian Rejewski, Jerzy Różycki, and Henryk Zygalski from the country.
The Polish transfer of theory and technology at Pyry formed the crucial basis for the subsequent World War II British Enigma-decryption effort at Bletchley Park, where Welchman worked.
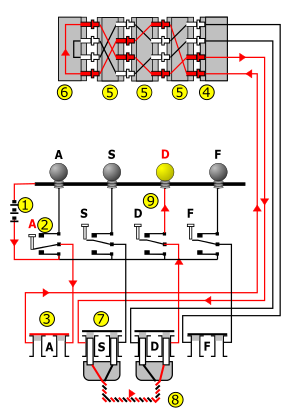
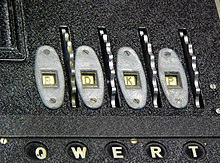
When the rotors are properly aligned, each key on the keyboard is connected to a unique electrical pathway through the series of contacts and internal wiring.
Current, typically from a battery, flows through the pressed key, into the newly configured set of circuits and back out again, ultimately lighting one display lamp, which shows the output letter.
Next, it passes through the (unused in this instance, so shown closed) plug "A" (3) via the entry wheel (4), through the wiring of the three (Wehrmacht Enigma) or four (Kriegsmarine M4 and Abwehr variants) installed rotors (5), and enters the reflector (6).
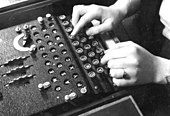
After insertion, a rotor can be turned to the correct position by hand, using the grooved finger-wheel which protrudes from the internal Enigma cover when closed.
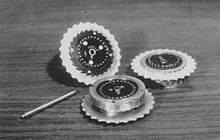
Rotors were marked with Roman numerals to distinguish them: I, II, III, IV and V, all with single turnover notches located at different points on the alphabet ring.
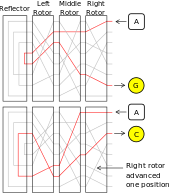
To avoid merely implementing a simple (solvable) substitution cipher, every key press caused one or more rotors to step by one twenty-sixth of a full rotation, before the electrical connections were made.
[23] Historically, messages were limited to a few hundred letters, and so there was no chance of repeating any combined rotor position during a single session, denying cryptanalysts valuable clues.
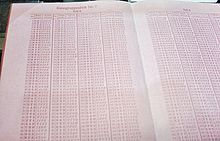
Navy codebooks were printed in red, water-soluble ink on pink paper so that they could easily be destroyed if they were endangered or if the vessel was sunk.
An Enigma machine's setting (its cryptographic key in modern terms; Schlüssel in German) specified each operator-adjustable aspect of the machine: For a message to be correctly encrypted and decrypted, both sender and receiver had to configure their Enigma in the same way; rotor selection and order, ring positions, plugboard connections and starting rotor positions must be identical.
The reason is that encrypting many messages with identical or near-identical settings (termed in cryptanalysis as being in depth), would enable an attack using a statistical procedure such as Friedman's Index of coincidence.
[40][41] After the end of World War II, the Allies sold captured Enigma machines, still widely considered secure, to developing countries.
Chiffriermaschinen AG began advertising a rotor machine, Enigma Handelsmaschine, which was exhibited at the Congress of the International Postal Union in 1924.
[45] While bearing the Enigma name, both models A and B were quite unlike later versions: They differed in physical size and shape, but also cryptographically, in that they lacked the reflector.
In 1927 Hugh Foss at the British Government Code and Cypher School was able to show that commercial Enigma machines could be broken, provided suitable cribs were available.
[49] The keyboard and lampboard contained 29 letters — A-Z, Ä, Ö and Ü — that were arranged alphabetically, as opposed to the QWERTZUI ordering.
[55] By 1930, the Reichswehr had suggested that the Navy adopt their machine, citing the benefits of increased security (with the plugboard) and easier interservice communications.
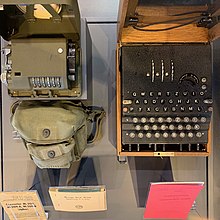
Two machines that were acquired after the capture of U-505 during World War II are on display alongside the submarine at the Museum of Science and Industry in Chicago, Illinois.
Replicas are available in various forms, including an exact reconstructed copy of the Naval M4 model, an Enigma implemented in electronics (Enigma-E), various simulators and paper-and-scissors analogues.
In early October 2000, Bletchley Park officials announced that they would pay the ransom, but the stated deadline passed with no word from the blackmailer.
In November 2000, an antiques dealer named Dennis Yates was arrested after telephoning The Sunday Times to arrange the return of the missing parts.
[72] In October 2008, the Spanish daily newspaper El País reported that 28 Enigma machines had been discovered by chance in an attic of Army headquarters in Madrid.
[76] On 3 December 2020, German divers working on behalf of the World Wide Fund for Nature discovered a destroyed Enigma machine in Flensburg Firth (part of the Baltic Sea) which is believed to be from a scuttled U-boat.