Battle of Gazala
Following Operation Crusader, in late 1941, the British Eighth Army had relieved Tobruk and driven the Axis forces from Cyrenaica to El Agheila.
[4] After a two-month delay, German and Italian forces in Libya began to receive supplies and reinforcements in men and tanks, which continued until the end of May, when Fliegerkorps II was transferred to the Russian front.
[6] In an appreciation made in January 1942, Auchinleck alluded to an Axis fighting strength of 35,000 men, when the true figure was about 80,000 (50,000 German and 30,000 Italian troops).
The Eighth Army expected to be ready by February and GHQ Cairo believed that the Axis would be too weak and disorganised to mount a counter-offensive in the meantime.
By 6 February, the Allies had fallen back to a line from Gazala to Bir Hakeim, a few miles west of Tobruk, from which the Italo-Germans had retired seven weeks before.
[9] Churchill pressed Auchinleck to attack to push the Axis out of Cyrenaica and relieve the pressure on Malta, which Churchill felt was essential to the war effort, ...having particular regard to Malta, the loss of which would be a disaster of the first magnitude to the British Empire and probably fatal in the long run to the defence of the Nile delta.The Eighth Army received new equipment, including 167 American Lend-Lease M3 Grant tanks equipped with 75 mm guns, and large numbers of 6-pounder anti-tank guns.
[11] The Eighth Army was in the process of reorganising, changing the relationship between infantry and artillery, while the RAF commander Arthur Tedder concentrated the efforts of the Desert Air Force (DAF) on supporting the troops on the ground.
A new fighter-bomber concept was developed and Air Vice-Marshal Arthur Coningham, commander of the DAF, moved his headquarters to the Eighth Army HQ to improve communication.
[12] Axis commanders knew that the entry of the United States into the war would give the Eighth Army access to an increase in materiel but sought to forestall an Allied offensive before these supplies could influence events.
The Italians tried to restrain Rommel by advocating the capture of Malta, which would postpone another offensive in Africa until the autumn but agreed to an attack on Tobruk for late May.
[16] Air attacks directed by Kesselring against Malta greatly reduced its offensive capacity, allowing supply convoys from Italy to reach Axis forces in Africa with increased regularity.
[17] Unternehmen Venezia (Operation Venice), the Axis plan of attack, was for armoured forces to make a flanking manoeuvre south of the fortified "box" at Bir Hakeim.
[32] On the far right of the Axis advance, the 90th Light Afrika Division engaged the 7th Motorised Brigade at Retma and forced it to withdraw eastwards on Bir el Gubi.
The Axis supply situation became desperate; defending the German rear, the "Ariete" Division repulsed attacks by the British armoured brigades on 29 May and during the first week of June.
[44][45] Early on 29 May, supply vehicles supported by the Trieste and Ariete divisions, worked through the minefield north of Bir Hakeim and reached the Afrika Korps.
[48] Ritchie ordered the Eighth Army to counter-attack against the Afrika Korps on 5 June but they were met by accurate fire from tank and anti-tank guns positioned in the cauldron.
A number of probes were sent to test the various opposing strong points and from 6 to 8 June, further attacks were launched on Bir Hakeim and repulsed by the French garrison.
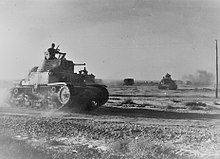
[52] At 05:45 on 10 June , C Squadron, equipped with M3 Grant tanks, of the Queen's Bays left the bivouac between Rigel Ridge to the north and Trigh Capuzzo to the south, heading towards the Ariete positions.
[56] The formation saw the Grants in the centre and the Stuarts on the wings but their M13s and the self-propelled guns managed to prevent the envelopment and forced the British to march along the front, exposing the flanks of their tanks to Italian fire.
The Afrika Korps had combined tanks with anti-tank guns; Rommel had acted rapidly on intelligence obtained from Allied radio intercepts.
[59] By the end of 13 June, the Knightsbridge box was virtually surrounded and was abandoned by the Guards Brigade later that night, their commanding officer Thomas Bevan having been killed the previous day.
The last gun in action was manned by Lieutenant Ashley and a signaller; when the battery had been silenced, the Axis tanks approached cautiously and the South African gunners were taken prisoner.
Ritchie ordered the Eighth Army to withdraw to Mersa Matruh, about 100 mi (160 km) east of the frontier, leaving Tobruk to threaten the Axis lines of communication as in 1941.
[72] The British prime minister Winston Churchill had placed great store on the symbolic value of Tobruk and there was an exchange of ambiguous signals, leading to the port becoming surrounded and besieged, rather than evacuated as originally planned.
[73] Later in the year, a Court of Inquiry (in absentia) found Klopper to be largely blameless for the surrender and ascribed the defeat to failures among the British high command.
Not only were its military effects grievous, but it had affected the reputation of the British armies.Auchinleck dismissed Ritchie on 25 June and assumed command of the Eighth Army for the First Battle of El Alamein, where he stopped Rommel's advance.
On 22 June, the Desert Air Force had 463 operational aircraft, 420 of them in the Middle East, the Germans 183 and the Italians 238, with another 174 in reserve and 500 in the Mediterranean excluding Italy.
The Afrika Korps was delayed at the Battle of Mersa Matruh but signal failures led to disorganisation and the X Corps line of retreat along the coast road being cut off.
The corps broke out at night to the south and worked its way around the German positions, collided with Axis forces several times and lost more than 6,000 prisoners, forty tanks and a large quantity of supplies.
The retirements brought the Eighth Army closer to its base and the Qattara Depression to the south of El Alamein closed the southern flank.