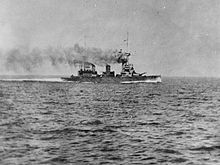
HMS New Zealand (1911)
New Zealand contributed to the destruction of two cruisers and was hit by enemy fire only once, sustaining no casualties; her status as a "lucky ship" was attributed by the crew to a Māori piupiu (warrior's skirt) and hei-tiki (pendant) worn by the captain during battle.
[21] Attitudes on this matter softened during the first decade, and at the 1909 Imperial Conference, the Admiralty proposed the creation of Fleet Units: forces consisting of a battlecruiser, three light cruisers, six destroyers, and three submarines.
Among the suggested names were Arawa, Caledonia, Wellington and Maori (which was already being used by a destroyer, and thus would have required a double renaming) being floated before Zealandia was eventually decided upon and subsequently approved by the King.
[44] The initial date of departure progressively moved backward into 1913 with the ship finally departing the Royal Navy dockyard at Devonport on 28 January for Portsmouth which it reached two days later.
[57] After departing Esquimalt New Zealand headed south stopping at Mazatlán, Acapulco, Panama City, Callao, Valparaíso, Punta Arenas, before she steamed through the Strait of Magellan and on to Montevideo, Rio Janeiro, then various islands of the Caribbean and finally Halifax, Nova Scotia (in Canada) before arriving in Portsmouth on 8 December 1913 having circumnavigated the globe.
The intention was that New Zealand would decommission on 30 August prior to transferring to the Mediterranean fleet where she would become the flagship of Rear Admiral Archibald Moore, but the outbreak of war cancelled that deployment.
Having broken the German naval codes, the British were planning to catch the raiding force on its return journey, although they were not aware of the High Seas Fleet's presence.
Admiral Beatty's 1st BCS (now reduced to four ships, including New Zealand) and the 2nd Battle Squadron (consisting of six dreadnoughts) were detached from the Grand Fleet in an attempt to intercept the Germans near Dogger Bank.
This started a fire amidships that destroyed her two port 21 cm (8.3 in) turrets, while the concussion damaged her engines so that her speed dropped to 17 knots (31 km/h; 20 mph), and jammed her steering gear.
Heavy fog and the need to refuel caused Australia and the British vessels to return to port on 17 April, and although they were redeployed that night, they were unable to stop two German light cruisers from laying the minefield.
[57] On the morning of 21 April, the 2nd BCS left Rosyth at 04:00 (accompanied by the 4th Light Cruiser Squadron and destroyers) again bound for the Skagerrak, this time to support efforts to disrupt the transport of Swedish ore to Germany.
At 15:30 on the afternoon of 22 April, the three squadrons of battlecruisers were patrolling together to the north-west of Horn Reefs when heavy fog came down, while the ships were steaming abreast at 19.5 knots, with Australia on the port flank.
It took some time for the instruction to be relayed by signal flag down the line and so it wasn't until 15:40 that Australia with a cruiser to her port side commenced her first zigzag and swung to starboard.
[82] Once it was safe to proceed Australia with her speed restricted to 12, and then later to 16 knots arrived back at Rosyth to find both drydocks occupied, one by New Zealand and the other by HMS Dreadnought so she departed for Newcastle-on-Tyne, where she was further damaged trying to dock during strong winds.
Hipper ordered his ships to turn to starboard, away from the British, to assume a south-easterly course, and reduced speed to 18 knots (33 km/h; 21 mph) to allow three light cruisers of the 2nd Scouting Group to catch up.
[86] At 16:26, the ship was hit by a 28-centimetre (11 in) shell, fired by Von der Tann, on 'X' barbette that detonated on contact and knocked loose a piece of armour that briefly jammed 'X' turret and blew a hole in the upper deck.
[87] Four minutes later, Southampton, scouting in front of Beatty's ships, spotted the lead elements of the High Seas Fleet charging north at top speed.
By 18:35, Beatty was following Indomitable and Inflexible of the 3rd BCS as they were steering east-south-east, leading the Grand Fleet, and continuing to engage Hipper's battlecruisers to their south-west.
The crew had approximately 50 minutes rest before, with the potential possibly that she may have to put to sea again, they began the task of refuelling with 1,178 tons of coal and then replenishing the ammunition with 480 twelve-inch shells, work which continued until 03:30 on the following morning.
More than a year after the Battle of Jutland, on the last occasion that New Zealand sighted enemy ships and went to action stations, a seaman was seen to climb a ladder to the bridge and take a quick look around.
Scheer turned south again, then steered south-eastward to pursue a lone British battle squadron sighted by an airship, which was in fact the Harwich Force of cruisers and destroyers under Commodore Tyrwhitt.
[109] With the war at an end most of the United Kingdom's older capital ships were put into reserve, as they were by now obsolete and with the government wishing to make significant cuts in its military expenditure there was little chance of their returning to full service, especially once the formal peace treaty was signed with Germany in mid-1919.
To prepare her for voyage, the battlecruiser was refitted between December 1918 and 11 February 1919 at the end of which she was recommissioned with a virtually all-new crew under the command of Captain Oliver Elles Leggett.
[18][110] The battlecruiser departed Portsmouth on 31 February 1919 and while crossing the Bay of Biscay encountered a storm that forced the evacuation of the newly constructed accommodation for Jellicoe and his staff when it became apparent that the dockyard had failed to seal the holes in the structure.
[116] The battlecruiser left Auckland on 3 October,[117] briefing stopping at Suva in Fiji and Samoa with mail, where at the latter her 12-inch guns were fired to entertain the local chiefs,[109] then Fanning Island for (six hours)[118] and Hawaii.
[121] After leaving Vancouver the ship stopped at San Diego, before passing via the Panama Canal into the Caribbean where as well as visiting Havana time was spent in Jamaica, where exercising of the main armament was undertaken.
[76] New Zealand was sold for scrap together with Agincourt and Princess Royal to the Exeter-based electrical engineering firm of J&W Purves with the proviso that they had to be demolished within 18 months of the Washington Naval Treaty being ratified.
[50] His daughter Ruth bequeathed it to New Zealand upon her death in 2002 and since 2005[50] it has been on display at the Torpedo Bay Navy Museum in Auckland alongside the ship's bell,[129] the wardroom buffet and other artifacts, including the piece of armour knocked off of X-turret at the Battle of Jutland.
His will requested not only that his successor be a "bull pup of honest parentage, clean habits, and moral tendencies", but also that "no Dachshound or other dog of Teutonic extraction" be permitted on board.
[128] His successor's service at the Battle of Jutland[133] caused him to become afraid of gunfire and when it was considered it was unlikely he could survive the ship's return voyage to the United Kingdom he was discharged with the rank of leading sea dog and given to the people of Auckland in October 1919.