North-Western Area Command
Its wartime sphere of operations included the Northern Territory, adjacent portions of Queensland and Western Australia, and the Dutch East Indies.
Headquartered at Darwin, North-Western Area Command was initially responsible for air defence, aerial reconnaissance and protection of the sea lanes within its boundaries.
In the official history of the RAAF in the Pacific theatre, George Odgers described the North-Western Area Campaign as "almost entirely an air war, with raid and counter-raid".
[1] From 1943, North-Western Area Command's role became increasingly offensive in nature, as the Allies began to advance in New Guinea and the Dutch East Indies.
Its combat aircraft ranged from single-engined fighters to heavy bombers, and were flown by Australian, British, American and Dutch squadrons.
[12] Following reports on 27 January that the formidable Japanese combined carrier fleet had entered the Flores Sea, Wilson ordered the dispersal of assets at RAAF Darwin.
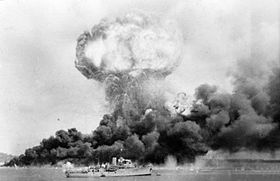
[17][18] The raids on 19 February destroyed civil and military infrastructure, twenty-three aircraft and ten ships, and killed approximately 250 people; 278 RAAF personnel deserted Darwin in an exodus that became known as the "Adelaide River Stakes".
[22] In the wake of the disaster, NWA headquarters moved to a bush camp south of the RAAF Station, and the senior leadership was changed.
[26] Air Commodore Frank Bladin took over as AOC NWA on 25 March, his initial objectives being to restore morale and deal with the perceived threat of an imminent invasion, tasks complicated by poor communications, transport and early warning systems.
[27][28] Proceeding to instigate more intense combat training and construct new satellite airfields with which to disperse his forces, Bladin became, in the words of Air Force historian Alan Stephens, "the RAAF's outstanding area commander of the war", and the first Australian in the Pacific theatre to be decorated by the Americans when he was awarded the Silver Star for gallantry after personally leading a raid by USAAF B-17 Flying Fortresses on Celebes in the Dutch East Indies.
[34] The 49th Fighter Group flew its final sorties in August and transferred to New Guinea the following month, having claimed seventy-nine Japanese aircraft destroyed for the loss of twenty-one Kittyhawks.
[39][40] Bostock exercised overall control of air operations through the area commands, although RAAF Headquarters continued to hold administrative authority over Australian units.
Bostock was to coordinate operations when they involved more than one area command, for instance when the fighter squadrons of both NWA and NEA were required to repulse a major attack.
[42] By December 1942, NWA's flying units included six RAAF squadrons operating mainly Kittyhawks, Beaufighters, Hudsons, and Vultee Vengeance dive bombers, as well as No.
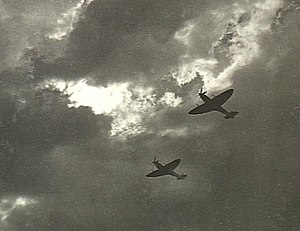
[54] To help protect northern Australia from ongoing air attack, three squadrons of Supermarine Spitfire fighters were transferred from the United Kingdom and became operational in March 1943 as No.
[43] A major engagement over Darwin on 2 May resulted in the loss of five Spitfires during combat, and several others in forced landings owing to fuel starvation or engine failure, for the destruction of one Japanese bomber and five fighters.
Bladin immediately ordered a retaliatory Beaufighter strike led by Wing Commander Charles Read against Penfui airfield, on the assumption—which proved to be correct—that this was where the Japanese raiders were based; four enemy aircraft were destroyed on the ground.
The Allies claimed a total of forty-six Japanese aircraft destroyed for the loss of thirty of their own on operations, seventeen to enemy action and thirteen from other causes.
1 Wing recorded NWA's most successful interception to date, claiming fourteen Japanese raiders destroyed and ten damaged, for the loss of two Spitfires.
[57] The same month, the USAAF's 380th Bombardment Group, consisting of four squadrons of Liberators, came under NWA's control, enhancing its strategic strike capability.
Cole reported that the command was "well organised, keen and in good shape", but considered its air defence capability inadequate, recommending augmentation by long-range fighters such as Lightnings.
[61] During August and September, Cole reduced regular reconnaissance missions to maximise his bombing effort, following a request from MacArthur to provide all available support for Allied assaults on Lae–Nadzab; NWA Liberators, Hudsons, Beaufighters and PBY Catalinas carried out raids to destroy Japanese bases and aircraft, and divert enemy forces from Allied advances.
Consisting of four attack squadrons flying Bristol Beauforts, Mitchells and Beaufighters, it was commanded by Group Captain Charles Eaton.
61 Wing was ordered to build a 10,000-foot (3,000 m) runway at Darwin to accommodate USAAF B-29 Superfortress heavy bombers for operations against oil refineries in Balikpapan, but the deployment never went ahead.
1 Wing to the Tanimbar Islands and strafed targets in Selaru, but told Caldwell that he considered the raid a wasted effort and had only undertaken it to boost the spirit of his pilots.
80 Wing, warning higher command that its morale would drop if it was not either given a more active role in the war or transferred to southern Australia for rest.
[69][77] In the meantime, NWA supported the assault on Leyte with attacks on ports, oil facilities, and shipping in the Dutch East Indies using Beaufighters, Mitchells, and Liberators.
Anti-aircraft fire and attacks by enemy fighters resulted in the loss of two Liberators; Allied submarines sank the damaged Isuzu the following day.
[90] The Air Force shrank dramatically as personnel were demobilised and units disbanded; most of the RAAF's bases and aircraft employed in operations after the war were situated within Eastern Area's sphere of control in New South Wales and southern Queensland.
[93] Darwin would subsequently function mainly as a transit centre and a base for peacetime exercises, rather than as a permanent station for flying squadrons.