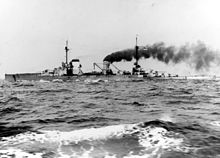
SMS Seydlitz
The ship was also hit by a torpedo during the battle, causing her to take in over 5,300 metric tons of water and her freeboard was reduced to 2.5 m. She had to be lightened significantly to permit her crossing of the Jade Bar.
Ultimately, the Kaiser and the Navy Department won the debate, and the battlecruiser for the 1909–1910 building year would continue in the pattern of the previous Von der Tann and Moltke-class designs.
[4] Seydlitz mounted a nearly identical main battery to that of the preceding Moltke-class ships: ten 28 cm (11 in) SK L/50 guns[b] in five twin-gun turrets.
The arrival at approximately 13:37 of the British 1st Battlecruiser Squadron, under the command of Vice Admiral David Beatty, quickly put the German ships at a disadvantage.
By 08:50, Hipper had requested permission from Admiral Friedrich von Ingenohl, the commander in chief of the High Seas Fleet, to send his ships to relieve the beleaguered German cruisers.
[15] The battlecruisers Von der Tann and Moltke were ready to sail by 12:10, but the low tide prevented the ships from being able to pass over the sand bar at the mouth of the Jade Estuary safely.
[18] At 03:20 on 15 December, Seydlitz, Moltke, Von der Tann, the new battlecruiser Derfflinger, and Blücher, along with the light cruisers Kolberg, Strassburg, Stralsund, and Graudenz, and two squadrons of torpedo boats left the Jade.
The captain of Moltke was furious; he stated that Ingenohl had turned back "because he was afraid of eleven British destroyers which could have been eliminated ... under the present leadership we will accomplish nothing.
Ingenohl was initially reluctant to attempt to destroy these forces, because I Scouting Group was temporarily weakened while Von der Tann was in drydock for periodic maintenance.
Konteradmiral Richard Eckermann, the Chief of Staff of the High Seas Fleet, insisted on the operation, and so Ingenohl relented and ordered Hipper to take his battlecruisers to the Dogger Bank.
[25] On 23 January, Hipper sortied, with Seydlitz in the lead, followed by Moltke, Derfflinger, and Blücher, along with the light cruisers Graudenz, Rostock, Stralsund, and Kolberg and 19 torpedo boats from V Flotilla and II and XVIII Half-Flotillas.
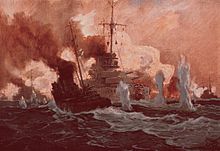
Beatty, in the stricken Lion, ordered the remaining battlecruisers to "Engage the enemy's rear," but signal confusion caused the ships to solely target Blücher, allowing Moltke, Seydlitz, and Derfflinger to escape.
[13] On 3 August 1915, Seydlitz, Moltke, and Von der Tann were transferred to the Baltic with I Reconnaissance Group (AG) to participate in a planned foray into the Riga Gulf.
The German forces, under the command of Hipper, included the four Nassau and four Helgoland-class battleships, the battlecruisers Seydlitz, Moltke, and Von der Tann, and a number of smaller craft.
The German battlecruisers Derfflinger, Lützow, Moltke, Seydlitz and Von der Tann left the Jade Estuary at 10:55 on 24 April, and were supported by a screening force of 6 light cruisers and two torpedo boat flotillas.
He had initially intended to launch the operation in mid-May, but the mine damage to Seydlitz had proved difficult to repair—Scheer was unwilling to embark on a major raid without his battlecruiser forces at full strength.
On 22 May, the Wilhelmshaven dockyard reported the ship to be fit for duty, but tests carried out that night showed that the broadside torpedo flat that had been damaged by the mine was still not watertight, and there were still leaks in the fore and aft transverse bulkheads.
Indefatigable had been destroyed by a salvo from Von der Tann approximately 20 minutes before, and Beatty sought to turn his ships away by 2 points in order to regroup, while the Queen Elizabeth-class battleships of the 5th Battle Squadron arrived on the scene and provided covering fire.
Instead, Scheer ordered his ships to turn 16 points to starboard, which would bring the pre-dreadnoughts to the relative safety of the disengaged side of the German battle line.
By 15:30 on 1 June, Seydlitz was in critical condition; the bow was nearly completely submerged, and the only buoyancy that remained in the forward section of the ship was the broadside torpedo room.
By that time, Derfflinger and Von der Tann each had only two guns in operation, Moltke was flooded with 1,000 tons of water, and Seydlitz was severely damaged.
Hipper reported: "I Scouting Group was therefore no longer of any value for a serious engagement, and was consequently directed to return to harbor by the Commander-in-Chief, while he himself determined to await developments off Horns Reef with the battlefleet.
The operation called for Hipper's battlecruisers to attack the convoy and its escorts on 23 April while the battleships of the High Seas Fleet stood by in support.
Moltke was forced to break radio silence in order to inform Scheer of the ship's condition, which alerted the Royal Navy to the High Seas Fleet's activities.
The Germans reached their defensive minefields early on 25 April, though approximately 40 nmi (74 km; 46 mi) off Helgoland Moltke was torpedoed by the submarine E42, though she successfully returned to port.
As Von der Tann and Derfflinger passed through the locks that separated Wilhelmshaven's inner harbor and roadstead, some 300 men from both ships climbed over the side and disappeared ashore.
Germany's military position was hopeless, and so Generals Paul von Hindenburg and Erich Ludendorff convinced the government to sign the Armistice to end the war.
[62] Following the capitulation of Germany in November 1918, most of the High Seas Fleet, under the command of Reuter, were interned in the British naval base in Scapa Flow.
[63] Prior to the departure of the German fleet, Admiral Adolf von Trotha made clear to Reuter that he could not allow the Allies to seize the ships, under any conditions.
On the morning of 21 June, the British fleet left Scapa Flow to conduct training maneuvers, and at 11:20 Reuter transmitted the order to his ships.