Second Battle of Charleston Harbor
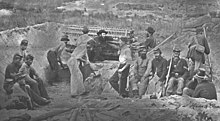
In the days immediately following the second battle of Fort Wagner, Union forces besieged the Confederate works on Morris Island with an array of military novelties.
Immediately in command of the Confederate forces surrounding Charleston was former career army officer and South Carolina businessman Roswell S. Ripley.
Ripley's forces were spread throughout the fortifications surrounding Charleston Harbor and included a division of the local South Carolina militia.
General John G. Foster, Union commander of the Department of North Carolina, enthusiastically sent a division of reinforcements telling Gilmore "Charleston is too important to be lost when so nearly won".
Keitt's replacement, General Johnson Hagood, made better use of sharpshooters and the few landward guns to impede the Union siege works upon the fort.
Lieutenant Charles Sellmer with a detachment of the 11th Maine Infantry was called in to man the 200-pound Parrott rifle now being referred to as the "Swamp Angel".
When Gilmore received no reply by the following day the first shot was fired from the Swamp Angel into Charleston using the steeple of St. Michael's Church for a bearing.
Gilmore complied with a day of cease-fire but also took the opportunity to express the fact that Charleston was a legitimate military target as an ammunition supply.
[16] Following Dandy's attack Confederate engineers began working to strengthen the rifle pits, hoping to force the Union army into mounting another costly assault.
Colonel George P. Harrison, the fort's commander, ordered an artillery counterattack but the rifle pits were already turning into a new siege line.
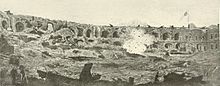
On September 5, Gillmore and Admiral Dahlgren attacked with an intense bombing of Fort Wagner for 36 hours killing 100 of the remaining defenders.
Yet the Union army and navy had captured an important position at the mouth of Charleston Harbor and reduced its most formidable fortress to rubble.
Despite this, the city of Charleston and Fort Sumter itself would remain in Confederate control until William T. Sherman's armies marched through South Carolina in 1865.