Siege of Kimberley
Outside Kimberley, the Boers treated the occupied territory as part of one of the republics, appointing a 'landdrost' (magistrate) and changing the name of the neighbouring town of Barkly West to Nieu Boshof.
The British military had to change its strategy for the war as public opinion demanded that the sieges of Kimberley, Ladysmith and Mafeking be relieved before the Boer capitals were assaulted.
The De Beers company was concerned about the defence of Kimberley some years before the outbreak of the war, particularly its vulnerability to attack from the neighbouring Orange Free State.
As it began to look more likely that war would break out, the nervous citizens of Kimberley appealed to the premier of the Cape Colony, William Philip Schreiner, for additional protection, but he did not believe the town to be under serious threat and declined to arm it further.
[8] Three days later, the town was placed under the command of Colonel Robert Kekewich of the 1st Battalion, Loyal Regiment (North Lancashire),[1] and secured against a coup de main, but not against sustained siege.
Also at his disposal were 120 men of the Cape Police (recalled from various outposts along the railway line), 2,000 irregular troops, the Kimberley Light Horse, and a battery of obsolete seven-pounder guns.
[8][10] However, Rhodes ignored the advice and moved into the town just prior to the onset of the siege, very narrowly evading capture when the Boer ultimatum expired at 5 pm on 11 October while he was still en route.
He was subject to the authority of the military commandant, a galling position for a distinguished statesman who had not a high opinion of the professional capacity of the British officer.In practice, unlike Baden Powell at Mafeking, Kekewich did not have free rein to conduct the defence as he saw fit.
[15] On the return journey, the armoured train was captured in the first action of the war between Kimberley and Mafeking at Kraaipan by Boers under the command of fighting general De la Rey, the hero of the western Transvaal.
On 12 October, the Jacobsdal Commando severed the railway line at the bridge over the Modder River south of Kimberley,[16] whereafter the Boers entrenched themselves in the hills at Spytfontein.
[18] The cattle that usually grazed on the outskirts of the town presented a problem; if they were left, they would be lost to the Boers, but if they were slaughtered, the meat would perish quickly in the summer heat.
The De Beers chief engineer, George Labram, provided a solution by building an industrial refrigeration plant underground in the Kimberley mine to preserve the meat.
[23] The defenders tried to send the large contingent of migrant native labourers that was working in the mines home, but twice the Boers drove them back into the town in an apparent attempt to put pressure on the limited food and water supply.
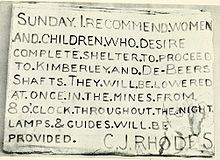
The scarcity of vegetables took the hardest toll on the poorest people, notably the 15,000-strong indigenous population; a local doctor suggested that they eat aloe leaves to avoid contracting scurvy,[30] while Rhodes organised a soup kitchen.
[Note 5] Kekewich's men held the belief that the action would assist Methuen's relief column at Magersfontein by keeping more Boers occupied at Kimberley.
A detachment of 40 members of Cape Police and Light Horse under the command of Major Scott-Turner of the Black Watch set out at midnight and completely surprised their enemy in the early hours of the morning.
They manufactured fortifications, an armoured train, a watch tower, shells, and a gun, known as Long Cecil, for the defenders in order to supplement their inadequate weapons.
[35][36] The Boers countered on 7 February with a much heavier 100-pounder named "Long Tom"; it had been disabled by British saboteurs at Ladysmith, before being repaired at Pretoria, and brought to Kimberley.
[38][40] Kekewich arranged a full military funeral for him, which was well attended, but took place after dark for safety reasons;[41] the procession was targeted by Boer shelling with the help of a traitor inside the town who lit the area with a flare.
[43] The British commander-in-chief in South Africa, General Sir Redvers Buller initially planned to march with a single large force on the Boer capitals of Bloemfontein and Pretoria.
[49][50] News of the shelling by the Boer Long Tom gun had reached Lord Roberts, whose parting words to his officers on 9 February were that "You must relieve Kimberley if it costs you half your forces.
[52][53] With this mind, Roberts ordered the Highland Brigade 20 miles (32 km) west to Koedoesberg,[Note 6][49] thereby encouraging Cronjé's forces to believe that the attack would occur there.
However, the bulk of the force initially headed south to Graspan,[Note 7][49] then east deep into the Orange Free State with the cavalry division guarding the British right flank by securing drifts across the Riet River.
On 13 February, Roberts activated the second part of his plan, that involved French's cavalry separating from the slower main force and piercing forward quickly by swinging northwards, just east of Jacobsdal, to cross the Modder River at Klip Drift.
The cavalry's route had taken them deep inside the Free State over Cronjé's line of communication, thereby cutting off any Boer forces who did not immediately fall back.
Rifle fire came from the river in the east while artillery shells rained from the hills in the north west; the route to Kimberley lay straight ahead through the crossfire, so French ordered a bold cavalry charge down the middle.
[64] Cronjé elected to sit tight rather than escape, giving French the opportunity to summon reinforcements before the Boers realised how small and depleted the force was that was harassing them.
[71] The Honoured Dead Memorial, a sandstone edifice commissioned by Cecil Rhodes and designed by Sir Herbert Baker, was erected to commemorate the defenders who fell during the siege.