Siege of Tobruk
Allied naval forces, such as the British Mediterranean Fleet (including the Inshore Squadron) ran the blockade, carrying reinforcements and supplies in and the wounded and prisoners out.
Bedouin tracks linked wells and the more easily traversed ground; navigation was by sun, star, compass and "desert sense", good perception of the environment gained by experience.
After blockading the fort for a fortnight, on the night of 20 January, the British Navy, led by the HMS Terror, under the command of Captain Hector Waller, bombarded Tobruk.
The cruiser regiment[clarification needed] arrived in late March with worn-out tracks, after many breakdowns en route and brought the division up to an under-strength armoured brigade.
The British 2nd Support Group (similar to a small infantry brigade) had only a motor battalion, a 25-pounder field gun regiment, an anti-tank battery and a machine-gun company.
[9] Neame was ordered to conserve the tank units, retire as far as Benghazi if pressed, abandon it if necessary, and hold the high ground nearby for as long as possible, with no prospect of reinforcement before May.
Rommel was identified on 8 March but local intelligence was hard to find under the restrictions to preserve the few troops and vehicles near the front and avoid the danger of the faster German eight-wheeler armoured cars, which inhibited Allied tactical reconnaissance.
On 6 April, Allied air reconnaissance reported that there were Axis columns in the desert and the 3rd Indian Motor Brigade repulsed an attack at Mechili, which led to O'Connor at the Cyrcom headquarters (Neame had left to visit Gambier-Parry) to order a general withdrawal.
[13] The Germans tried twice to bluff Gambier-Parry into surrender but he received orders from Cyrcom to break out and retreat to El Adem and decided to attack at dawn, to gain a measure of surprise.
The garrison had fired most of its small arms ammunition at the vision slits of the German tanks, which had hung back in fear of mines and when Italian infantry attacked, had little left.
[14] Axis supplies came from Europe and deliveries were moved by road; after Operation Compass (December 1940 – February 1941), only Tripoli remained, which had a maximum capacity of four troopships or five cargo ships at once, about 45,000 long tons (46,000 t) per month.
Lack of deliveries and the Eighth Army offensive, forced a retreat to El Agheila from 4 December, crowding the Via Balbia where Allied ambushes destroyed about half of the remaining Axis transport.
Morshead planned an active defence and stressed that, with battalions holding 5 mi (8.0 km) frontages, a break-in should be expected anywhere that the attackers made a serious effort and that it should be eliminated, since there would be no withdrawal.
Another attempt was made later and by dawn a small bridgehead had been established, where the 5th Panzer Regiment drove through and turned northwards, ready to divide into one column for the harbour and one to move west to stop the escape of the garrison.
On 22 April, a company of the 2/48th Australian Battalion, three infantry tanks and a troop of 25-pounders, raided a hillock held by the Fabris Detachment south-west of Ras el Medauar; the raiders destroyed two guns and took 370 prisoners.
[26] The Desert Air Force [so-named from October 1941] flew long-range missions to attack German armour massing near Tobruk in the early stages of the siege.
"[28] On 1 May, for example, 274 Squadron lost all six Hurricanes it sent on a single mission when a flight of Bf 109s from JG 27 led by Gerhard Homuth, and containing the most successful fighter pilot in Africa, Hans-Joachim Marseille, engaged them from a superior altitude over Tobruk.
On the run-in, there were no lights to guide them in, because the advance Folbot section had been delayed, when their submarine HMS Triumph had to dive and take evasive action when it was mistakenly attacked by Allied aircraft.
Rommel thought that Tobruk could only be taken by a deliberate attack, which could not begin until support units had arrived in the area and the Luftwaffe had been reinforced, particularly with transport aircraft to carry ammunition, fuel and water.
On 27 April, Major-General Friedrich Paulus, a Deputy Chief of the General Staff, arrived from Oberkommando des Heeres (OKH) in Berlin, to question Rommel on his intentions, impress on him that there was little more help available and to forecast the defensive possibilities of the area, if Sollum was lost.
The posts either side of Ras el Medauar were shelled and bombed and German troops began to dribble forward, under cover of dust and the gathering darkness.
The German attack was stopped for a loss of five British tanks and in the evening, the Australian 2/48th Battalion counter-attacked Ras el Medauar but met determined resistance and was repulsed.
During the day, 73 and 274 Squadrons had maintained standing patrols over the area and on the morning of 2 May, the fighting around Wadi Giaida continued in a dust storm, as German troops tried to trickle forward.
The Tobruk garrison settled into a routine of patrols, air raids and minor attacks, some to regain positions in the Medauar salient and some in connexion with WDF operations.
The plan assumed that it would take 15 minutes for Italian artillery to open fire on the captured trenches, and the raiders were only about 100 yd (91 m) away when shelling began to come down onto the position they had just departed.
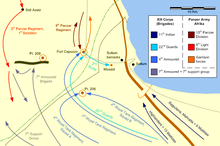
The Allies attacked with a small tank-infantry force in three columns and seized the top of the Halfaya Pass, Bir Wair and Musaid, then pressed on and took Fort Capuzzo.
[56] On 12 May, the Tiger convoy lost one ship and arrived in Alexandria with 238 tanks, to re-equip the 7th Armoured Division and 43 aircraft; on 28 May, planning began for Operation Battleaxe.
[61] By mid-afternoon, the Allies had advanced about 3.5 mi (5.6 km) towards Ed Duda on the main supply road, where they paused as it became clear that 7th Armoured Division would not arrive.
[63] On 22 November, the 25th Infantry Division "Bologna" repulsed an attack from Tobruk towards Sidi Rezegh and next day, Rommel sent the Afrika Korps towards the Egyptian border (the Dash to the Wire) to exploit the victory and destroy XXX Corps.
As night fell the British tanks disengaged and the New Zealand Division, fighting at the south-east end of the corridor into Tobruk, was endangered by the Afrika Korps.