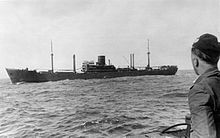
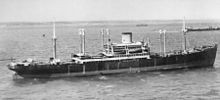
Sinking of HMAS Sydney
[10] The cruiser was recalled to Australia in early January 1941: the need to rest the ship and personnel, plans to spread combat experience across the RAN fleet, and a desire to reinforce the nation following German raider activity in nearby waters were all factors.
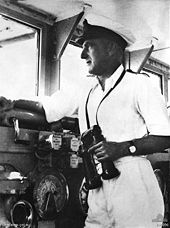
[34] Detmers ordered Kormoran to alter course into the sun (heading 260°) at maximum achievable speed (which quickly dropped from 15 to 14 knots (28 to 26 km/h; 17 to 16 mph) because of problems in one of her diesel engines) while setting the ship to action stations.
[48][52] In response to the cruiser's signal, Detmers ordered that Kormoran's disguise be dropped, for the Dutch flag to be replaced by the Kriegsmarine ensign, and for the guns and torpedoes to open fire.
The second, three-shell salvo destroyed Sydney's bridge and damaged her upper superstructure, including the gun direction control tower, wireless offices, and foremast.
[48][59] Around the time of the eighth or ninth German salvo, one of the two torpedoes fired at the start of the engagement struck Sydney just forward of "A" turret and near the asdic compartment (the weakest point on the ship's hull), ripping a hole in the side and causing the bow of the cruiser to angle down.
[71] Kormoran was stationary, and at 18:25, Detmers ordered the ship to be abandoned, as damage to the raider's engine room had knocked out the fire-fighting systems, and there was no way to control or contain the oil fire before it reached the magazines or the mine hold.
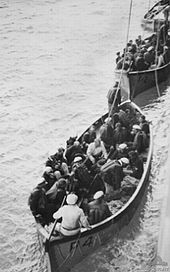
[85] Six nearby merchant vessels (Pan Europe, Saidja, Herstein, Sunetta, Centaur, and Hermion) were instructed to pass through that location and keep a lookout for survivors or wreckage of either ship, while four RAN auxiliaries (HMAS Yandra, Heros, Olive Cam, and Wyrallah) sailed from Fremantle to search the area.
[92] Arriving in Carnarvon on the afternoon of 27 November, the Germans were relocated from the boats to Centaur's cargo holds, where they were joined by their colleagues who had reached shore and Australian Army guards.
[99] Censorship restrictions on the newspapers were lifted to publish the statement, but radio stations were instructed to wait 48 hours before broadcasting the news to avoid alerting any other German ships in the area.
[111][113] After the main interrogations were completed, the Germans were moved from Fremantle to Murchison, Victoria during late December and early January, the officers aboard the liner Duntroon and the sailors overland on two trains.
[131] This was attempted at a 1991 forum: although the battle's location was generally agreed upon, because the exact fate and time of sinking for Sydney were unknown, the possible site could not be more accurately determined.
[133] In 2002, a coalition of oil and gas companies involved in the North West Shelf Venture performed a gratis search of eight suspected targets in the proposed southern area.
[134] Subsequent examination of the most popular southern site by DOF Subsea Australia vessel SV Geosounder in March 2007 found no evidence of a shipwreck, the two searches firmly discrediting the alternative engagement area.
[165] The first collected historical account of the engagement was published in 1947 in George Hermon Gill's Royal Australian Navy, 1939–1942, the first of two RAN volumes in the government-sponsored Australia in the War of 1939–1945 series.
[168] Several biographical and autobiographical works which touched on the battle (including books by Detmers and former Sydney commander John Collins) were also published around this time; none of these contributed new information.
is reliant on assertions that had been proved false, unreliable sources (including a 'sailor's report' found to be a translation of an inaccurate Australian newspaper article), and selective use of German accounts that fit the hypothesis.
[177] Winter used material from German and American archives in addition to Australian sources, with the main thrust of her work comparing the relative experience and competence of Burnett and Detmers, which supported the accepted view of the battle.
[181] Wesley Olson's Bitter Victory: the death of HMAS Sydney, published in 2000, was a re-examination of the evidence, including comparisons with similar naval engagements and sinkings, which supported the accepted view of the battle.
[189] Samuels cites no reliable sources and ignores or dismisses evidence supporting the accepted view as part of the cover-up; one review states that the book only brings suffering to the relatives of those killed and is on par with the Roswell UFO incident as a conspiracy theory.
[189] Also in 2005, Brett Manning used the alternative theories of the battle as the basis for the spy novel Enduring Deception, in which an American agent must cover up the cruiser's encounter with a Japanese submarine so the Pearl Harbor attack occurs without warning, drawing the United States into the war.
[192] Military historian Dr Tom Lewis OAM, then a serving naval officer, wrote several analytical articles about the controversies surrounding the battle, all of which argued in favour of the Kormoran account.
[197] Much controversy surrounding the battle stemmed from disbelief that a modified merchant ship could defeat a modern cruiser, with most theories describing how the Germans deceitfully gained the advantage.
[199][200] The proximity meant that the advantage would go to the ship that fired first; while Burnett likely assumed that Sydney was dealing with a merchantman, Detmers was ready for Kormoran to surprise the cruiser, and the raider's gun crew knew where to aim for maximum effectiveness.
[219] There were suggestions over the years the Japanese submarine I-124, sunk off Darwin by HMAS Deloraine on 20 January 1942—some three months after the loss of the Sydney—contained information about the true fate of the Sydney or that herself may have been involved.
[247] Ammunition handlers from the 4-inch guns, who wore protective aprons, could have been standing clear of their weapons because of the planned catapult launch of the Walrus amphibian or the direction "X" turret was facing when trained on Kormoran, both of which could have injured the unprotected gunners.
[248] A second group would have been a cutter party preparing to launch a boat to rescue the Walrus crew if it ditched, or to board Kormoran, with their life jackets mistaken for aprons.
[251] This, combined with Detmers' observation and the belief that Sydney's approach followed procedures for an 'innocent' instead of a 'suspicious' vessel, prompted Cole to conclude that the Australian cruiser was not at action stations.
[252] On the afternoon of 6 February 1942, lookouts on Christmas Island spotted an object out at sea, which on closer inspection turned out to be a Carley float carrying the body of a Caucasian man wearing a blue boiler suit that had been sun-bleached white.
By manoeuvring close to Kormoran, Burnett removed the advantage of his longer-ranged primary armament and put Sydney in a position where the raider's main guns could penetrate the cruiser's armour.
[279] Post-action analysis found that if Canberra had moved closer, the same damage could have been achieved for less ammunition, and one or both ships might have been captured—factors that Burnett had commented on during his previous posting as Deputy Chief of Naval Staff and which Frame and Gill think may have influenced his actions.