52nd (East Lancashire) Light Anti-Aircraft Regiment, Royal Artillery
[5] After the Munich Crisis in 1938, the TA was doubled in size, and in June 1939 the 52nd formed a duplicate unit at Oswaldtwistle, the 56th Light Anti-Aircraft Regiment, which received its 'East Lancashire' subtitle in February 1942.
[6] The War Office's plan was that the four newly converted TA LAA regiments (51st–54th) would go to France as soon as they could be mobilised, in order to provide AA cover for the British Expeditionary Force (BEF).
The new LAA regiments were still badly under-equipped for active service: 52nd had 16 Bofors, 40 AALMGs and 7 Vickers 2-pdr Mk VIII pom-poms, with a reduced scale of transport for a mobile role.
[7][8][9][10][11] When the German invasion of the Low Countries began on 10 May 1940, the BEF advanced into Belgium under Plan D, and by 15 May 52nd (EL) LAA Rgt was with I Corps on the River Dyle.
The AA units covered the shrinking 'pocket' until it was their turn to destroy their equipment and join the queues of men waiting to be taken aboard small boats back to England.
[20] Apart from home defence, Britain's strategic focus was on the Mediterranean and Middle East, and after the entry of Italy into the war in June 1940 there was an urgent need to reinforce British forces in the region.
A series of convoys began shipping troops (including AA units) on the six-week journey via the Cape of Good Hope and the Red Sea to Egypt.
[21][22][23] On 28 October Italy invaded Greece and British troops were sent to help, including 154 LAA Bty, which landed at Piraeus on 6 November and was allocated to defending airfields.
The battery reached Grevena on 12 April, then spent 5–6 days moving back by stages along rough tracks through narrow ravines, constantly in action.
In one defile near Kalabaka the Luftwaffe caught a mass of halted motor and horse-dawn vehicles and caused a catastrophic traffic jam; 155 LAA Bty lost one gun and took 24 hours to cover 8 miles (13 km).
[32][33][34] 154 LAA Battery and 20 Heavy AA Bty of 2nd HAA Rgt defending the airfields at Menedi and Eleusis were under repeated attack from 18 to 20 April by Bf 109s and Junkers Ju 87 'Stukas'.
The bulk of W Force was now making its way to Kalamata to be evacuated and the remaining AA guns were redeployed to Argos to cover the route through Athens and across the Corinth Canal.
A troop of 154 LAA Bty helped to defend the airfields at Argos against fierce attack until the last Royal Air Force (RAF) fighters were destroyed, then made its way to the bridge over the Corinth Canal.
[33][37][38] After conquering mainland Greece, the Germans turned their attention to Crete, where RHQ and 156 Bty of 52nd (EL) LAA Rgt had been deployed with 'Creforce' since the previous December.
On the eve of the invasion, Lt-Col Mather with RHQ was AA Defence Commander (AADC) of 'M' Group defending the naval installations in the Suda–Canea Sector, consisting of:[39][40][41][42] A few miles away, two troops of 156 LAA Bty under Maj R.S.
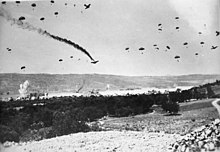
The assault by paratroops and glider troops was launched on 20 May, after another 2-hour air raid in which 156 LAA Bty on its exposed high ground around the airfield suffered severely.
During the battle the inadequate AA defences had shot down 147 Luftwaffe aircraft and damaged many more: the Germans had been close to calling off the operation because of these unsustainable losses.
This extended layout was under the command of 2 AA Bde, charged with defending the canal and ports that were vital to the flow of supplies and reinforcements to the Western Desert campaign.
After the Commonwealth victory at the Second Battle of El Alamein, Eighth Army pursued the defeated Axis forces westwards, and AA units moved up behind it to protect its communications.
By January 1943, RHQ of 52nd (EL) LAA Rgt was in 18 AA Bde, which was stretched between Alexandria and Matruh, and covering the Desert Air Force (DAF) landing grounds in between.
Wheeler went down to the beach where 52nd (EL) LAA and 9th (Londonderry) HAA Rgts were landing, and formed a 400-strong infantry force ('Gunnerforce') from them, equipped with rifles and a large number of automatic weapons, under the command of Lt-Col Dayrell-Browning of the 52nd.
[59][60][61][62] On 17 September the brigade sent 195/52 LAA Bty to protect landing beaches at Maiori where 23 Armoured Bde was making a 'left hook' round the Sorrento Peninsula.
[59][60][61] By 5 October the brigade's units were deployed around the Bay of Naples, finding considerable difficulty in establishing communications and suitable gun sites, some of which had to be bulldozed.
On 23 October another air raid on Naples developed, with a number of bombers taking evasive action over Capua, where some were destroyed by 12 AA Bde's guns.
Its tasks for X Corps included providing AA cover for vulnerable points (VPs) such as routes, bridges, landing grounds, field gun positions and the Aversa railway yards.
[4] In January 1944 12 AA Bde moved forward to cover the assembly areas and ferry sites for X Corps' crossing of the Garigliano, the preliminary phase of the Battle of Monte Cassino.
Meanwhile, X Corps' attempts to expand its bridgehead came under counter-attack and 12 AA Bde's LAA regiments had to defend the Garigliano bridges against Luftwaffe fighter-bomber attacks.
12 AA Brigade's LAA regiments were committed to bridges, defiles, assembly areas and artillery positions, and enemy aircraft were active in low-level strafing and bombing.
However, Luftwaffe activity declined towards the end of the year, and LAA gunners were sometimes employed on other tasks, such as helping the engineers to launch Bailey bridges near Rimini.
By January 1945 the brigade's units were spread thinly to defend a large number of roads, ports and railheads for Eighth Army and landing grounds for the DAF.