Battle of Isurava
In what became the first major battle of the campaign, the two sides fought a heavy engagement around Isurava in late August, as four Australian infantry battalions attempted to fend off attacks by a similarly sized Japanese force.
Subjected to a heavy Japanese artillery bombardment, and lacking their own with which to counter this indirect fire, the Australians defended for four days, before conducting a withdrawal in contact, falling back towards Templeton's Crossing, which was the scene of further fighting in early September 1942.
In 1942, the steep terrain offered considerable challenges to military operations, and both the Japanese and Allies misunderstood its nature at the time of the early fighting in New Guinea.
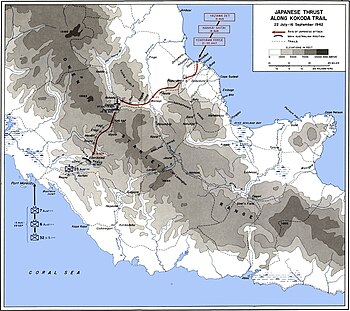
To the Japanese, who had learned of the Gap through vague explorer's accounts,[4] it potentially offered a corridor from Buna through the Owen Stanleys along which they could launch a quick advance on Port Moresby.
[5][Note 1] The terrain rises and falls with regularity, up to 5,000 metres (16,000 ft) up and down over the full length of the track, markedly increasing the distance to be traversed, although there are several flat areas, particularly around Myola.
[15] The advanced landing forces, consisting primarily of the Colonel Yosuke Yokoyama's 15th Independent Engineer Regiment, sailed from Rabaul and came ashore unchallenged as there were only a small number of Australians stationed in the area.
Shortly afterwards a small advanced element, supported by part of the 1st Battalion, 144th Infantry Regiment, began moving south-west towards Oivi, mounted in motor vehicles and on bicycles.
[16] These troops were initially tasked with proving the route over the Owen Stanleys before the main body of the landing force, Major General Tomitaro Horii's South Seas Detachment, arrived.
Meanwhile, the Australians, who had deployed only limited forces north of Port Moresby, attempted to delay the Japanese along the track long enough to bring reinforcements forward.
[18] Nevertheless, a lack of supplies forward of Port Moresby continued to limit the ability of the Allies to concentrate troops along the Kokoda Track throughout much of the campaign, as the native carrier system was stretched and aerial resupply – a technique that was still developing – was less effective than initially envisaged.
There was a brief fire-fight on 24 July, before the Japanese began forcing a crossing of the Kumusi River in rubber assault boats supported by mortars and machine gun fire.
[23] In the short lull that followed, the Japanese began landing the main body of Horii's South Seas Detachment on the northern coast,[24] while minor patrol actions resulted in several skirmishes north of Isurava.
[18] The engagements around Kokoda and the US landing at Guadalcanal caused General Harukichi Hyakutake, 17th Army commander in Rabaul, to re-consider the drive on Port Moresby.
Potts' orders were therefore changed on 29 August to mounting a stand around Isurava, in an effort to block the Japanese advance into the Owen Stanleys on their way towards Port Moresby.
As a result of the heat, heavy loads and distance, a large number of troops, and several artillery pieces,[11] failed to reach Isurava in time for the battle, reducing the size of the Japanese force available for the attack.
The loss of Kokoda had deprived them of a forward airfield, but to an extent this had been alleviated by the creation of a supply drop zone for US transport aircraft around the dry lake at Myola.
[46] Potts, realising that Horii had launched a major attack, decided to deploy the 2/14th under Lieutenant Colonel Arthur Key to Isurava, using the 39th to screen their movement.
Meanwhile, Major Tadashi Horie's 2/144th was allocated to the eastern side of Eora Creek, where Japanese reconnaissance had revealed the parallel track bypassing Isurava.
Probing attacks continued around Isurava that night, as the Japanese sought to test the Australian defences for weaknesses amidst a heavy torrential downpour.
Continuing to sweep enemy positions with his fire, and inflicting an extremely high number of casualties upon them, Private Kingsbury was then seen to fall to the ground, shot dead by the bullet from a sniper hiding in the wood.
Frustrated by the lack of progress, Horii decided to commit the 2/41st, under Major Mitsuo Koiwai,[58] with the aim of conducting a wide arc to the west and emerging on the track to the south of Alola.
In possession of the ridges that dominated the Australian position from both sides of the valley in which it sat, the Japanese were able to lay down considerable volumes of mortar and machine gun fire in support of their assaults.
It was during this stage of the fighting that Private Bruce Kingsbury of the 2/14th made a unique individual contribution to the campaign and was posthumously awarded the Victoria Cross as a result.
Consequently, late on 30 August, Potts decided that if he remained in location, his command would be destroyed, and so he ordered a withdrawal south of Alola towards Eora village.
[11][63] In aftermath of the battle, as the Australians withdrew towards Eora Creek, the Japanese pushed over the crest of the ridge south of the Isurava rest house and then occupied Alola.
There they secured a large amount of small arms ammunition and grenades, as well as rations, which were eagerly consumed by the troops who were now beginning to feel the effects of hunger as a result of an already strained supply line.
[65] On 28 August, Horii received orders to secure an advanced position south of the Owen Stanleys, but to keep the majority of his force to the north, while the situation around Guadalcanal was resolved.
[72] There was no climactic battle at Imita Ridge, as Horii cancelled his offensive on 14 September, and began withdrawing north to shorten his line of communication and bring supplies forward for his troops to regain their strength.
Williams argues that, rather than skilful handling by Potts, the vital factor in allowing the Australians to live to fight another day, was Horii's own mistakes, as well as tactical errors by the Japanese battalion commanders on the ground.
[83] Japanese author Kengoro Tanaka draws the opposite conclusion, highlighting the stubborn defence put up by the Australian troops on the ground, and the heavy casualties inflicted on the attackers, as being key factors.