Battle of Magdhaba
British Empire The Battle of Magdhaba took place on 23 December 1916 during the Defence of Egypt section of the Sinai and Palestine Campaign in the First World War.
[1][Note 1] The attack by the Anzac Mounted Division took place against an entrenched Ottoman Army garrison to the south and east of Bir Lahfan in the Sinai desert, some 18–25 miles (29–40 km) inland from the Mediterranean coast.
In August 1916, a combined Ottoman and German Empire army had been forced to retreat to Bir el Abd, after the British victory in the Battle of Romani.
During the following three months the defeated force retired further eastwards to El Arish, while the captured territory stretching from the Suez Canal was consolidated and garrisoned by the EEF.
An Ottoman Army garrison in a strong defensive position was located at Magdhaba, some 18–30 miles (29–48 km) inland to the south east, on the Wadi al-Arish.
During the day's fierce fighting, the mounted infantry tactics of riding as close to the front line as possible and then dismounting to make their attack with the bayonet supported by artillery and machine guns prevailed, assisted by aircraft reconnaissance.
At the beginning of the First World War, the Egyptian police who had controlled the Sinai Desert were withdrawn, leaving the area largely unprotected.
The Maghara Hills, 50 miles (80 km) south west of Romani, in the interior of the Sinai Desert, were also attacked in mid-October by a British force based on the Suez Canal.
[7] These supply lines were marked by railway stations and sidings, airfields, signal installations and standing camps where troops could be accommodated in tents and huts.
[Note 4] If left intact, the Ottoman forces at Magdhaba and Hafir el Auja could seriously threaten the advance of the EEF along the north route towards Southern Palestine.
[18] However, the battle of attrition on the Somme, coupled with a change of Britain's prime minister, with David Lloyd George succeeding H. H. Asquith on 7 December, destabilised the status quo sufficiently to bring about a policy reversal, making attacks on the Central Powers' weak points away from the Western Front desirable.
Another consequence of the victory was that Major General H. A. Lawrence, who had been in command of the Northern Sector of the Suez Canal defences and Romani during the battle, was transferred to the Western Front.
[25][26][Note 6] Murray considered this force to be under strength by at least a division for an advance to Beersheba, but felt he could gain El Arish and form an effective base on the coast, from which further operations eastwards could be supplied.
As a major general, Chetwode had been in command of cavalry on the Western Front, where he was involved in pursuing retreating Germans after the First Battle of the Marne.
[8] On 20 December, a week after Chauvel returned from leave, the advance to El Arish began when the Anzac Mounted Division left Bir Gympie at 21:45.
They moved out without the 2nd Light Horse Brigade, which was in the rear assisting with patrolling the lines of communication stretching 90 miles (140 km) back to Kantara on the Suez Canal.
[35][36] Chetwode reported that he had arranged a special camel convoy with rations and horse feed to arrive at El Arish at 16:30 that day, with a view to the Anzac Mounted Division advancing on Magdhaba, 18 miles (29 km) away.
Clearly, the move of the Ottoman garrison from El Arish had not been a sudden, panicked reaction; indeed it was first noticed by Allied aerial reconnaissance planes as early as 25 October.
On 22 December 1916, the day before the attack, the garrison had been inspected by Kress von Kressenstein, commander of the Ottoman Desert Force, who drove from his base at Hafir el Auja.
Secondly, the arrival of the new British commander, Chetwode, and his staff and their vital forward planning to organise the necessary logistical support for an immediate long range attack by the Anzac Mounted Division.
The column had been successfully guided by brigade scouts, until the garrison's fires had become visible for about an hour during their trek, indicating the Ottomans did not expect an attacking force to set out on a second night march, after their 30 miles (48 km) ride to El Arish.
[46] The Royal Flying Corps's 5th Wing under the command of Lieutenant-Colonel P B Joubert de la Ferté stationed at Mustabig supported the Anzac Mounted Division.
By the time the advance to El Arish occurred in December 1916, two additional hospital trains were available on the Sinai railway, and medical sections had been deployed at the following: At 06:30 the No.
During the day, pilots and their observers provided frequent reports; fourteen were received between 07:50 and 15:15, giving estimated positions, strength, and movements of the Ottoman garrison.
[47][50] The main attack, from the north and east, was to be made by the New Zealand Mounted Rifles Brigade, commanded by Brigadier General Edward Chaytor, which moved in line of troop columns.
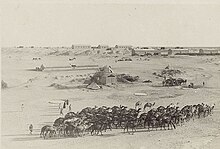
This attack began near the village of Magdhaba and the Wadi El Arish, on the virtually featureless battleground, when the British Empire artillery opened fire at the same time as Chaytor's group moved towards the Ottoman garrison's right and rear.
After meeting severe shrapnel fire as they trotted over the open plain, they were forced to take cover in the Wadi el Arish where they dismounted, continuing their advance at 10:30 against the Ottoman left.
All organised resistance ceased ten minutes later and as darkness fell, sporadic firing petered out, while prisoners were rounded up, horses collected and watered at the captured wells.
[36][63] Aerial reconnaissance found Ottoman forces moving their headquarters north from Beersheba, while the garrison at their main desert base of Hafir El Auja was slightly increased.
[66] After filling up from the water convoy after its arrival at Magdhaba, the New Zealand Mounted Rifles and 3rd Light Horse Brigades left to ride back to El Arish in their own time.