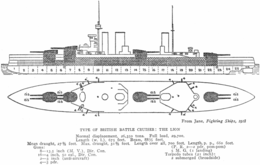
HMS Lion (1910)
During the Battle of Jutland she suffered a serious propellant fire that could have destroyed the ship had it not been for the bravery of Royal Marine Major Francis Harvey, the gun turret commander, who posthumously received the Victoria Cross for having ordered the magazine flooded.
She spent the rest of the war on uneventful patrols in the North Sea, although she did provide distant cover during the Second Battle of Heligoland Bight in 1917.
[8] After the Battle of Jutland revealed her vulnerability to plunging shellfire, 1 inch (25 mm) of additional armour, weighing approximately 100 long tons (102 t), was added to the magazine crowns and turret roofs.
They turned south at full speed at 11:35[Note 1] when the British light forces failed to disengage on schedule and the rising tide meant that German capital ships would be able to clear the bar at the mouth of the Jade Estuary.
Beatty's main body encountered the crippled Cöln shortly after turning north and she was sunk by two salvos from Lion.
An earlier Raid on Yarmouth on 3 November had been partially successful, but a larger-scale operation was devised by Admiral Franz von Hipper afterwards.
The fast battlecruisers would actually conduct the bombardment while the entire High Seas Fleet was to station itself east of Dogger Bank to provide cover for their return and to destroy any elements of the Royal Navy that responded to the raid.
Admiral Beatty's 1st BCS, now reduced to four ships, including Lion, as well as Vice-Admiral Sir George Warrender's 2nd Battle Squadron with six dreadnoughts, was detached from the Grand Fleet in an attempt to intercept the Germans near Dogger Bank.
[Note 2] This confusion allowed the German light cruisers to escape, and alerted Hipper to the location of the British battlecruisers.
However, Lion scored the first serious hit of the battle when one of her shells penetrated the working chamber of Seydlitz's rear barbette at 09:40 and ignited the propellant lying exposed.
[20] Seydlitz returned the damage at 10:01 with a 283-millimetre (11.1 in) shell that ricocheted off the water and pierced Lion's five-inch armour aft, although it failed to explode.
However, the resulting 24-by-18-inch (610 by 460 mm) hole flooded the low power switchboard compartment and eventually shorted out two of Lion's three dynamos.
One splinter put a hole in the exhaust pipe of the capstan engine which eventually contaminated the auxiliary condenser with saltwater.
[24] By 10:52 Lion had been hit fourteen times and had taken aboard some 3,000 long tons (3,000 t) of water which gave her a list of 10° to port and reduced her speed.
[23] In the meantime Blücher had been heavily damaged by fire from all the other battlecruisers; her speed had dropped to 17 knots (31 km/h; 20 mph) and her steering gear had been jammed.
Almost immediately afterwards, at 15:32, he ordered a course change to east-south-east to position himself astride the Germans' line of retreat and called his ships' crews to action stations.
Hipper ordered his ships to turn to starboard, away from the British, to assume a south-easterly course, and reduced speed to 18 knots (33 km/h; 21 mph) to allow three light cruisers of the 2nd Scouting Group to catch up.
[28] This began what was to be called the 'Run to the South' as Beatty changed course to steer east-south-east at 15:45, paralleling Hipper's course, now that the range closed to under 18,000 yards (16,000 m).
They burned violently, with the flames reaching as high as the masthead, and killed most of the magazine and shell room crews still in the lower part of the mounting.
[31] Royal Marine Major Francis Harvey, the mortally wounded turret commander, was posthumously awarded the Victoria Cross for having ordered the magazine flooded.
The smoke and haze from these hits caused Lützow to lose sight of Lion, and she switched her fire to Queen Mary at 16:16.
[34] At 16:30 the light cruiser Southampton, scouting in front of Beatty's ships, spotted the lead elements of the High Seas Fleet charging north at top speed.
[36] Beatty's ships maintained full speed to try to put some separation between them and the High Seas Fleet and gradually moved out of range.
By 18:35 Beatty was following the 3rd BCS as they were steering east-south-east, leading the Grand Fleet, and continuing to engage Hipper's battlecruisers to their southwest.
Beatty took this opportunity to recall the two surviving ships of the 3rd BCS to take position astern of New Zealand and then slowed down to eighteen knots and altered course to the south to prevent himself from getting separated from the Grand Fleet.
[40] This manoeuvre was successful, and the British lost sight of the Germans until 20:05, when the light cruiser Castor spotted smoke bearing west-north-west.
[41] Shortly after 20:30 the pre-dreadnought battleships of Rear Admiral Mauve's II Battle Squadron were spotted and fire switched to them.
Scheer steered south-eastward pursuing a lone British battle squadron reported by an airship, which was in fact the Harwich Force under Commodore Tyrwhitt.
Along with the rest of the 1st BCS she guarded the interned ships[49] until she was assigned to the Atlantic Fleet in April 1919 and then placed in reserve in March 1920.
Paid off on 30 March 1922, despite a press campaign to have her saved for the nation as a memorial, Lion was sold for scrap on 31 January 1924 for £77,000[50] to meet the tonnage limitations of the Washington Naval Treaty.