Southern Palestine offensive
The next day, the fiercely contested fighting south of Tel el Khuweilfe by the EEF was not designed to capture Hebron, but to create sufficient area for the deployment of the XX Corps, for a flank attack on the central defences of the old Gaza to Beersheba line.
If they could capture Jerusalem this would put pressure on the Ottoman Empire, which could in turn place a strain on the German alliance, at the same time enhancing Britain's long term aim of strengthening their influence in the Middle East.
The 21st Infantry Regiment on 26 October, according to the Turkish General Staff Archives was claimed to be "at half strength in trained men" and reinforcements were failing to keep up with "sick and battle casualties."
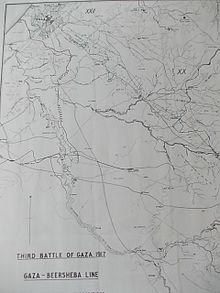
Stretching from the Mediterranean Sea on either side of Gaza a series of strong groups of positions at Sihan, Atawineh, Abu Hariera-Arab el Teeaha and Beersheba, ran eastwards for 30 miles (48 km) to a point south of Sharia.
Bulfin) Desert Mounted Corps (Lieutenant General Sir H. Chauvel) Altogether, the EEF comprised 200,000 men (including Arab workers), 46,000 horses, 20,000 camels, more than 15,000 mules and donkeys, and hundreds of artillery pieces.
On 2 November the XX Corps took over the Ottoman hospital when the Australian Mounted Division receiving station, transferred to the town hall where wounded from the fighting in the hills north of the city started to arrive.
[109][110][111] These attacks, which concentrated on a 2 miles (3.2 km) long section of the defences between Umbrella Hill and the coast, aimed to capture three groups of trench complexes or redoubts, called el Arish, Rafa, and Cricket by the EEF.
"[112] During these attacks, which were never intended to capture Gaza, just the first line of Ottoman trenches, the XXI Corps utilised new infantry tactics, and were supported by tanks and a large quantity of artillery, organised according to a western front-style of deployment.
[113] The main flank attack on the Ottoman front line stretching from Gaza, was made on 6 November by the EEF in the centre at Hareira and Sheria, and a gap was created for the Desert Mounted Corps to advance to capture Huj on their way to the Mediterranean coast.
Chauvel, aware of the advance by troops of the XXI Corps along the coast ordered Hodgson at 13:00 to send a regiment of the 4th Light Horse Brigade (which had returned to his command earlier in the day) to make touch them.
During a personal reconnaissance by Major General Shea commanding the 60th (London) Division, he saw a "straggling column of enemy moving from west to east some three miles (4.8 km) ahead and a flank guard with artillery hastily taking up a position to the right front."
The military commissioner argued that the Army Group had ordered provisions be sent back as a priority but the Flying Squadron officer threatened to machine gun the railway station if the wagons were not handed over.
[180] Bombs were also dropped on the main positions behind the Kauwukah defences, near Um Ameidat, on Gaza and on shelters west of Sheria, and three aerial combats were fought against three hostile aircraft.
Our pilots then descended and machine-gunned them.The only infantry unit capable of advancing on 9 November was the 52nd (Lowland) Division's 156th (Scottish Rifles) Brigade, commanded by Brigadier General Archibald Herbert Leggett.
Just before dark the 2nd Light Horse Brigade captured a further 200 prisoners, before the Anzac Mounted Division took up a night battle outpost line, along high ground south of the Wadi Mejma, from near Isdud to Arak Suweidan.
[208][209][Note 14] Both the Australian and Yeomanry Mounted Divisions reconnoitred the eastern half of the Ottoman line running from Qastina, roughly through Balin and Barqusya, to the neighbourhood of Bayt Jibrin in the Judean Hills.
[213] The 4th Light Horse Brigade held a line linking to the Anzac Mounted Division at Beit Affen, while the Ottomans rearguard were holding a ridge near Barqusya with three cavalry troops, three guns and about 1,500 infantry.
[217][219] The 20 miles (32 km)-long defensive line, chosen by the Ottoman commanders to rally their 20,000-strong army and stop the invasion of Southern Palestine, was also designed to protect the Jaffa to Jerusalem railway and Junction Station.
[220][221][222] Erich von Falkenhayn, commander of the Yildirim Army Group, had decided to make a stand in front of Junction Station, deploying his forces by the evening of 11 November and he ordered a counterattack against the British right flank which was covered by the Australian Mounted Division.
Owing to poor light, the artillery was no longer able to give much assistance, but the Gurkhas quickly retook the hill with a bayonet charge, suffering 50 casualties, and in the process recovering two Lewis guns.
Two batteries of Australian Mounted Division had come into action on the high ground north-west of Summeil firing on the fresh Ottoman force moving over the open plain in full view of the gunners.
However, infantry in the 75th Division made steady slow progress, eventually forcing the main body of the Ottoman rear guard, to fall back to a slight ridge 1 mile (1.6 km) to the north-east.
[255] However, the Ottoman defenders continued to hold El Mughar village until two squadrons of the Berkshire Yeomanry regiment (6th Mounted Brigade) fighting dismounted, with two battalions of the 52nd (Lowland) Division, renewed the attack.
[266][267] At the same time the New Zealand Mounted Rifles Brigade (commanded by Brigadier General William Meldrum) ran into a determined and well entrenched Ottoman rearguard near Ayun Kara, which they attacked.
[301] During the week beginning 27 November the Ottoman Army launched a series of infantry attacks employing shock tactics in the hope of breaking the British lines during the period of destabilisation created by EEF reinforcements and withdrawals.
[315][317] Although it is claimed that on 3 December the Ottoman Army had abandoned their counterattacks and that fighting in the Judean Hills ceased,[301][316] as a consequence of units of the 74th (Yeomanry) Division recapturing Beit Ur el Foqa, during a night time attack,[318] the position was impossible to hold.
[333] In order to establish this line, it was necessary to push the 3rd and 7th Infantry Divisions of the Ottoman Eighth Army back away from the Nahr el Auja 4 miles (6.4 km) north of Jaffa on the Mediterranean coast.
[336][335] They relieved the New Zealand Mounted Rifles Brigade, which had been heavily involved in the first attempt to capture the Nahr el Auja, fought shortly after their victory at the Battle of Ayun Kara.
[317] Preparations were, however, complicated by the sodden state of the low and swampy ground on the southern banks of the Nahr el Auja where the attack would be launched, and the river was swollen by rain which had fallen on 19 and 20 December.
Allenby's advance by comparison made considerable territorial gains, helped secure Baghdad and the oilfields at Basra in Mesopotamia, encouraged the Arab Revolt, and inflicted irreplaceable losses on the Ottoman Army.