12th Light Horse Regiment (Australia)
In 1921, as part of a re-organisation of Australia's military following the disbandment of the AIF, the regiment was re-raised as a part-time unit of the Citizens Force based in New South Wales.
The 12th Light Horse Regiment was established on 1 March 1915[Note 1] at Liverpool, New South Wales, and two days later began forming at Holsworthy as part of the all-volunteer Australian Imperial Force (AIF), which was raised for service overseas during the First World War.
They mainly fought dismounted, using their horses to obtain mobility that foot soldiers did not possess, but they could also conduct certain cavalry roles, such as scouting and screening, while mounted.
[8] On 11 July, the 4th Light Horse Brigade received orders to interrupt its journey to Egypt and instead disembark at Aden, where an Ottoman attack was expected.
Moving into a camp at Heliopolis, near Cairo,[9] after receiving a draft of 54 reinforcements and about 350 replacement horses, the regiment began a period of intense training and guard duties as they acclimatised to the local conditions.
[11] The troops were not initially informed of this, and following a train trip to Alexandria on 25 August they embarked upon the transport SS Marquette and sailed to Lemnos Island where they were transferred to Prince Abbas.
[14] For the remainder of the campaign, about 600 men from the regiment – including a batch of reinforcements that arrived in early October – carried out mainly defensive duties before leaving with the last Australian troops to be evacuated from the peninsula on 20 December.
[17] Under a new commanding officer, Lieutenant Colonel John Royston – a veteran of the Boer War who had replaced Abbott after the latter had been sent to England – the regiment began to re-form.
During this fighting, the 12th Light Horse Regiment provided flank protection, carrying out patrols, and was not directly engaged except for its machine-gun section.
Assigned the task of attacking the Atawineh Redoubt early in the morning of 19 April, the regiment dismounted about 2 mi (3.5 km) from it and advanced on foot.
Spread thinly across a 1,000 yd (900 m) front with just 500 men,[32] the 12th was dangerously exposed as machine-gun fire began to inflict casualties, checking the Australians' advance.
[33] After three days they were withdrawn back to Shaquth, where they worked to improve defences and conducted patrols for the next fortnight before dispatching two squadrons in early May to attack an Ottoman foraging party at Esani.
Supporting artillery helped suppress the machine-gun fire from the flanks,[44] and the speed of the charge made it difficult for the Ottoman gunners to adjust their range.
After moving on to Summeil the next day, one of the regiment's squadrons received heavy fire while providing flank protection to the 54th Division as it attacked to the south of Et Tine.
They were then ordered to launch an attack around Latron during the Battle of Nebi Samwil, but after moving to Abu Shushen where they dismounted, the regiment was recalled to Junction Station.
[61] In March, the 4th Light Horse Brigade, commanded by Brigadier General William Grant, was inspected by the Duke of Connaught who, according to author Kenneth Hollis, likened the "snap and automatic precision" of their ceremonial drill to "a battalion of Grenadiers".
[62] The following month they moved to Selmeh, near Jaffa, to support the attack on the Ottoman position that had been established around Jiljulah and Kalkileh on the railway line that stretched north in the direction of Haifa.
Although the 74th Division made some progress on the flank, the regiment's involvement in the attack was called off due to heavy resistance and the 12th, along with the rest of the 4th Light Horse Brigade, was sent to the Jordan Valley, which had been occupied by British Empire forces.
[63][64] In late April 1918, the regiment joined an attack on Es Salt,[17][65] which was undertaken as part of a plan to capture the village so it could be used as a staging point for a further advance towards the railway junction at Deraa.
[69][70] After coming under attack, and finding themselves hard pressed, the 4th Light Horse Brigade was forced back to the south,[71] exposing the rear of the troops holding Es Salt.
Over the course of next few days little progress was made by the British Empire troops and, despite the arrival of reinforcements, the commander of the operation, Lieutenant General Harry Chauvel, decided that it was necessary to withdraw from the position on 3 May.
Before dawn the next morning, the regiment led the Australian Mounted Division's advance towards Semakh and Tiberias, moving by day to a position near Nahr Iskanderun where they rested until midnight.
[78] There the regiment rested again until midday before making for Keikur Beidas; encountering a number of surrendering Ottoman troops along the way, it arrived there in the afternoon but halted only briefly before continuing on to the mouth of the Plain of Esdraelon, where they bivouacked for the night.
[80] At this point, the defenders raised a white flag of truce, and as several Australians from the 11th and 12th Light Horse advanced to take their surrender, the Germans manning the station killed them.
In the afternoon, after the garrison was seen to withdraw, they advanced in concert with a number of armoured cars and at 3:00 pm the regiment entered Tiberias, capturing 200 German and Ottoman troops and a large amount of stores.
[85][86] From there, on 27 September, they began the final advance to Damascus, crossing the Jordan River and, early the following day, established a divisional bridgehead around Et Min during the Battle of Jisr Benat Yakub.
Forming up with the 4th on their left, the regiment attacked across a maize field towards a spur near the Jebel es Aswad, advancing on a position that they believed was strongly held.
[89] The 12th then spent the night south-west of the city and the following day, 1 October 1918, it was one of the first Australian units to enter Damascus, sending patrols in ahead of the main advance.
[17] Following the end of the war, the 12th Light Horse Regiment remained in the Middle East for a number of months, during which time, under the command of Lieutenant Colonel Phillip Chambers,[91] they were used to suppress the 1919 Egyptian Uprising.
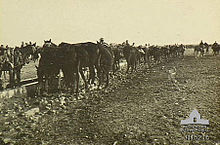
[93] Due to concerns about costs, availability of shipping and quarantine restrictions, the decision was made that the horses would not be returned to Australia, but that they would be sold to the British Indian Army for further service, or to local Egyptians.