4th Division (Australia)
The division spent the majority of the war in Western Australia, before moving to Queensland prior to its deactivation in late 1944.
[2][3] Under the command of Major General Vaughan Cox, a British Indian Army officer,[4] the 4th Division began forming at Tel el Kebir, in Egypt in February 1916.
[7] The following month, the division moved to France, taking over part of the "nursery" sector near Armentières, where they could be introduced to trench warfare in a relatively quite area.
In August 1916, it relieved the 2nd Division on the Pozières heights,[10] arriving in time to fight off a determined German counterattack.
Meanwhile, an attack on the 14th Battalion was repulsed after an individual effort by Lieutenant Albert Jacka, who had previously received the Victoria Cross for actions at Gallipoli.
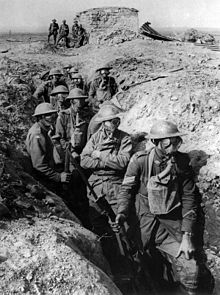
As part of this, on 11 April, two of the division's brigades – the 4th and 12th – assaulted the new line in the First Battle of Bullecourt, supported by British tanks for the first time.
Lacking artillery support, which had been held back due to incorrect reports about the location of Allied troops, and enfiladed from the flanks,[19] the Australians became cut off and came under heavy counter-attack from the 27th Division.
On 2 July, the divisional commander, Holmes, was fatally wounded by a stray shell while escorting the New South Wales premier, William Holman, around the battlefield at Messines.
Supported by a well co-ordinated artillery barrage,[26] which rolled ahead of the assault, and then broke up the subsequent German counter-attack, the attack proved successful, albeit costly.
[28][29] On 12 October, the 12th Brigade was assigned to protect the 3rd Division's flank during the First Battle of Passchendaele, and took part in an effort to capture the Keiberg ridge.
The Canadians then took over responsibility for the sector, and were eventually able to secure the village in November, while the Australians were withdrawn to Messines for a rest.
[30][31] In the wake of considerable losses, which could not be made up from voluntary recruitment, Australian authorities considered breaking up the 4th Division to provide reinforcements, although this did not eventuate.
[33] Throughout the winter of 1917–1918, the Australians rotated between the front and rest areas around Flanders and northern France, during which time it was largely quiet, apart from occasional shelling and aerial attacks.
[34] The 4th Division spent a short period in the line around Hollebeke in the northern part of the Australian sector during this time.
[36] The 4th Brigade was detached from the division during this time, and fought a sharp action alongside the New Zealanders at Hebuterne, holding off several German attacks in late March and early April.
On 21 April, in the lead up to the battle, the German fighter pilot, Manfred von Richthofen (the "Red Baron") was shot down over Australian lines, north of Villers-Bretonneux at Corbie.
There are many theories as to who shot him down, one of which is that an Australian Vickers machine gunner, Sergeant Cedric Popkin of the 24th Machine-Gun Company, 4th Division, fired the actual bullet that killed von Richthofen.
[41][42] At dawn on 24 April, the Germans launched their attack, supported by armoured vehicles and a heavy artillery bombardment, that included mustard gas.
With the situation urgent, the British III Corps ordered a counter-attack from the Australian 13th and 15th Brigades to retake the town.
The attack was launched around 10 pm that night, with the two brigades isolated the town, enveloping it from the north and south, before entering it on Anzac Day to begin mopping up operations, with the Australians penetrating from the east, while British troops came from the opposite direction.
A combined arms assault, including armour and air support, the attack proved successful in capturing the town, in just over 90 minutes, for around 1,400 casualties.
[47] In early October, the remainder of the Australian Corps was withdrawn from the line for rest at the insistence of Prime Minister Billy Hughes.
At this time, the division assumed control of a broad area, with many dispersed brigades: the 6th at Kuranda, the 11th at Cairns, the 12th at Smyth's Siding, and the 14th at Cluden.
[57] As further Allied advances in New Guinea reduced the threat posed to the area the 4th Division became redundant and its headquarters elements were withdrawn to Atherton and disbanded in October 1944.