Australia in World War I
Even before Britain declared war on Germany on 4 August 1914, the nation pledged its support alongside other states of the British Empire and almost immediately began preparations to send forces overseas to engage in the conflict.
The AIF departed Australia in November 1914 and, after several delays due to the presence of German naval vessels in the Indian Ocean, arrived in Egypt, where they were initially used to defend the Suez Canal.
[3] Within days, plans for an Australian expeditionary force were completed by Brigadier General William Throsby Bridges and his staff officer, Major Cyril Brudenell Bingham White.
Sydney and the destroyer HMAS Warrego landed small parties of naval reservists at the settlements of Kabakaul and the German gubernatorial capital Herbertshöhe on Neu-Pommern, south-east of Rabaul.
[10] A small 25-man force of naval reservists was subsequently landed at Kabakaul Bay and continued inland to capture the radio station believed to be in operation at Bita Paka, 4 miles (7 km) to the south.
Upon their arrival in Egypt in November, the 1st Division moved to Camp Mena, near Cairo, where they were used to defend the Suez Canal against Turkey, which had declared war on 29 October; the Australians commenced a period of training to prepare them for combat on the Western Front as it was still expected that they would be sent to England for deployment in the European theatre.
[31] Overcrowding and shortages of equipment in England meant that it was decided to keep the Anzacs in Egypt during the European winter, during which time they would undertake further training to prepare them for their eventual use in the trenches in France.
The British Secretary of State for War, Field Marshal Lord Kitchener, appointed General Sir Ian Hamilton to command the Mediterranean Expeditionary Force (MEF) that was to carry out the mission.
[53] Meanwhile, the landing at Suvla Bay was only lightly opposed but the British commander, Lieutenant General Sir Frederick Stopford, had so diluted his early objectives that little more than the beach was seized.
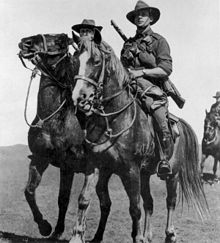
[58] In March 1916, the infantry began to move to France while the cavalry units stayed in the area and fought Turkish troops and the Senussi Arab tribes that were threatening British control of Egypt.
Chauvel, with the agreement of Lieutenant General Philip Chetwode commanding the Desert Column who had arrived earlier that day, set out to attack the Turkish forces at Magdhaba with the Anzac Mounted Division.
[99] From 1 to 7 November, strong Turkish rearguards at Tel el Khuweilfe in the southern Judean Hills, at Hareira and Sheria on the maritime plain and at Sausage Ridge and Gaza close to the Mediterranean coast, held the Egyptian Expeditionary Force in heavy fighting.
Its 53rd (Welsh) Division and corps cavalry, together with the New Zealand Mounted Rifles Brigade, were deployed in the front line near Tel el Khuweilfe, in the Judean Hills north of Beersheba.
[143] Two days after taking over the line, the 2nd Division was thrown into a hastily planned attack that resulted in further casualties when the Germans spotted the Australians forming up and once again subjected them to the weight of their artillery and machine guns.
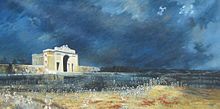
During the Second Battle of the Somme the Australian Corps fought actions at Lihons, Etinehem, Proyart, Chuignes, and Mont St Quentin, before taking part in their final engagement of the war on 5 October 1918 at Montbrehain.
[169] Australian casualties during these battles were very high and coupled with the drying up of reinforcements from Australia, the rejection of the proposal to introduce conscription and the granting of home leave to men who been serving since 1914 meant that by the end of the war the AIF was stretched to the limit.
[173] The Australian Flying Corps (AFC) was formed in March 1914 and was soon deployed to German New Guinea, with one BE2c aircraft and crew dispatched with the AN&MEF, although the colonies surrendered before the plane was even unpacked.
Flying underpowered and unreliable aircraft such as the Caudron, Maurice Farman Longhorn and Martinsyde, the Half-Flight suffered a high attrition rate, losing two killed and six captured out of its strength of just nine pilots.
[181] Notably during this time Lieutenant Frank McNamara was awarded the Victoria Cross for rescuing another Australian pilot who had been shot down by ground fire and forced to land close to Turkish positions on 20 March 1917.
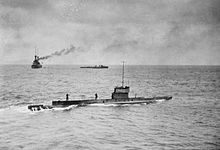
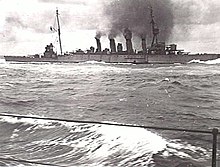
[181] At the outbreak of war the Royal Australian Navy consisted of the battlecruiser HMAS Australia, the light cruisers Sydney, Melbourne and Brisbane (under construction), the destroyers Parramatta, Yarra and Warrego, and the submarines AE1 and AE2.
[193] Six destroyers—the Warrego, Parramatta, Yarra, Swan, Torrens and Huon—were sent in response to this request, and undertook anti-submarine operations in the Adriatic, working out of Brindisi, Italy as part of the Otranto Barrage.
[195] In the early stages of mobilisation several militia infantry battalions were called out to carry out guard duties upon infrastructure that was considered important to the war effort, such as munitions factories, communications facilities, ammunition dumps and transportation centres.
[201] In February 1916 a large-scale effort by militia artillerymen to enlist in the artillery units that were being raised for the 3rd Division was prevented when they were called out to man the coastal defences due to the threat posed by a German commerce raider that was believed to be in the Pacific.
[201] In April 1918 the militia artillery was again mobilised, although this time only for a month, when news that the German commerce raiders Wolf and Seeadler had entered Australian waters the previous year.
[158] In Australia, public opinion regarding the matter was divided; many Australians opposed to the issue on moral grounds, feeling that the situation was not desperate enough to require such a drastic measure, but others felt it necessary to achieve final victory.
[213] These initial concerns were short lived, at least in the beginning as the British government provided assurances that it would underwrite a large amount of the war risk insurance for shipping to allow trade among the Commonwealth to continue.
This understanding proved particularly beneficial for the wool and wheat industries; the British government undertook to buy Australian products even though the shortage of shipping meant that there was no chance that they would ever receive them.
[223] Due to the size of the forces deployed overseas—roughly 167,000 personnel in France, Britain and Egypt—and the logistical requirements of bringing them home the process was a lengthy one and as such it became important to occupy the troops while they waited.
Although previously Australian foreign interests had been largely handled by Britain, as a combatant Australia sent its own delegation to the Paris Peace Conference in 1919, and it also began to take a more assertive role in regional affairs in the Pacific.
At the peace conference Prime Minister Hughes pushed aggressively for reparations and an Australian mandate over German New Guinea; a stance which conflicted with the liberal internationalist inspired Fourteen Points put forward by American President Woodrow Wilson.