Military history of New Zealand during World War I
A War Council, which included Marshall, Prime Minister William Massey, and Major General Alexander Godley, the commandant of the New Zealand Military Forces, was formed.
These included implementing inspections of incoming vessels at the four major ports, mobilisation of the garrison artillery to man the various forts around the country, and commencement of censorship.
[13] The outbreak of World War I was announced in the afternoon of 5 August by the Governor of New Zealand, Lord Liverpool, when he read out aloud the telegram dispatched by the Colonial Office confirming the commencement of hostilities to a crowd of 15,000 people gathered outside the old Parliament Building in Wellington.
[14] Massey, speaking to the crowd after Lord Liverpool's proclamation of war, urged his fellow citizens to "keep cool, stand fast, do your duty to your country and your Empire".
[15] The general population, at least 20% of whom were born in Great Britain, also demonstrated keen patriotism and an appreciation that New Zealand needed to play a role in the ensuing conflict.
However, the indigenous people of New Zealand, the Māori, had a more muted reaction; not having the same links to Great Britain, they were only a small proportion of the population and were not a part of mainstream society.
To help allay concerns about the possibility of being intercepted by the German East Asiatic Squadron, the convoy was joined by HMAS Australia and the French cruiser Montcalm at Noumea.
[24] It had been envisaged for a number of years that New Zealand would contribute an expeditionary force to serve in any conflict involving the British Empire and plans for raising it had been in place for some time.
[25] In the years prior to the outbreak of the war, Godley coordinated plans with his counterpart in Australia for the purpose of making a joint contribution to an expeditionary force.
[27] To form the basis of the NZEF, Massey had wanted to call up men of the Territorial Force but was advised that this was only possible for active service in New Zealand.
In any event, it proved unnecessary as men of the Territorial Force came forward on a voluntary basis in large numbers and furthermore, the public response to the call for volunteers for the NZEF was immediate and enthusiastic.
[25][28] Volunteers who passed their medical examination proceeded to mobilisation camps established in Auckland, Palmerston North, Christchurch and Dunedin, for training.
Ultimately, the main body of the NZEF, under the command of Godley,[Note 1] departed New Zealand on 16 October after an earlier attempt to leave was abandoned following the assessment of the risk of interception by the German East Asiatic Squadron.
[25][31] Following its departure from Wellington, the convoy transporting the NZEF steamed to Western Australia where it linked up with the troopships carrying the Australian Imperial Force (AIF).
[32][33] In December, the Australian and New Zealand Army Corps (ANZAC), under Lieutenant General William Birdwood, was formed to command both the AIF and NZEF components.
[37] On 2 February, after the Ottomans launched a raid on the Suez Canal, elements of the brigade took part in repelling the attack, with the Canterbury Battalion suffering the division's first losses in battle, with two men being wounded, one of whom later died.
[40][41] In early May, Hamilton decided to focus the MEF's efforts on the Helles sector, which he believed represented its best chance of success for gaining the heights of Achi Baba.
During the subsequent Second Battle of Krithia on 8 May, the New Zealanders suffered 835 casualties in an ill-advised and unsupported daylight advance over open ground that Lieutenant Colonel William Malone, the commander of the Wellington Infantry Battalion, later believed could have been occupied after dark with minimal losses.
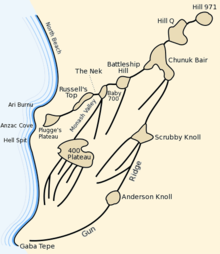
[44][47] The force tasked with taking the summit of Chunuk Bair was the New Zealand Infantry Brigade, commanded by Colonel Francis Johnston along with an Indian mountain battery.
Johnston then inexplicably waited for all of his force to arrive at the rendezvous point before attacking Chunuk Bair, contrary to Birdwood's instructions to advance irrespective of any delays.
The 1st Battalion fought two brisk but inexpensive actions south-west of Matruh as part of a mixed force (including British, Australians, and Indians), one on Christmas Day, the other on 23 January 1916.
New Zealanders fought in most of the battles leading up to the fall of Jerusalem and the defeat of the Ottoman Army, and were praised for their fighting alongside their Australian and British comrades.
Arriving in France, it settled in on the stalemated Western Front as part of I ANZAC Corps, initially based in the Armentières sector where they would undergo intensive training in trench warfare.
On 7 June, after the detonation of nearly 500 tons of explosives in huge mines on both sides of the New Zealand sector, the 2nd and 3rd Brigades scrambled over the top, in and out of shell holes, and up the battered slopes.
With prisoners and booty including many guns it was a striking success at no great cost; but the German artillery revived and by the time the division was relieved on 9 and 10 June it had lost 3,700 men, evenly distributed between the three brigades.
Crossing this scene of carnage, the 1st and 4th Brigades gained their objectives after a hard fight, inflicting exceptionally heavy loss on the enemy and capturing much equipment.
The New Zealand Division, which was back up to full strength and trained in open warfare tactics was rushed forward three days later to stem a breakthrough in the First Battle of the Somme, which threatened Amiens.
The day proved to be the division's most successful of their whole time on the Western Front as they pushed east and advanced ten kilometres, capturing 2,000 German soldiers and 60 field guns.
[67] From January 1915, Philomel patrolled the Gulf of Alexandretta in the Eastern Mediterranean, supporting several landings and sustaining three fatal casualties, one being the first New Zealander killed in action in the war.
Although Germany had plans for naval raids on Australia and New Zealand, the threat from her Asiatic Squadron did not eventuate, as that force moved across the Pacific before being destroyed at the Battle of the Falkland Islands.