Battle for Baby 700
[nb 1] On 25 April 1915, the Australian and New Zealand Army Corps (ANZAC), conducted an amphibious landing on the Gallipoli Peninsula.
The attack proved a costly failure for the British Empire forces, after the New Zealand troops on the left flank were delayed, resulting in the main assault by the Australians becoming pinned down.
This time it met with limited success, but the deception raids notably at The Nek and Lone Pine resulted in severe casualties.
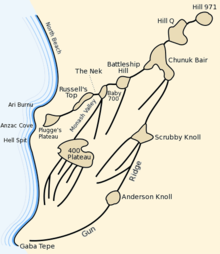
[3] The most direct route to there from the present ANZAC lines was a distance of 350 yards (320 m) from Russell's Top through The Nek, a twenty-yard (18 m) wide piece of high ground between Malone's Gully to the north and Monash Valley to the south.
[6] However, heavy Turkish resistance had forced the brigade commander, Colonel Ewen Sinclair-Maclagan, to instead stop and form a defence line on the second ridge.
Meanwhile the men at Pope's Hill on the opposite slope of Monash Valley, had Turkish positions along Dead Man's Ridge only one hundred yards (91 m) to their rear.
[11] At this early stage of the campaign the ANZACs' lines were a series of intermittent trenches and posts with large gaps between them which allowed Turkish snipers to infiltrate their rear areas daily.
[8] A strong Turkish counter-attack against Anzac Cove was launched on 27 April by Ottoman troops occupying the high ground around Chunuk Bair.
[13] The initial plans called for a large-scale assault on 30 April, which would capture of all of 400 Plateau in the south, along Mortar Ridge to Baby 700, and along the seaward slopes to the coast in the north.
[14] Brigadier-General Harold Walker, who was in command of the 1st Australian Brigade, knew the country and the state of his troops and was doubtful that it would succeed.
The New Zealand and Australian Division, commanded by Major-General Alexander Godley, as the strongest formation, would conduct the assault at 19:30 on 2 May.
A naval gunnery and field artillery bombardment of Baby 700 would begin thirty minutes before the start of the attack.
[20] At 19:15 as the bombardment lifted, the 16th Battalion climbed out of Monash Valley and as they cleared the ridge, came under heavy Turkish small arms fire, from The Nek and the Chessboard to their rear.
The New Zealanders made several attempts to move beyond the crest and eventually established a rough defence line at the foot of the Chessboard.
[31] At 01:35, Godley assigned two Royal Marine Light Infantry battalions to Colonel John Monash as the 4th Australian Brigade reserve.
Left on their own and exposed to Turkish fire, small groups of the 16th Battalion started back, and eventually the Turks occupied their trench.
Royal Marines from the Portsmouth Battalion then advanced to Dead Man's Ridge via the western approach, having earlier been heavily engaged while attempting to climb the eastern slope.
After suffering heavy casualties, the Marines were forced to withdraw, leaving their dead, who remained on the position for several days before a solo effort by one of the survivors allowed them to be brought down and buried.
The battalion commander, Lieutenant Colonel Granville Burnage, left Durrant in charge and made a solo effort to reach Monash at brigade headquarters after 15:00 on 3 May.
In the weeks following the failed assault on Baby 700, the Turks launched several of their own attacks, aimed at Quinn's Post, which were repulsed with heavy casualties.