Battle of Megiddo (1918)
Following the battles, Daraa was captured on 27 September, Damascus on 1 October and operations at Haritan, north of Aleppo, were still in progress when the Armistice of Mudros was signed ending hostilities between the Allies and Ottomans.
The operations of General Edmund Allenby, the British commander of the Egyptian Expeditionary Force, achieved decisive results at comparatively little cost, in contrast to many offensives during the First World War.
Allenby achieved this through the use of creeping barrages to cover set-piece infantry attacks to break a state of trench warfare and then use his mobile forces (cavalry, armoured cars and aircraft) to encircle the Ottoman armies' positions in the Judean Hills, cutting off their lines of retreat.
In early 1915 and in August 1916 the Ottomans, with German commanders, aid and encouragement, had attacked the Suez Canal, a vital link between Britain and India, Australia and New Zealand.
Although the Ottomans defended Medina, at the end of the Hejaz Railway against them, part of the Sherifian Army, led by Hussein's son, the Emir Feisal, and British liaison officer T. E. Lawrence, extended the revolt northwards.
After a pause of several weeks caused by bad weather and the need to repair his lines of communication, Allenby advanced eastward to capture Jericho in February 1918.
The army group's commander was the German general, Erich von Falkenhayn, who wished to continue a policy of "yielding defence" rather than hold all positions at all costs.
Feisal's headquarters were at Aba el Lissan, about 15 miles (24 km) south-west of the Ottoman position at Ma'an, and his army received support from the British through the port of Aqaba.
Assistance to Feisal included liaison officers, detachments of armoured cars, Indian machine gunners and a French Algerian mountain battery,[21] 2,000 dromedary from three disbanded battalions of the Imperial Camel Corps Brigade,[22] weapons, ammunition and above all, money (almost always in coin).
[23] The 2,000[24] regular soldiers of the Arab Northern Army maintained a blockade of the Ottoman garrison at Ma'an after an unsuccessful attack at Khirbet es-Samra earlier in the year.
but when it came to co–operation with Allenby's forces, the Arabs under Lawrence had in my experience, nuisance value only.Allenby intended to break through the western end of the Ottoman line, where the terrain was favourable to cavalry operations.
[30] As a preliminary move, the Arab Northern Army would attack the railway junction at Daraa beginning on 16 September, to interrupt the Ottoman lines of communication and distract the Yildirim headquarters.
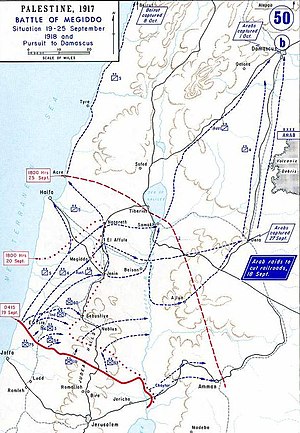
[32][33][34] The main breakthrough was to be achieved on the coast on 19 September by four infantry divisions of XXI Corps, commanded by Lieutenant General Edward Bulfin, massed on a front 8 miles (13 km) wide.
These two communication centres were within the 60 miles (97 km) radius of a strategic cavalry "bound", the distance mounted units could cover before being forced to halt for rest and to obtain water and fodder for the horses.
[13] Earlier in the year (on 9 June), units of the 7th (Meerut) Division had captured two hills just inland from the coast, depriving the Ottomans of two important observation points overlooking the Allied bridgehead north of the Nahr-el-Auja.
[48] Eventually, Ottoman and German reconnaissance aircraft could not even take off without being engaged by British or Australian fighters,[13] and could therefore not see through Allenby's deceptions, nor spot the true Allied concentration which was concealed in orange groves and plantations.
[55][56] As the Ottomans reacted, sending the garrison of Al-Afuleh to reinforce Daraa,[57] the units of Chetwode's Corps made attacks in the hills above the Jordan on 17 and 18 September.
[13][56] At 1:00 am on 19 September, the RAF Palestine Brigade's single Handley Page O/400 heavy bomber dropped its full load of sixteen 112-pound (51 kg) bombs on the main telephone exchange and railway station in Al-Afuleh.
[67] By the end of the first day of battle, the left flank unit of the British XXI Corps (the 60th Division) had reached Tulkarm[68] and the remnants of the Ottoman Eighth Army were in disorderly retreat under air attack by Bristol F.2 Fighters of No.
1 Australian Squadron, through the defile at Messudieh and into the hills to the east, covered by a few rearguards hastily organised by the Gernan Asia Korps headquarters and its commander, Oberst Gustav von Oppen.
[73] With the railway blocked, the Seventh Army's only escape route lay to the east, along the Nablus-Beisan road that led down the Wadi Fara into the Jordan valley.
British cavalry later found 87 guns, 55 motor-lorries, 4 motor-cars, 75 carts, 837 four-wheeled wagons, and scores of water-carts and field-kitchens destroyed or abandoned on the road.
"[76] According to Chauvel's biographer, Allenby's plan for the Battle of Megiddo was as "brilliant in execution as it had been in conception; it had no parallel in France or on any other front, but rather looked forward in principle and even in detail to the Blitzkrieg of 1939.
The Handley Page 0/400 ferried across petrol, ammunition and spares for the fighters and two Airco DH.9s, and itself bombed the airfield at Daraa early on 23 September and nearby Mafraq on the following night.
[80] On 22 September, on the western side of the Jordan River, the Ottoman 53rd Division was attacked at its headquarters near the Wadi el Fara road, by units from Meldrum's Force.
[85][86] On 25 September the Ottoman troops who had reached Mafraq by train from Amman, but who could proceed no further because the railway ahead was demolished, came under heavy aerial attack which caused many casualties and much disorder.
Many Ottoman soldiers fled into the desert but several thousand maintained some order and, having abandoned their wheeled transport, continued to retreat northwards towards Daraa on foot or horseback, under constant air attack.
[86][87] I desire to convey to all ranks and all arms of the Force under my command, my admiration and thanks for their great deeds of the past week, and my appreciation of their gallantry and determination, which have resulted in the total destruction of the VIIth and VIIIth Turkish Armies opposed to us.
Almost an entire Ottoman brigade (along with some German and Austrians) was massacred near the village of Tafas on 27 September, with the commander Jemal Pasha [citation needed] narrowly escaping.
They subsequently advanced to Mouslimmiye, where Mustafa Kemal (who had replaced Liman von Sanders in command of the Yıldırım Army Group) had rallied some troops under XXII Corps HQ.