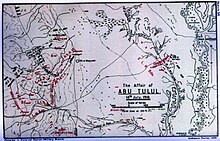
Battle of Abu Tellul
Following two raids east of the River Jordan by the EEF the first in March and second in April the defence of the valley became the responsibility of the Desert Mounted Corps.
[15][17][18] Bad feelings between the two allies arose when it was believed by sections of the Ottoman Army in Palestine that some German units had been withdrawn and sent to the Caucasus.
These and other British artillery stationed south of the river also took part in supporting the Australian Light Horse counter-attack, which regained all that had initially been lost before the day's end.
[22][23] The fords on the Jordan River at Makhadet Hijla and El Hinu were held by the Mysore and Hyderabad Lancers, while the Ghoraniyeh bridgehead was garrisoned by the Alwar and Patiala Infantry Battalions and the 14th and 15th (Imperial Service) Cavalry Brigades of the 2nd Mounted Division.
[27] On 13 July the section of the front line which passed through the Jordan Valley to the Dead Sea was commanded by Chauvel's Desert Mounted Corps.
This salient was difficult to defend, as the posts and sangars were isolated owing to the hilly terrain interspersed by rocky crevasses.
[32] The attack commenced with long-range artillery shelling from both sides throughout the night, then 17 German aircraft bombed the Jordan Valley garrison at 04:00 in the morning of Sunday 14 July, causing dozens of casualties.
[35][36] The 2nd Light Horse regimental commanding officer observed from his new position on Abu Tellul West, just before dawn, a large body of troops coming up the hill towards his twelve-man post.
At first he assumed they were some of his own men retiring from the outer posts, but when they reached the wire and began to cut it, he at once gave the order to open rapid fire.
[36] The German battalions forming the centre of the attacking force made a considerable advance circling over the Vale position and across Abu Tellul; establishing a post on Abu Tellul East and then pushing on to eastern side; to The Bluff where they occupied a post with their backs to Kh al Beiyudak.
This move cut off all the Light Horse posts at Vyse and on Mussallabeh as well as those on The Bluff and Abu Tellul East, all were without communication to regimental or brigade headquarters.
[38] Three attempts were made by the left of the attacking force on Mussallabeh, but were driven back each time with heavy loss by well placed machine-gun fire leaving about 200 dead.
[36] While the outer light horse posts had been surrounded, they had all held out, and turned their machine-guns on the attacking force and by this stage reinforcements of the 1st Light Horse Regiment and the Wellington Mounted Rifle Regiment, were pushing along both sides of the Abu Tellul Ridge, to quickly drive out the remainder of their opponents, and restored the position.
[22] After six-and-a-half hours of fierce hand-to-hand fighting at Mussallabeh, Abu Tellul and on the Wadi Mellaha, a total of 425–448 prisoners were captured, 358–377 of whom were German while the Light Horse suffered 108 casualties.
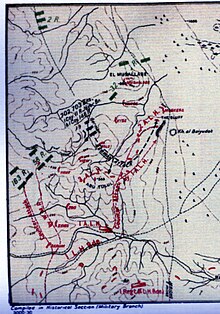
[43][45][46] At 03:30 a squadron of the Jodhpore Lancers crossed the Jordan at the El Hinu ford and a squadron of the Mysore Lancers crossed at Makhadet Hijla to discover the Ottoman cavalry force on a 2-mile (3.2 km) long front with its right flank just north of the Wadi er Rame 1.5 miles (2.4 km) east of Makhadet Hijla.
When the two squadrons of Jodhpore Lancers were in position south of the Ottoman flank, they charged in extended order two horses' lengths apart.
Here they came under heavy machine-gun fire from the right bank of the Wadi er Rame and suffered twenty-eight casualties out of the 125 men who were in the attack.
[48] At 14:30 the Poona Horse moved out of the Ghoraniyeh bridgehead and galloped through shellfire to get in touch with the Sherwood Rangers Yeomanry who were deployed in front of Ain el Garaba.
[49] The total losses suffered by the German and Ottoman forces in the hills at Abu Tellul and Mussallabeh, at the Wadi Mellaha, and at the Wadi er Rame and Ain el Garaba defending the fords on the eastern bank of the Jordan, were 540 prisoners (377 German and 71 Ottoman) and up to 1,000 casualties while the British Empire forces suffered a total of 189 casualties.
[51] Many casualties came in to the 4th Light Horse Field Ambulance soon after the long-range artillery shelling commenced; the numbers increasing when bombing and machine-gun attacks by the aircraft followed.
At the tent division all wounded were attended, receiving emergency treatment from the medical officers and hospital staff before being loaded on the ambulances again by the stretcher bearers and evacuated by road to the casualty clearing stations in Jerusalem.
[33] While the Egyptian Expeditionary Force had successfully demonstrated its attacking abilities at Gaza, Beersheba, Jaffa and Jerusalem, this victory by the Desert Mounted Corps' Australian Light Horse, British Yeomanry, Indian Lancers and New Zealand Mounted Rifles' brigades demonstrated their strength in defence in the face of determined German and Ottoman attacks.
[50] This had been the only occasion during the Sinai and Palestine campaign when German infantry attacked as storm-troopers and Chauvel commented on their crushing defeat, that it might improve the image of Australian troopers "in the minds of their detractors, who are many.
[46] German prisoners captured at Abu Tellul claimed they had been betrayed by their Ottoman allies who should have more strongly supported their flanks.
Von Sanders, their commander in chief, knew that these same regiments had fought well, just a few months before, during the two Transjordan attacks in March and April.
"[21][44][Note 3] An Ottoman artillery attack began at 01:00 on Tuesday 16 July and the 1st Light Horse Brigade, still in position on Abu Tellul and Mussallabeh, was heavily shelled.