Battle of Beersheba (1917)
Meanwhile, Lieutenant General Philip Chetwode, commanding the EEF's Eastern Force, began the stalemate in Southern Palestine, defending essentially the same entrenched lines held at the end of the second battle.
The stalemate continued through the summer in difficult conditions on the northern edge of the Negev Desert, while EEF reinforcements began to strengthen the divisions, which had suffered more than 10,000 casualties during the two battles for Gaza.
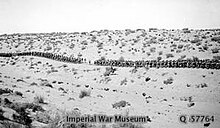
These swordless mounted infantrymen galloped over the plain, riding towards the town and a redoubt, supported by entrenchments on a mound at Tel es Saba, south-east of Beersheba.
Most of the 12th Light Horse Regiment on the left rode on, across the face of the main redoubt to find a gap in the Ottoman defenses, crossing the railway line into Beersheba to complete the first step of an offensive.
[12] The Ottoman defences in the centre of the line, at Atawineh and Hairpin redoubts at Hareira and Teiaha, supported each other as they overlooked the plain, making a frontal attack virtually impossible.
[22] The EEF had already decided to invade Ottoman territory before the first battle of Gaza, on the basis of Britain's three major war objectives: to maintain maritime supremacy in the Mediterranean; preserve the balance of power in Europe; and protect Egypt, India and the Persian Gulf.
Despite the EEF's defeats during the first two battles of Gaza, with about 10,000 casualties,[23] Allenby planned an advance into Palestine and the capture of Jerusalem to secure the region and cut off the Ottoman forces in Mesopotamia from those in the Levant and on the Arabian Peninsula.
[32][33] Until June 1917, Sheria was the headquarters of the German commanded Ottoman force defending the Gaza-Beersheba line, but as a consequence of EEF aerial bombing, it was moved to Huj in July.
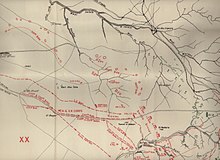
[45] To the west and south-west of the town, the 27th Division's 67th and 81st infantry regiments were deployed in a fortified semicircular line of deep trenches and redoubts strengthened by barbed wire.
[67][68] Beginning immediately after dawn, the two infantry divisions would attack the outer defences on the high ground west and south-west of Beersheba in two stages, preceded by a bombardment.
This group, under orders from the 74th (Yeomanry) Division, held the section of the Beersheba defence stretching north from the Wadi es Saba, towards the Beersheba-to-Tel el Fara road.
11 Light Armoured Motor Battery (LAMB) was sent ahead of the Anzac Mounted Division to a position on the north slopes of the Gebel el Shereif to guard their flank as they moved forward.
After watering only their transport animals, they began their approach march from Asluj at 24:00 (following the Anzac Mounted Division on their 32 to 34 miles (51 to 55 km) ride) arriving at 04:50 on 31 October at the Thaffha crossroads.
[104][106] With the EEF guns moved forward into captured Ottoman positions, shelling recommenced at 10:30, continuing with pauses to let the dust settle until noon, when there was still some concern that the wire in front of the 74th (Yeomanry) Division had not been cut.
[45] The Anzac and the Australian mounted divisions rode between 25 and 35 miles (40 and 56 km) from Asluj and Khalasa respectively, circling south of Beersheba during the night of 30–31 October to get into position to attack from the east.
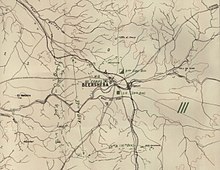
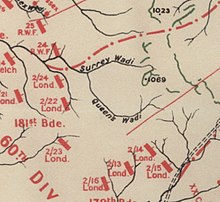
[129] The first objective of the Anzac Mounted Division was to cut the road from Beersheba to Hebron and Jerusalem, about 6 miles (9.7 km) north-east of the town at Tel el Sakaty, also known as Sqati, to prevent reinforcement and retreat in that direction.
The second objective, the redoubt on the height of Tel el Saba (which dominated the east side of Beersheba north and south) had to be captured, before an attack across the open ground could be launched.
[79][132][133][Note 14] While the infantry battle was being fought on the west side of Beersheba, Edward Chaytor (commanding the Anzac Mounted Division) ordered the 2nd Light Horse Brigade to attack Tel el Sakaty at 08:00 and gain control of the Jerusalem road.
As they crossed the Wadi Khalil and the road to Jerusalem, the 5th Light Horse Regiment was also heavily shelled by artillery and fired on by machine guns from the high ground north and northwest overlooking the area.
While they continued to hold the road to Jerusalem, the 5th and 7th light horse regiments found cover in the Wadi Aiyan, although targeted from the high ground north of Sakaty by five Ottoman machine guns, where they remained until evening.
[74][92][141][Note 15] At about 08:55, some 200 Ottoman cavalry with transport and guns were seen moving north from Beersheba along the road to Jerusalem; shortly afterwards, an aircraft reported seeing a large camp at Tel el Saba.
The Canterbury Mounted Rifles Regiment was, by now across the Wadi Khalil and firing on the rear of the Tel el Saba position, but they were held up by Ottoman defenders on the slopes of the hills overlooking the Beersheba-to-Jerusalem road.
Staff Sergeant Stewart came running and together we got a tourniquet on his thigh in about 90 seconds ... Others were attending Oates, high right arm blown off, and Hay with his left buttock cut clean away.
But we placed him on a stretcher, a pathetic, incoherent, weeping wreck, unable to walk.During the final attack and capture of Tel el Saba, the 1st Light Horse Brigade reported at 14:20 a squadron of Ottoman cavalry leaving Beersheba and heading north.
[162] German commander of the Eighth Army Kress von Kressenstein explained: The understrength Turkish battalion entrusted with its defence doggedly held out with great courage and in so doing fulfilled its obligation.
[168] As the leading squadrons, preceded by scouts 70 to 80 yards (64 to 73 m) in front, came within range of Ottoman riflemen manning the defences "directly in their track" a number of horses were hit by sustained rapid fire.
It was noticed also that the morale of the enemy was greatly shaken through our troops galloping over his positions thereby causing his riflemen and machine gunners to lose all control of fire discipline.
Meanwhile, the 12th Light Horse Regiment established all round defensive positions, including picquets guarding the pumping station which were withdrawn at 23:00, when brigade headquarters arrived, and took over garrisoning duties.
[182][204] The 7th Mounted Brigade, with one section of the Light Armoured Motor Battery and one Ford car attached, had ridden out of Esani at 20:00 on 30 October across country (via Itweil el Semin) to Ras Ghannam on the Asluj-to-Beersheba road.
In deciding on the extent to which you will be able to carry out safely the policy, you will be guided by the fact that an increase in the forces now at your disposal, is improbable.Henry Gullett's claim that "[f]rom then on to the end of the war the Turks never forgot Beersheba" and that the German and Ottoman infantry, "when galloped, as ... they frequently were, invariably shot wildly and surrendered early in the conflict,"[225] was disproved when solid Ottoman defence met the 11th and 12th light horse regiments' charge during fighting for Sheria on 7 November, and the yeomanry's charge at Huj on 8 November 1917.