Battle of Lone Pine
At Lone Pine, the assaulting force, initially consisting of the Australian 1st Brigade, managed to capture the main trench line from the two Ottoman battalions that were defending the position in the first few hours of the fighting on 6 August.
Nevertheless, despite the Australian victory, the wider August Offensive of which the attack had been a part failed and a situation of stalemate developed around Lone Pine which lasted until the end of the campaign in December 1915 when Allied troops were evacuated from the peninsula.
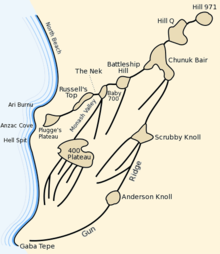
[7] Being towards the southern end of the area around Anzac Cove, the terrain in the Lone Pine region was comparatively gentle and the opposing trenches were separated some distance with a flat no-man's land intervening.
[8] Due to its location relative to the beachhead and the shape of the intervening ground, Lone Pine's importance lay in the fact that its position provided a commanding view of the Australian and New Zealand rear areas.
From the 400 Plateau it was possible to observe as far south as Gaba Tepe and its possession would have afforded the Ottomans the ability to place the approaches to the Second Ridge under fire, preventing the flow of reinforcements and supplies from the beachhead to the forward trenches.
In reality it was actually a reserve area where the Ottomans had established a regimental headquarters and sited a series of bivouacs in terraces and at the time of the attack there were large numbers of reinforcements camped there.
Further fighting around Lone Pine continued throughout the early stages of the campaign, but eventually a stalemate developed in which neither side was able to advance and static trench warfare began.
[16] In early July 1915, while making plans for an offensive to break the deadlock that had developed around the Gallipoli Peninsula following the initial landings in April, the commander of the Australian and New Zealand Army Corps, Lieutenant General William Birdwood, had determined that an attack at Lone Pine could be used to divert Ottoman attention away from a main attack that would be launched by a combined force of British, Indian and New Zealand troops further north around Sari Bair, Chunuk Bair and Hill 971.
[17][Note 4] The Australian 1st Infantry Brigade was chosen to undertake the attack on Lone Pine, and consisted of about 3,000 men,[2] under the command of a British officer, Colonel Nevill Smyth.
[24] The preparation stage of the attack began at 2:00 p.m. on 6 August, when the Australians detonated the three mines they had dug in front of the Ottoman lines, in an attempt to create cover for the advancing troops.
[26] Retreating into tunnels which had been cut as part of mining operations, the majority of the forward Ottoman troops were able to find shelter from the bombardment that lasted for an hour.
The third wave had received the same amount of ammunition, but was also issued entrenching equipment that would be used to construct positions to defend the initial gains against the inevitable Ottoman counterattack.
[28] In support, each battalion had four Vickers medium machine-guns, which had been issued with 3,500 rounds, and contributed a platoon whose job would be to throw the 1,200 grenades that the brigade had been allocated for the attack.
[23] From his headquarters overlooking the fighting, the senior Ottoman commander Esad Pasa, began to co-ordinate the response, passing orders for reinforcements to be brought up and calling down artillery.
[21] Casualties among the first wave of attackers were "relatively light" as the defenders in the front line of Ottoman trenches were still sheltering from the preliminary bombardment and had not had time to return to their fire steps after it had been lifted.
[30] When the Australians reached the Ottoman trenches they found them roofed with pine logs with no easy entrance,[8] which had not been identified by aerial reconnaissance during the planning stages.
[13] As the Ottoman defenders recovered from the artillery barrage, they began firing at the Australians through specially cut holes at point blank range.
Due to concerns of shooting their comrades, the Australians were unable to fire their rifles initially,[33] and the fighting devolved into a melee as the soldiers attacked each other with bayonets and grenades.
[42] Throughout the night of 6/7 August, the Ottomans brought up reinforcements from the 5th Division's 13th Regiment under Ali Riza Bey, which marched from Kojadere, south-east of the position known to the Australians as "Scrubby Knoll".
[37][43] The 9th Division, under German Colonel Hans Kannengiesser,[44] also received orders to begin moving towards Lone Pine from its position between Helles and Anzac from Esad Pasa.
To keep up the supply, Australians put about 50 soldiers to work at Anzac Cove manufacturing makeshift grenades out of empty jam tins: over 1,000 were sent up to the 1st Infantry Brigade late on 7 August.
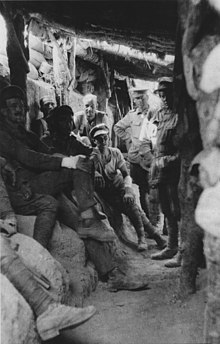
[3][54] Private Victor Laidlaw of the Australian 2nd Field Ambulance wrote on 16 August: 16.8.15 ...looking through the periscope one can see quite well, also plenty of dead bodies can be seen, in fact in the Lonesome Pine Trench which we captured the Turks were lying there 5 feet deep and our fellows had to fight standing on the top of them.
[32] Though a tactical victory for the Australians in terms of the fact that they remained in possession of the ground captured,[3] and had managed to draw off some Ottoman reinforcements,[53] nevertheless the wider repercussions of the attack at Lone Pine weighed heavily on the outcome at Chunuk Bair.
Sent north to reinforce Lone Pine, due to the effectiveness of the Australian attack, Kannengiesser's 9th Division was directed instead to proceed on to Chunuk Bair where, at the time, there was only one Ottoman artillery battery and a covering force of 20 infantrymen.
[61] The stalemate continued as both the Australians and Ottomans lacked the strength to mount a determined attack and this situation ultimately lasted until the Allied evacuation in December 1915.
[57] Seven Australians were awarded the Victoria Cross for their actions during the fighting at Lone Pine,[3] including four men from the 7th Battalion, which had been rushed forward to help relieve the 1st Brigade at the height of the Ottoman counterattacks.
[67] The other VC recipients were Privates Leonard Keysor[68] and John Hamilton,[69] Corporal Alexander Burton and Lieutenants Frederick Tubb and William Symons.
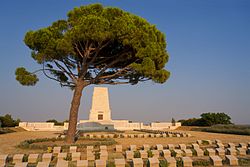
On Bean's advice the Australian government sought permission from the newly formed Turkish Republic to establish an official war cemetery in the area.