Battle of the Nek
The name derives from the Afrikaans word for a "mountain pass" but the terrain itself was a perfect bottleneck and easy to defend, as had been proven during an Ottoman attack in June.
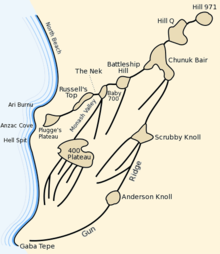
It connected Australian and New Zealand trenches on the ridge known as "Russell's Top" to the knoll called "Baby 700" on which the Ottoman defenders were entrenched.
Early on 7 August 1915, two regiments of the Australian 3rd Light Horse Brigade, one of the formations under the command of Major General Alexander Godley for the offensive, mounted a futile bayonet attack on the Ottoman trenches on Baby 700.
[7][8] The name given to the feature by Australian troops – the Nek – derives from the Afrikaans word for "mountain pass" and according to Glenn Wahlert was "likely coined by veterans of the South African war".
[10] The difficult nature of the terrain had been highlighted earlier in the campaign, initially when a battalion of the Turkish 57th Regiment had suffered heavy casualties during a failed counter-attack in April.
At least five groups of machine guns – approximately 30 altogether – were located in the area, providing direct fire support to the Ottoman troops holding the Nek.
[33][34] The 27th Regiment, under Lieutenant Colonel Sefik Bey, also held part of the line south from the Nek to Quinn's Post (Bomba Sirt).
[37] This was, according to Roland Perry, designed to "influence the troopers to keep running at the [Ottoman] trenches" and ultimately meant they could not stop and fire.
[38] Preparations for the attack began several days earlier when the troopers were ordered to stow unnecessary clothing, including woollen tunics, and equipment.
[37][45] The initial concept of operations for the August offensive required a simultaneous attack from the rear of Baby 700, thereby creating a hammer and anvil effect on the Ottoman trenches caught in between this pincer movement.
[42] The New Zealanders had made some progress, though, having captured the lower part of Rhododendron Spur and it was hoped that Chunuk Bair could still be carried; as a result, Birdwood and Skeen decided it was important for the attack on the Nek to proceed as a feint – rather than a pincer – to assist the New Zealanders at Chunuk Bair,[47][28] while the Australians and Indians from other formations also attacked Hill 971.
[49] A further part of the plan required an attack from Steele's Post through several tunnels against German Officers' Trench by the Lieutenant Colonel Gordon Bennett's 6th Battalion (2nd Infantry Brigade of the Australian 1st Division).
This would see the Australian light horsemen become the right flank of the assault on Chunuk Bair, linking in with the New Zealand Infantry Brigade on Rhododendron Spur.
[42] Following the decision to proceed, at 04:00 field artillery and howitzers began firing from the beachhead around Anzac Cove onto the Ottoman trenches around the Nek.
[15] According to Bean, owing to a failure to co-ordinate timings, the field artillery preparation of the forward positions ceased at 04:23, although the naval guns continued to engage some of the depth targets.
[15] At the appointed time, the first wave of 150 men from the 8th Light Horse Regiment, led by their commander, Lieutenant Colonel Alexander Henry White, "hopped the bags" and went over the top.
[57] The second wave of 150 followed the first without question two minutes later and met the same fate, almost all the men being cut down by heavy rifle and machine gun fire before they got halfway to the Ottoman trench.
[63] Meanwhile, the troops assigned to the fourth wave assembled on the fire-step of the forward Australian trench; amidst much confusion the right hand side of the line charged before Hughes' order could reach them.
[67] In the aftermath, the ridge between Russell's Top and the Turkish trenches was covered with dead and wounded Australian soldiers, most of whom remained where they fell for the duration of the war.
[77] In analysing the battle, Carlyon writes that the attack failed due to poor planning and appreciation of the ground by Birdwood, Godley and Skeen.
[79] Perry writes that Godley "on the beach and out of touch, was most culpable",[80] although Carlyon highlights command deficiencies within the Australian brigade as being a key factor, focusing on the role of Hughes and Antill in the decision to continue the attack.
[61] Bean, while noting higher-level conceptual errors by Birdwood and Skeen, also concludes that the local commanders were "chiefly responsible" for the large-scale loss of life at the Nek.
He also contrasts Hughes and Antill's unquestioning approach with that of Brigadier General Harold Walker, who was ordered to attack Lone Pine despite his own protests but who critically analysed the problem to give his soldiers the best chance of success.
[75] Coulthard-Clark concludes that "at most, the bold display by the light horsemen at the Nek may have impeded for a few hours – but did not prevent – the transfer of Turkish reinforcements towards Chunuk Bair, where the New Zealanders were also engaged in a desperate struggle".
When Australian Commonwealth burial parties returned to the peninsula in 1919 after the war's end, the bones of the dead light horsemen were still lying thickly on the small piece of ground.
The Nek Cemetery now covers most of no-man's land of the tiny battlefield and contains the remains of 316 Australian soldiers, most of whom fell during the 7 August attack; only five could be identified.
[63] On 25 November 1915, shortly before the decision to completely withdraw from the peninsula, Godley was temporarily promoted to lieutenant general and appointed corps commander.
[89] Post war, the belief that the main reason for the failure of the assault was due to a delay between the artillery bombardment and the attack being launched has been challenged.
A January 1916 report by the British commander during the Gallipoli campaign, General Ian Hamilton, provided limited details and was, according to Carlyon, very optimistic in its assessment.
[91] The battle is depicted in the climax of Peter Weir's movie, Gallipoli (1981),[92] although it inaccurately portrays the offensive as a diversion to reduce Ottoman opposition to the landing at Suvla Bay.