First Battle of Gaza
Late in the afternoon, on the verge of capturing Gaza, the Desert Column was withdrawn due to concerns about the approaching darkness and large Ottoman reinforcements.
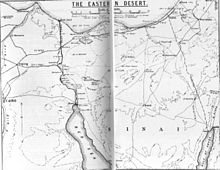
In December 1916, the newly created Desert Column's victory at the Battle of Magdhaba secured the Mediterranean port of El Arish and the supply route, water pipeline and railway stretching eastwards across the Sinai Peninsula.
As the Allied operations in the Middle East were secondary to the Western Front campaign, reinforcements requested by General Sir Archibald Murray, commander of the Egyptian Expeditionary Force (EEF), were denied.
[4] Britain's three major war objectives now were to maintain maritime supremacy in the Mediterranean Sea, while preserving the balance of power in Europe and the security of Egypt, India, and the Persian Gulf.
[6] There were now two possible directions for an advance towards Jerusalem by Eastern Force to take: through Rafa on the coast, or inland through Hafir El Auja, on the Ottoman railway.
[18] That day, the New Zealand Mounted Rifles and the 2nd Light Horse Brigades commanded by Edward Chaytor made a reconnaissance in force to Khan Yunis 5 miles (8.0 km) past Rafa.
[6][19] As a consequence of the reconnaissance to Khan Yunis, and the growing strength of EEF units in the area, the Ottoman Army garrisons realised the line was nevertheless too weak to be successfully defended.
[8][25] Around Khan Yunis gardens, orange orchards, fig plantations and grazing were carried on by the local population, while in the Rafa and Sheikh Zowaiid areas barley and wheat were grown.
"A series of bombing raids on the railway from Junction Station to Tel el Sheria aimed to disrupt the Ottoman lines of communication during the build-up to the battle.
Then on 5 March six aircraft of the Royal Flying Corps (RFC) conducted bombing attacks intended to interfere with the Ottoman withdrawal from the Khan Yunis line.
[33][34][35] Between Rafa and Gaza, to the east of the coastal sand dunes, a gently rolling plateau of light, firm soil rose slowly inland, crossed by several dry wadis, which became torrential flows in the rainy season.
[7] The town and the fertile surrounding areas strongly favoured defence; Gaza being located on a plateau 200 feet (61 m) high which is separated from the Mediterranean Sea by about 2 miles (3.2 km) of sand hills to the west.
Although camel trains remained important throughout the war, together with pack mules and donkeys, where roads were bad and in hilly trackless terrain, where the horse-drawn and mule-drawn wagons, motor lorries and tractors could not go, they began to be replaced.
"[7] The plan of attack produced by Dobell and his staff, was similar to those successfully implemented at Magdhaba by Chauvel and at Rafa by Chetwode, except that the EEF infantry were to have a prominent role.
Money's Detachment was to cross the wadi mouth and hold a position in the sand dunes between the Rafa-Gaza road and the sea to divert the Ottoman defenders' attention, and cover a section of the 15th Heavy Battery.
[82] While the Ottoman army positions at Gaza had been reconnoitred and photographed from the air, it was still necessary for the staff of the Anzac and Imperial Mounted Divisions, along with the Commander of the Royal Artillery (CRA), to carry out personal reconnaissances of the Wadi Ghuzzeh.
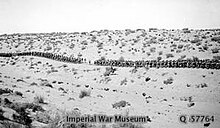
[83] At 15:30 the Imperial Mounted Division, led by the 3rd Light Horse Brigade, marched out of camp at Marakeb, heading for Deir el Belah about six hours or 18 miles (29 km) away.
However, the fog made it impossible for Dallas to reconnoitre the proposed battleground, and he waited at El Breij for it to lift while his two leading brigades moved slowly forward.
[93] While the fog made navigation difficult, it also shielded the movement of large bodies of troopers, so the two mounted divisions with the Imperial Camel Brigade attached, rapidly cut the roads leading to Gaza from the north and east, isolating the Ottoman garrison, in a 15 miles (24 km) long cavalry screen.
[93] Gaza was now completely surrounded and, following Desert Column's orders, the 53rd (Welsh) Division, which had not seen action since the Gallipoli campaign, made a direct attack from the south and east towards Ali Muntar.
The Canterbury Mounted Rifles Regiment had pushed along 'The Ridge' from the rear to assist in the attack, one squadron swinging south against Ali Muntar to enter the defenders' trenches just after the infantry.
The New Zealand Mounted Rifles Brigade's dismounted fighters advanced from Jebaliye against the east and northeast of Gaza to assist in the capture of Ali Muntar, before pushing on through a very enclosed region.
"[81][Note 13] This decision to withdraw was puzzling to many of those fighting in and near the town, as the infantry held Ali Muntar and 462 German and Ottoman army prisoners, including a general who was a divisional commander.
Hodgson CB CVO, in holding off greatly superior forces of the enemy during the afternoon of the 26th and the night of 26/27th thus enabling the A & NZ Mtd Div to assist in the Infantry attack on Gaza and subsequently to withdraw after dark.
At 17:38 Dobell commanding Eastern Force, ordered the 54th (East Anglian) Division to move 2 miles (3.2 km) to the west to Burjabye Ridge, and informed Desert Column.
"[144] As late as 21:12, the 53rd (Welsh) Division still held Ali Muntar, at which time they advised Desert Column they would have to evacuate towards Sheikh Abbas, to conform with a withdrawal occurring on their right.
[147][148] After dawn on 27 March the first Ottoman counterattacks recaptured Ali Muntar and a portion of Green Hill, but the 1/7th Battalion of the Essex Regiment, (161st Brigade, 54th Division), retook the positions before consolidating and re-establishing their posts.
[149] The hostile artillery batteries at Sheikh Abbas targeted all the tracks across the Wadi Ghuzzeh, employed by the Egyptian Camel Transport Corps, who were at the time attempting to supply food, water and ammunition, to the forward units.
[132][142] Ali Muntar, which had been held by two battalions of the Essex Regiment (54th Division), was strongly attacked, and at 09:30 the British infantry were forced to withdraw, having suffered severe losses.
[151] After first advising Murray, at 16:30 Dobell issued orders for the withdrawal to the left bank of the Wadi Ghuzzeh of the 53rd (Welsh) and the 54th (East Anglian) Divisions under the command of Dallas.