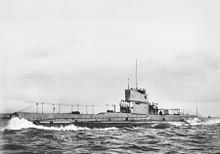
HMAS AE2
After the start of World War I, AE2 was sent to German New Guinea with the Australian Naval and Military Expeditionary Force, then spent time patrolling around Fiji.
With orders to "run amok" inside Turkish territory, AE2 operated for five days before mechanical faults forced her to the surface, where she was damaged by the torpedo boat Sultanhisar.
[4] The 13,000-nautical-mile (24,000 km; 15,000 mi) journey was, at the time, "the longest submarine transit in history", and 60 of the 83 days of the voyage were spent at sea.
[3][4] On the outbreak of World War I in September 1914, the two submarines were assigned to the Australian Naval and Military Expeditionary Force as it captured German New Guinea.
[5] After the German surrender, AE2 spent three weeks patrolling around Fiji with the battlecruiser Australia, then returned to Sydney on 16 November for maintenance and repairs.
[7] AE2 arrived in Port Said, Egypt, on 28 January 1915, and was ordered to join the British 2nd Submarine Flotilla, and proceeded to take part in patrols in support of the Dardanelles Campaign.
[6][8] On 10 March, the submarine ran aground off Mudros when returning from a patrol, as the harbour lights used to aid navigation had been switched off in AE2's absence, which Stoker was not prepared for.
[6] Attempts to open the Dardanelles through naval power were unsuccessful: three Allied battleships were sunk, and another three crippled, during a surface attack; although the British submarine HMS B11 was able to enter the strait and sink the modernised ironclad Mesudiye, two failed attempts to traverse the waterway and enter the Sea of Marmara resulted in the loss of HMS E15 and the French submarine Saphir to mines and strong currents.
[6][11] Despite the failures of E15 and Saphir, Stoker planned his own attempt, which was approved by the Allied fleet's commander, Vice Admiral John de Robeck.
[12] The submarine was spotted by shore artillery and fired on from about 04:30; Stoker ordered the boat to dive to avoid the shells and to traverse the first minefield.
[13][12] By 06:00, AE2 reached Chanak, and proceeded to torpedo a Turkish gunboat believed to be a Peyk-i Şevket-class cruiser while simultaneously taking evasive actions to avoid an enemy destroyer.
[12] Some sources identify AE2 as one of the factors leading to Birdwood's decision to commit to the attack, although the Australian War Memorial claims there "is no real evidence" to support this.
[4][17] When AE2 reached the rendezvous point on 30 April, smoke from the torpedo boat Sultanhisar was sighted, so the submarine dived and moved to investigate.
[4] After a further thorough side-scan sonar and magnetometric survey of the reported scuttling site of the AE2, Kolay located the submarine in June 1998, lying in 72 metres (236 ft) of water.
[21][24] Moving the submarine to a viewing tank, or alternately relocating the wreck to shallower water, were advised against because of the AU$80–100 million cost of such projects.
[21] Moving AE2 would also pose high risk to both the submarine and any vessels involved in the relocation; as well as potentially damaging the wreck, there is still an unexploded torpedo aboard.
[21] Instead, the workshop advised that the submarine be preserved through the use of sacrificial anodes to reduce corrosion, along with buoys and a surveillance system to mark the wreck and detect unauthorised access and potential damage.
[27] In 2009, Edith Cowan University was commissioned by the National Archives of Australia to research and produce a computer game/simulation called AE2 Commander, funded under the $15,000 Ian Maclean Award.